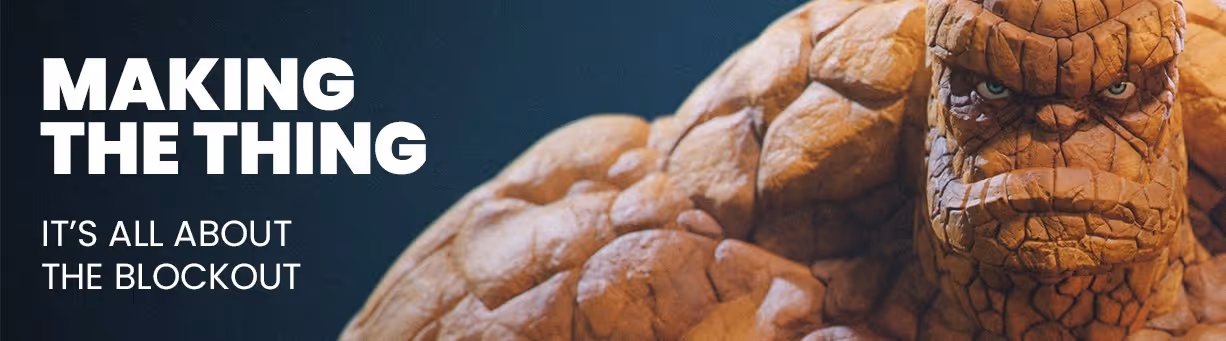
1. Primitive Blockout – Setting Up the Main Volumes
Before worrying about details, I always start with basic geometric shapes to establish the form. This keeps things simple and makes it easy to tweak proportions early on.
![001.png [optipng output image]](https://cdn.prod.website-files.com/66724d67c7a3aed4762456d2/684b9fdd3c3877a9a297057a_ezgif-895c1948171dcc.avif)
How to do it:
- Use spheres, cylinders, and cubes (Dynamesh or IMM brushes work great for this).
- Keep each shape separate… this helps maintain control over individual parts.
- Focus on big, readable forms first. No details yet!
- Check the silhouette from multiple angles to ensure it's strong.
At this stage, think of your sculpt like a toy prototype—it should have clear, chunky shapes that represent the character well. If the silhouette reads well, you're off to a great start.
2. Blockout Adjustments – Refining Proportions
Now that we have a rough volume in place, it’s time for some subtle adjustments to refine the primary forms without adding detail yet… mainly working on transitions.
![002.png [optipng output image]](https://cdn.prod.website-files.com/66724d67c7a3aed4762456d2/684b9fdd3c3877a9a2970575_ezgif-22bc06bf9ceb75.avif)
What to focus on:
- Use the Move Brush & Move Topological Brush to adjust the shape while keeping everything low-res. Adjust the basic shapes to make them feel part of a single piece.
- Make sure the proportions feel solid and natural, even if the character is exaggerated.
- Start thinking about the weight distribution… how does this character "sit" in 3D space?
- Keep the resolution low so you can make broad changes easily (avoid over-refining too soon).
At this stage, you’re still blocking in forms, so don’t rush into using sculpting brushes. The key is to maintain flexibility while refining the shape.
3. Sculpting Pass – Cleaning Up and Defining the Forms
Once you’re happy with the proportions, it’s time to merge objects, subdivide and refine surfaces. The goal here is to create a polished base before adding details. If you do the blockout right, getting a clean polish surface would be very easy:
![003.png [optipng output image]](https://cdn.prod.website-files.com/66724d67c7a3aed4762456d2/684b9fdd3c3877a9a2970572_ezgif-27c9deb86515bd.avif)
How to do it:
- Combine the objects (Dynamesh and/or ZRemesher) to create a unified mesh. (you can keep large pieces separate, like Arms, head and torso).
- Start smoothing and sculpting using ClayBrush and Smooth Strong to refine shapes.
- Use Subdivision levels to gradually increase resolution while maintaining control.
- Define key muscle groups and secondary forms…. still no fine details yet!
Think of this step as the clean up… removing anything that is unnecessary and leaving only the forms that are needed to describe the character.
4. Adding Details – Surface Texture and Refinements
Now comes the fun part, turning this clean sculpt into rocky, battle-worn Ben Grimm! To achieve the classic rocky texture, we’ll use a mix of procedural noise and manual sculpting.
![004.png [optipng output image]](https://cdn.prod.website-files.com/66724d67c7a3aed4762456d2/684b9fdd3c3877a9a297057d_ezgif-204f2647ff136f.avif)
Techniques to use:
- Apply Surface Noise with a custom tileable rock pattern to generate the initial texture.
- Manually sculpt rock edges using TrimDynamic, ClayTubes, and DamStandard to break up uniformity.
- Adjust rock sizes to ensure variety… some big chunks, some smaller cracks, etc.
- Make sure the flow of details follows the character’s natural movement (larger rocks on broad surfaces, smaller cracks in tighter areas).
At this stage, the character should look detailed but not overdone… too much noise can kill readability, so keep an eye on the big picture.
5. Polypaint & Pose – Bringing the Character to Life
Finally, it’s time to add color and a dynamic pose to bring it all together.
![005.png [optipng output image]](https://cdn.prod.website-files.com/66724d67c7a3aed4762456d2/684b9fdd3c3877a9a2970581_ezgif-8722569ecae761.avif)
Final touches:
- Use Polypaint to add an orange hue with subtle variations, in my case I kept deeper cracks darker, while raised areas catch more light to enhance the depth of the details.
- Adjust the pose to make the character feel alive slightly hunched forward with fists clenched (although you don see them haha).
- Export and ready to render!
This structured approach ensures you don’t get lost in the details too early—by the time you’re adding surface detail, the primary shapes and silhouette are already working.
✅ Start simple → ✅ Refine forms → ✅ Merge & clean up → ✅ Detail with purpose → ✅ Final polish & pose
Hope this breakdown helps in your sculpting workflow! Let me know if you’d like me to expand on any specific step… I actually saved the various stages as separate files so I can put a tutorial together if you want and also cover a bit of the rendering to turn it into this:
![006.png [optipng output image]](https://cdn.prod.website-files.com/66724d67c7a3aed4762456d2/684b9fde3c3877a9a2970598_ezgif-8ae208dad1fb37.avif)
That’s it for now.


.webp)

.webp)