


The goal here isn’t photorealism. It’s repeatable structure: what works well on iPad, what can get tricky, and how the process fits into a usable creation pipeline.

Step 1: Set up a fast “tool access” palette
Before touching geometry, speed up the workflow by placing frequently used tools into ZBrush for iPad’s pop-up palette. iPad can’t be customized as deeply as the desktop version, but keeping essentials within reach matters because the process is repetitive.
This doesn’t change the art, just the friction. Less hunting for tools means more time sculpting and refining.
Step 2: Block the whole character using primitives (start simple)

Start with a single sphere and use light distortion to establish the character’s overall “demand” shape. Set it up at a lower resolution for Dynamesh while the silhouette and pose are still loose.
Then duplicate the primitive to create major body sections (head, neck, etc.). Early on, avoid committing to details. Let the form suggest the demeanor and proportions.

Step 3: Build legs and arms with duplication + gizmo scaling
Legs can stay consistent by reusing the same base primitive. Duplicate the shape, scale it into a longer/thinner form using the Gizmo, and then duplicate/rotate it into place.
Once one leg is positioned, use mirror and weld to complete the pair.
Arms are even simpler: duplicate the legs, adjust rotation/scale, and place them where the arms should be.
At this stage, the character should read as a pose. Details come later.

Step 4: Add early contrast elements (eyes + eyelids)
Place a sphere for the eye. Apply a black color and use toy plastic for the eye material. The clean reflection helps the eye pop and “breathes life” into the silhouette early.
For the area around the head/eye sockets (and eyelids), use another sphere. A key shortcut here: clipping brushes can slice a simple primitive to reveal an interior shape. Since the source is still sphere-based, duplicating and scaling that piece down makes it easy to reuse for eyelids.

Step 5: Connect the blockout with Move brushes (and AccuCurve for sharper flow)
Once the primitives are positioned, refine the “integration” between separate pieces. Use:
- Move brush
- Move Topological (with continuity-friendly behavior)
For sharper shaping, enable AccuCurve. This helps create a more pointed effect that works especially well with Move tools.
The objective is to make the body parts feel like they belong together, not like random chunks mashed onto a single character.

Step 6: Merge subtools, then Dynamesh for a unified mesh
When the blockout feels right, move every subtool into a folder, then merge that folder into a single subtool. After that, run Dynamesh on the entire mesh.
This step produces a unified character body that can be redynameshed and controlled at chosen resolutions, an important setup for the next refinement stage.

Step 7: Polish the sculpt using a small brush set (clean build-up + GIO + smooth)
To move from rough blockout into a “sketch that’s actually usable,” rely on a limited but consistent brush toolkit.
Common picks from the workflow:
- Clean Build Up brush (a cleaner clay-build-up style stroke)
- GIO brush (an improved Dam Standard-like pinching effect that stays crisp)
- Smooth brush to keep forms tidy while adding volumes
As volumes are added, smoothing repeatedly ensures the sculpt stays controlled rather than messy.

Step 8: Create clean base topology with ZRemesher, then project back
For a more refined result (and better foundation for later details), place a marker in the undo history, then use ZRemesher (as described in the workflow) to establish a clean base topology.
Then:
- Subdivide the clean topology mesh a few times to gain resolution
- Use Project History to project and recover what was sculpted in Dynamesh
This yields a solid base that preserves sculpt intent while giving a cleaner topology structure to work from.

Step 9: Add clothing/accessories using extract-from-masked volumes
To create a jacket/gown-like piece over the body:
- Duplicate the body
- Remove lower subdivision levels
- Mask the region where clothing will exist
- Use Extract to create a new mesh from the masked area
The extracted clothing mesh can then be refined and conformed to the body of the character using the same brushes and topology tools. In short: clothing becomes an editable “overlay” that matches the underlying volume.
To make fabric feel grounded, use Dynamics / drape to simulate how the piece settles over the body. If topology is simple, this drape is usually fast.

Step 10: Build organic parts (hands, complex volumes) with ZSphere → Adaptive Skin
Hands and other organic shapes can be constructed faster by working in a dedicated tool using ZSphere. This approach is particularly powerful for building volumes with hierarchy - antlers, horns, branches, and more.
In practice:
- Create the hand shape using a small set of spheres inside ZSphere
- Adjust before converting to a proper mesh
- Generate Adaptive Skin to create the actual surface
- Append/import that hand mesh back into the main character scene
Finally, place and adjust to ensure the hand connects convincingly to the body, even if it remains a separate subtool.

Step 11: Duplicate/append for feet and other repeats (mirror + weld)
Feet follow the same idea as hands, but the repetition saves time:
- Reuse the previously created ZSphere hand/foot setup
- Append a left foot into the main working file
- Adjust placement so it reads as a foot
- Mirror and weld to get the matching side if needed
The workflow becomes “rinse and repeat” once the core rig logic is established.

Step 12: Create bandages (a fast polygroup + topology simplification trick)
If the goal is quick bandage shapes rather than hyper-realistic fabric, a clever shortcut is used:
- Duplicate the body and focus on one leg
- Use Slice Curve to cut through the model, creating stacked “rings”
- These rings are primarily polygroups (mesh changes are minimal at this point)
- Simplify topology using ZRemesher based on the Polygroups created with the Slice Curve brush.
- Split into individual meshes with thickness (panel loops function)
- Adjust volumes with Move brushes and maintain continuity with Move Topological
Because the bandage rings are separate pieces, overlapping becomes natural - helpful for wrapping behavior.

Step 13: Use specialized brushes where they matter (face fur + beak)
For small, readable details around the face, the workflow swaps tools instead of forcing one brush to do everything.
Examples:
- Use Sculptris Pro (for fun / optional use) with a custom brush to establish initial fur-like areas
- Use Sculptris Pro with a snake hook brush to push prominent clumps/flicks
Then add the bird identity with a beak:
- Start from a cylinder
- Use Gizmo deformers to taper and bend into place
- Remesh/subdivide and sculpt to match the polish of the rest
One of the most important creative behaviors here: evaluate readability. If proportions or elements don’t “read” as intended, remove them and try again - or append a new piece and refine.

Step 14: PolyPaint for color (keep it simple, focus on values)
Color is done using PolyPaint. The workflow stays intentionally straightforward:
- Use the Standard brush
- Remove any alpha
- Disable Z add
- Enable RGB
- Adjust RGB intensity for pressure-based control
The painting procedure is repetitive by design:
- Select the object/subtool to paint
- Choose a base color (palette setup)
- Fill the object
- Use hue/brightness/value variation to create contrast and highlights
The “hard part” isn’t the technique. It’s making color choices that balance harmoniously across the whole character.

Step 15: Build hierarchy with accent colors (beak, chest ring, belt details)
Instead of trying to color everything equally, treat the character like a composition.
Accent elements can be pushed brighter/saturated (even if they share the same base hue family) to establish visual hierarchy. In this example, those accent roles are played by:
- The beak
- Bone/belt details
- The ring on the chest
This approach makes the character easier to read at a glance and ties the stylized parts into one unified palette.

Where ZBrush for iPad fits in a real workflow
This character demonstrates that iPad can handle full-body creation, not just doodles, when the workflow stays structured:
- Block with primitives
- Unify mesh for refinement
- Use clean topology generation (ZRemesher + project)
- Repeat accessory patterns (extract/mask + drape, ZSphere for organic parts)
- Keep color simple and value-driven
More realism is possible later (noise, alphas for micro-detail, more extensive polishing), but the core message remains: patience + iteration + tool consistency enable impressive results entirely within the iPad app.
Final thoughts
If the intention is to create portfolio-ready character concepts without switching tools every five minutes, this pipeline is a strong starting point. It’s less about fancy steps and more about reliable stages - so progress keeps moving forward.
For deeper learning, Pablo Muñoz Gómez recommends starting with an introductory ZBrush for iPad series if ZBrush for iPad is new, and exploring a complete beginner-to-application course if the goal is to learn ZBrush properly for desktop as well.
Cloth and Drapery Brushes Pack
This is a pack of 54 custom brushes that will simplify and speed up the process of setting up folds, sculpt wrinkles and detail various types of fabrics in ZBrush!
Get resource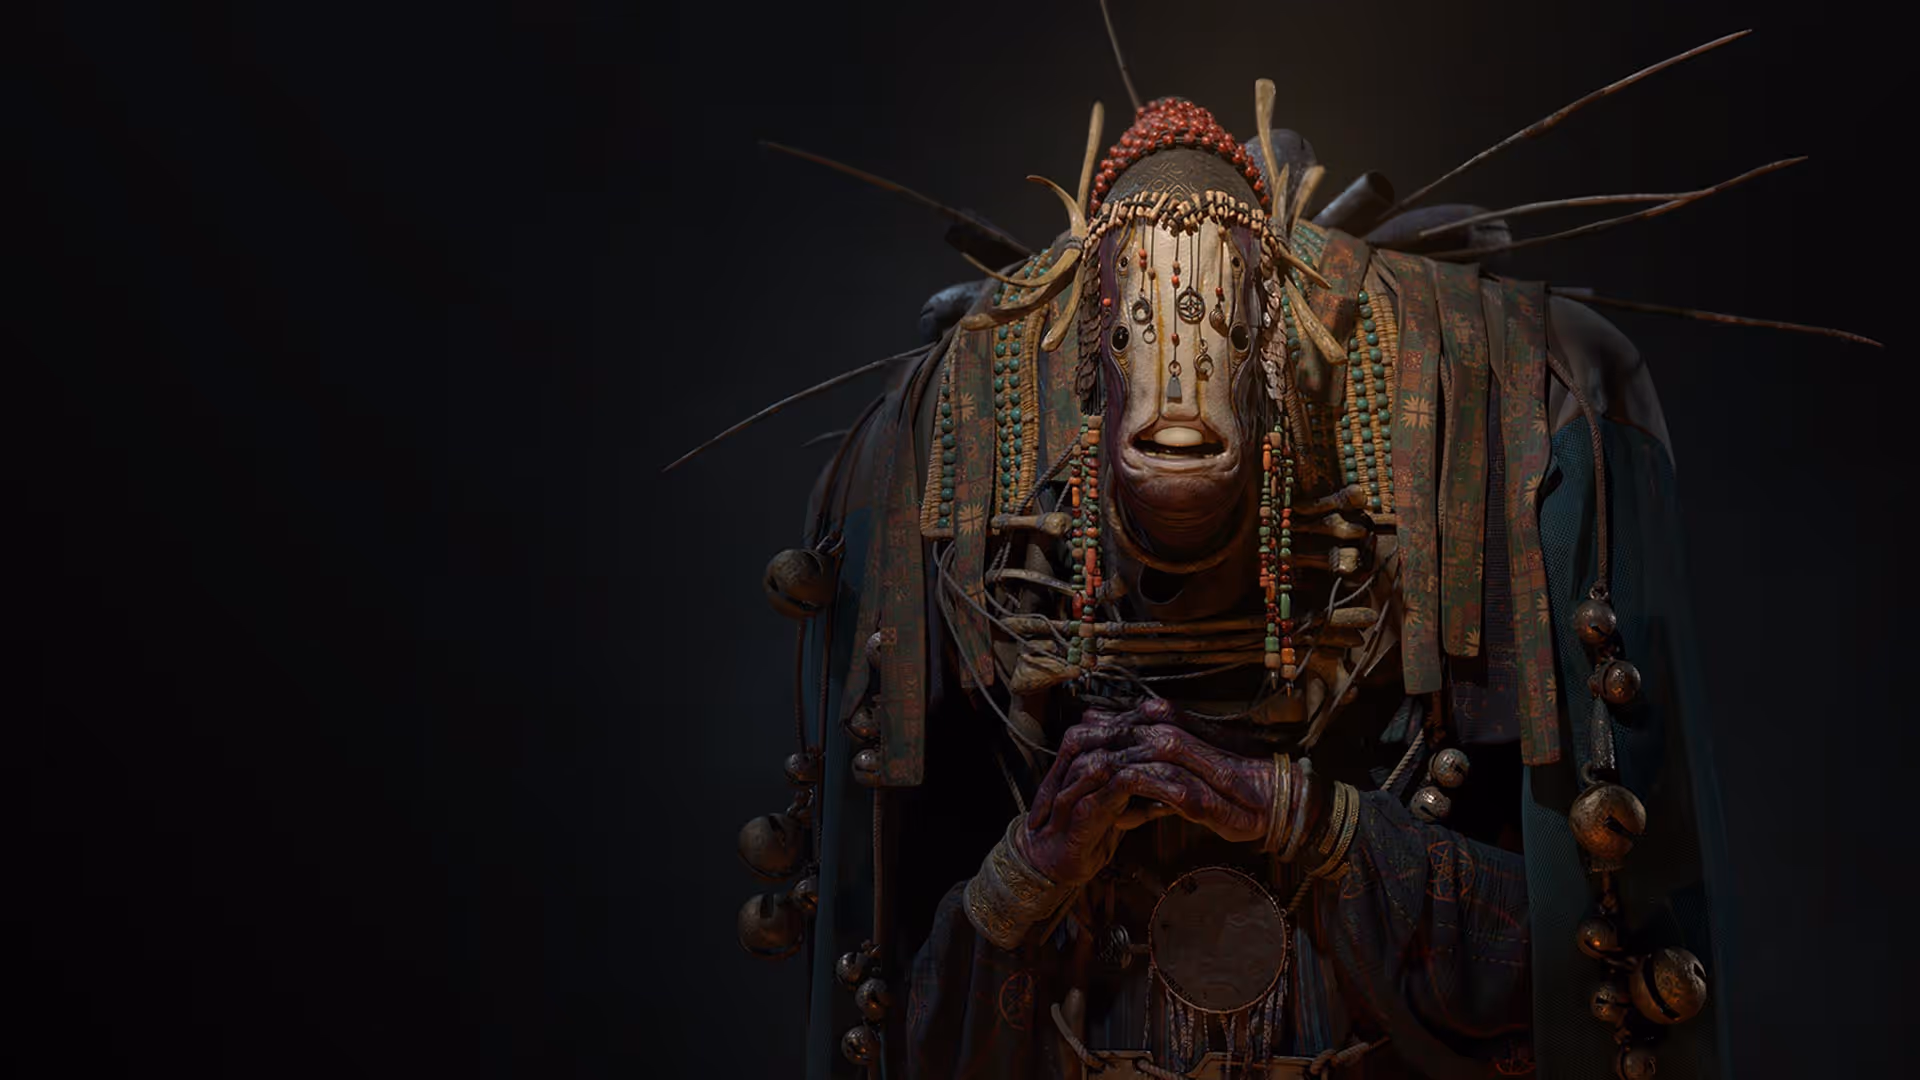
ZBrush for iPad Video Series
Pablo shares his thoughts on ZBrush for iPad Pro after trying it during beta testing. He explores how the portable device handles sculpting on the go... it's a simple, but effective way to see what to expect.
Check it out


.png)
.webp)

