.webp)
So let’s break down the paneling effect because it is really cool and uses a simple setup with Anchor points. Just to be clear, these ‘cuts’ in the image below are what I’m referring to as “panels” in the suit. You can definitely do this in ZBrush, but if you want flexibility, Substance 3D Painter is the best!
.webp)
To achieve this effect, we only need 3 layers. Let’s start with the first one:
Create a new fill layer, add a Black Mask and add a Paint effect to that Mask. Then use the Pen tool to draw a random line… you can delete it or edit it later once the “setup” is complete. This is the great thing about this workflow.

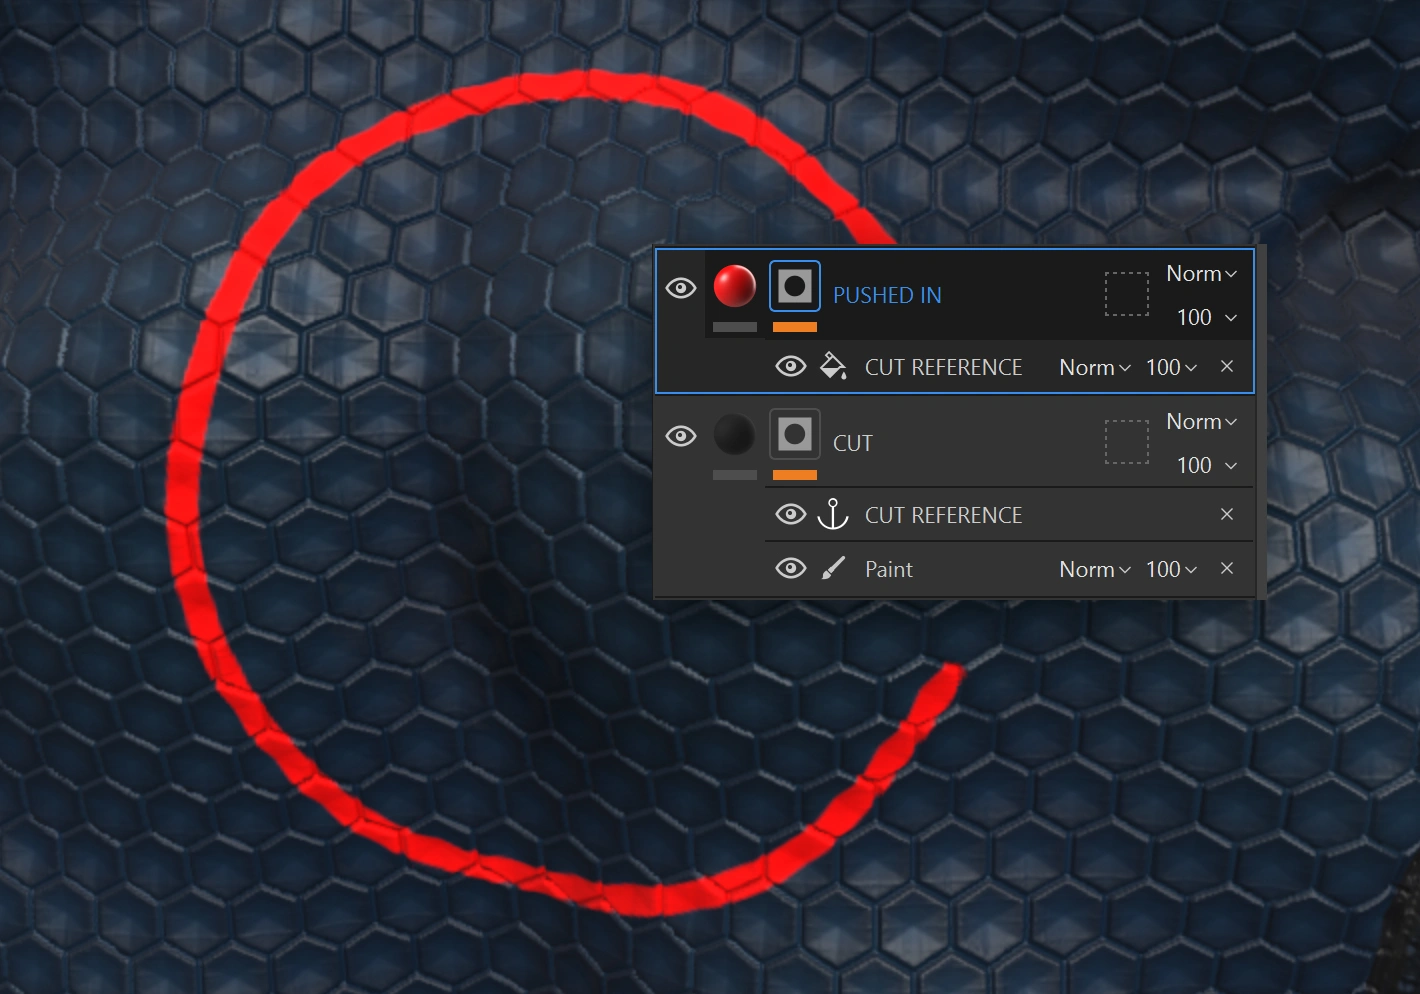
The next step is to create the anchor point… this is ultimately the “trick” of this workflow. From the effects (Magic Wand Icon), create a new anchor point and make sure it is above your paint layer.
This now becomes your reference so anything you do below it can be referenced into a new layer. We also changed the colour of the “cut” to black and made a bit rougher:

Now, for the next layer, create a new fill with a Black Mask. We like to give our fill layers very bright colours while we set them up, then we can change them so this one will be red and we called it “PUSHED IN” since it will be the crevice area.
The next important step is to create a fill effect in the Mask of this layer and reference the anchor point we created in the layer below:
Once you’re finished with the second layer, all you need to do is duplicate it. Update the colour so you can see it better (in my case GREEN) and rename it to “PUSHED OUT” or something relevant:

Now the fun part… toggle off the green layer for now, and focus on the red one.
First, enable the height channel and push it in (negative values). Then form the effects, add a filter and choose Bevel Smooth. This part is super important to create a more believable “cut”.
This effect allows you to play with some settings and basically create a concave or convex profile for your Mask edges. Since the panel line is thin, you can change from a “blocky” profile to a more natural pinched and smooth cut:
.webp)
Now, toggle on the green layer and add a new filter on top of the anchor reference. For the filter, choose the Mask Outline and set the Mask position dropdown to “outside” (this should be the default).
This will create the effect around the line… essentially an outline of your Mask which is the reference of that first anchor point:
.webp)
That is pretty much the setup. You can now swap the layers around so the green effect goes below the red one. Then, the red layers are pushed in more clearly:

Once you are happy with the effects of both layers, toggle off the colours and adjust the height information as well as the roughness channels. You’ll end up with a pretty convincing panel.
This is roughly the same as doing the cut with something like the Dam Standard Brush or the GIO Brush (Available in the Resources)… But with the huge advantage of being able to edit the placement, thickness and intensity of the line at any given point.

Hope you find this trick useful!


.webp)

