

Pick a Mixer-Ready Base
Start in the Actors section, Content tab, then open the Character folder and look for the Mixer Ready collection. These assets are prepared specifically for the new Actor Mixer workflow and will save time later.

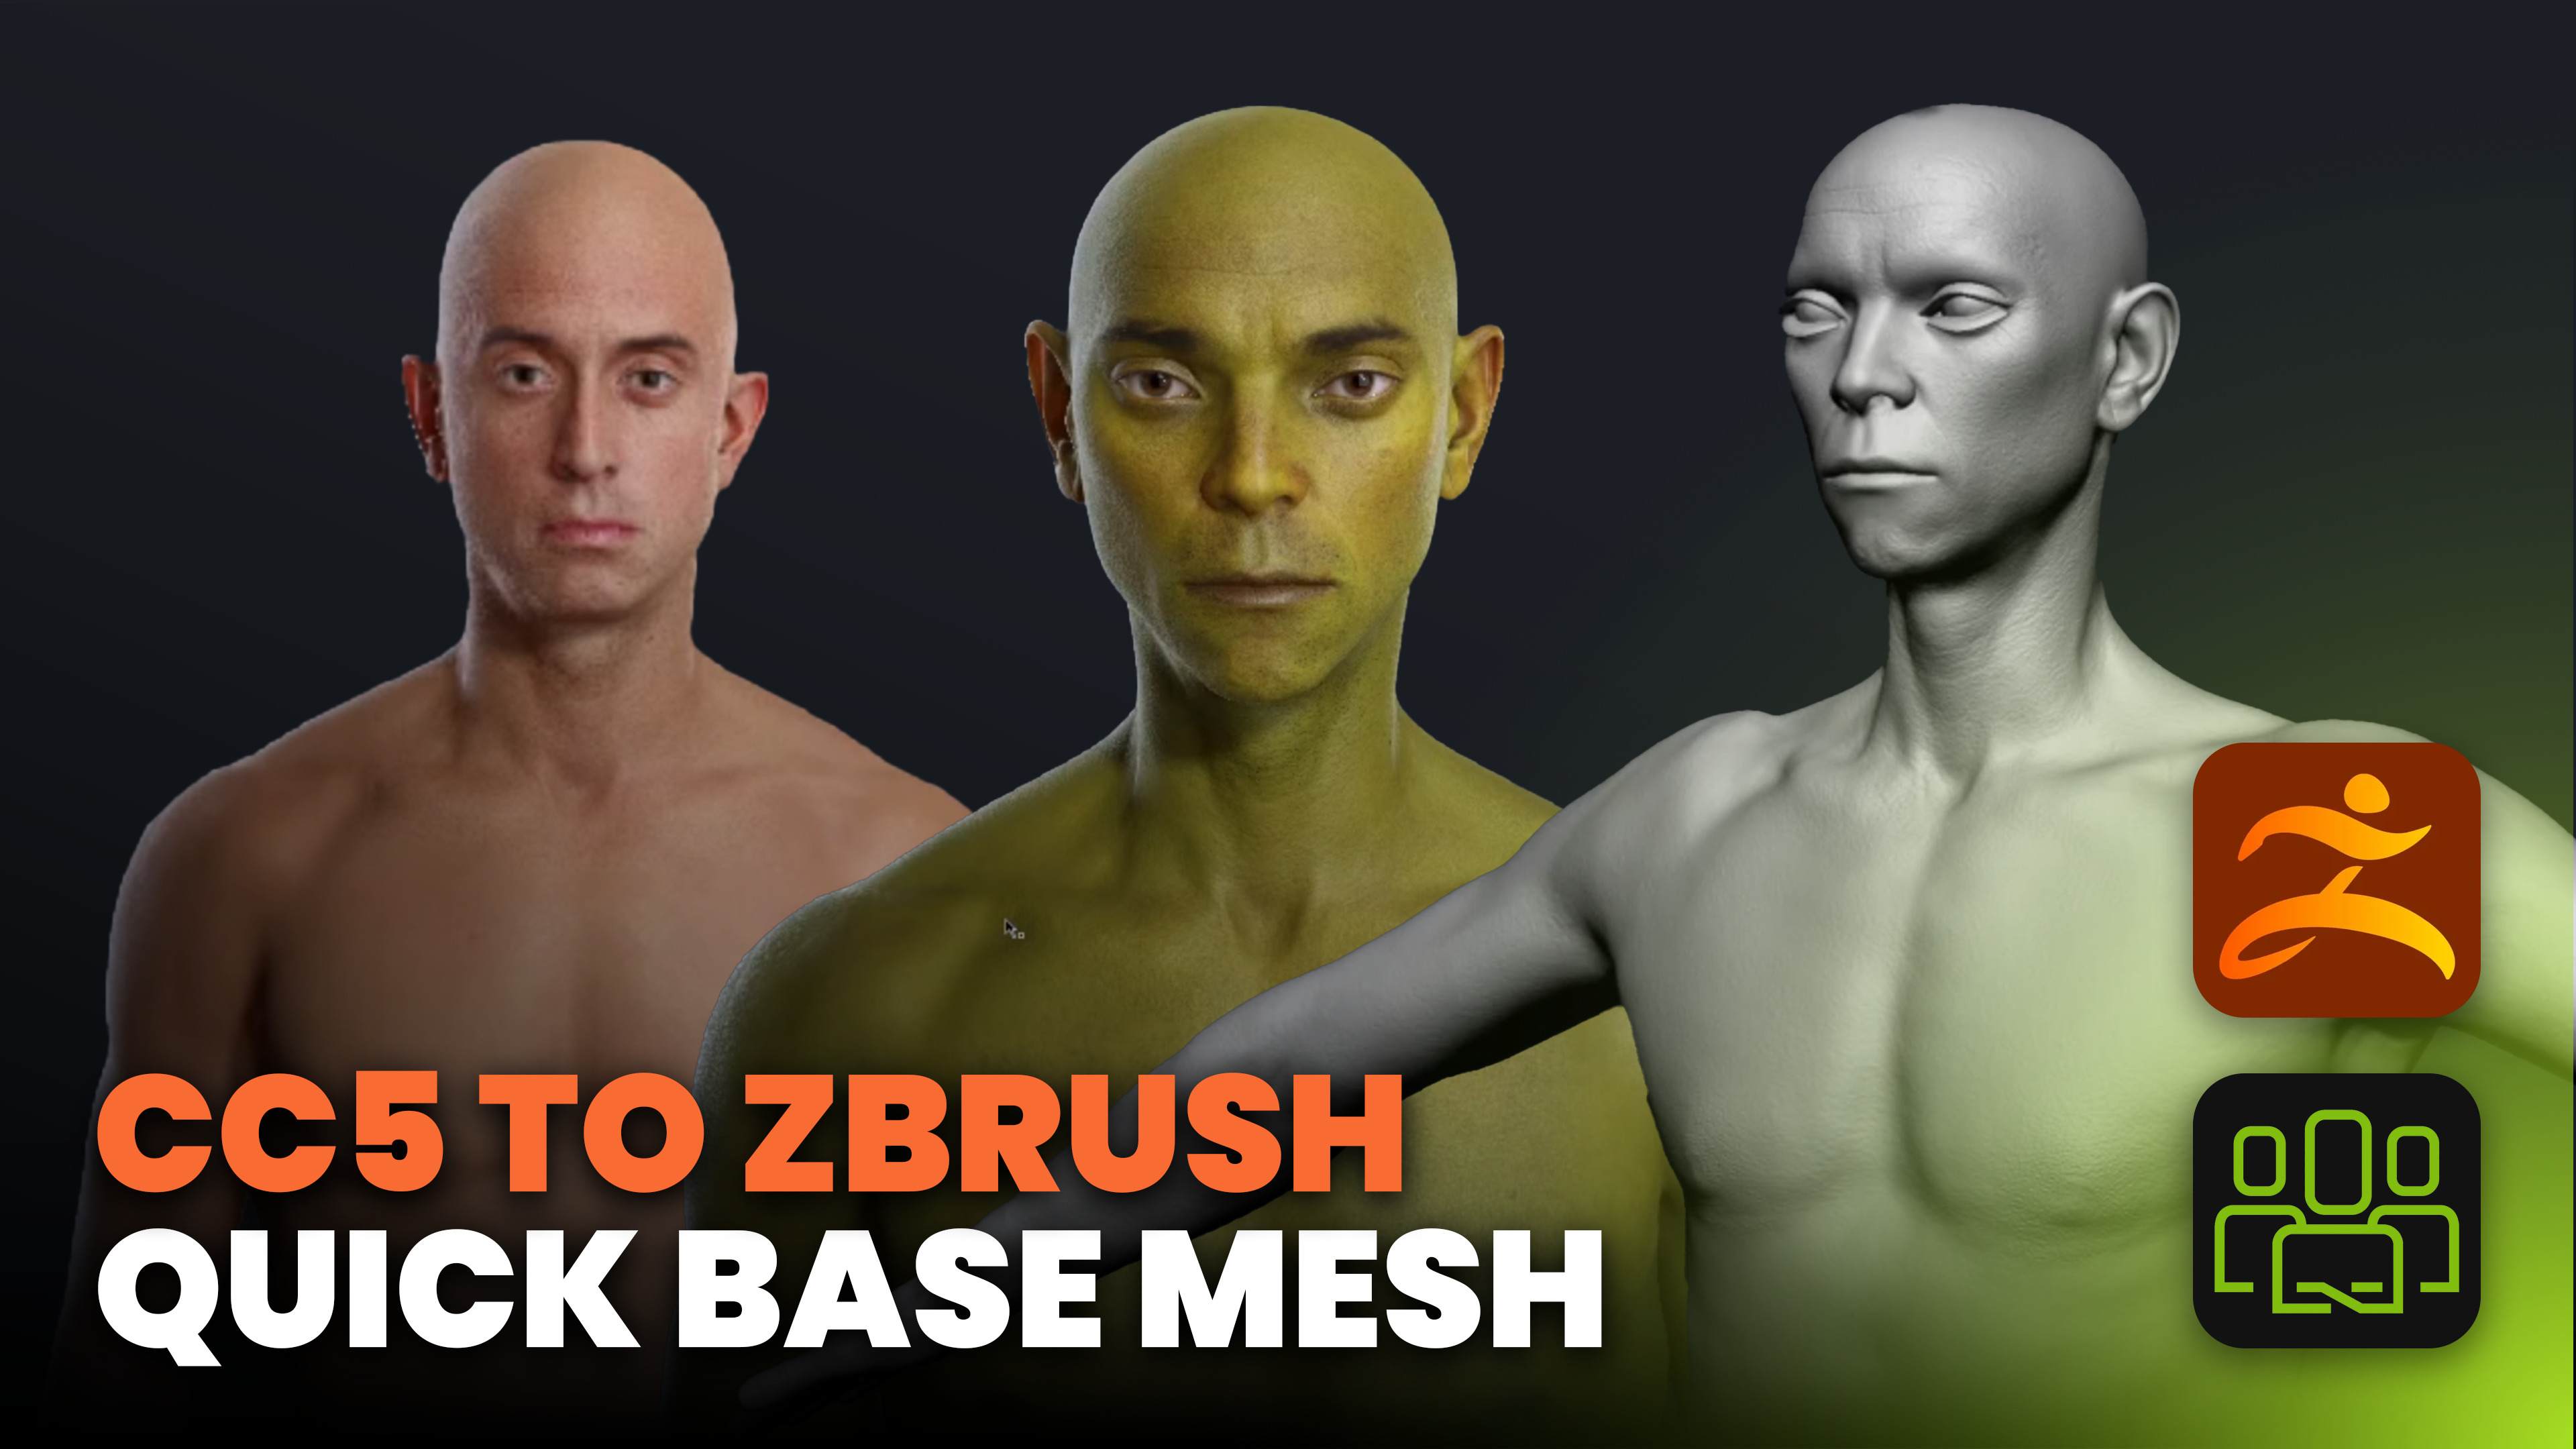
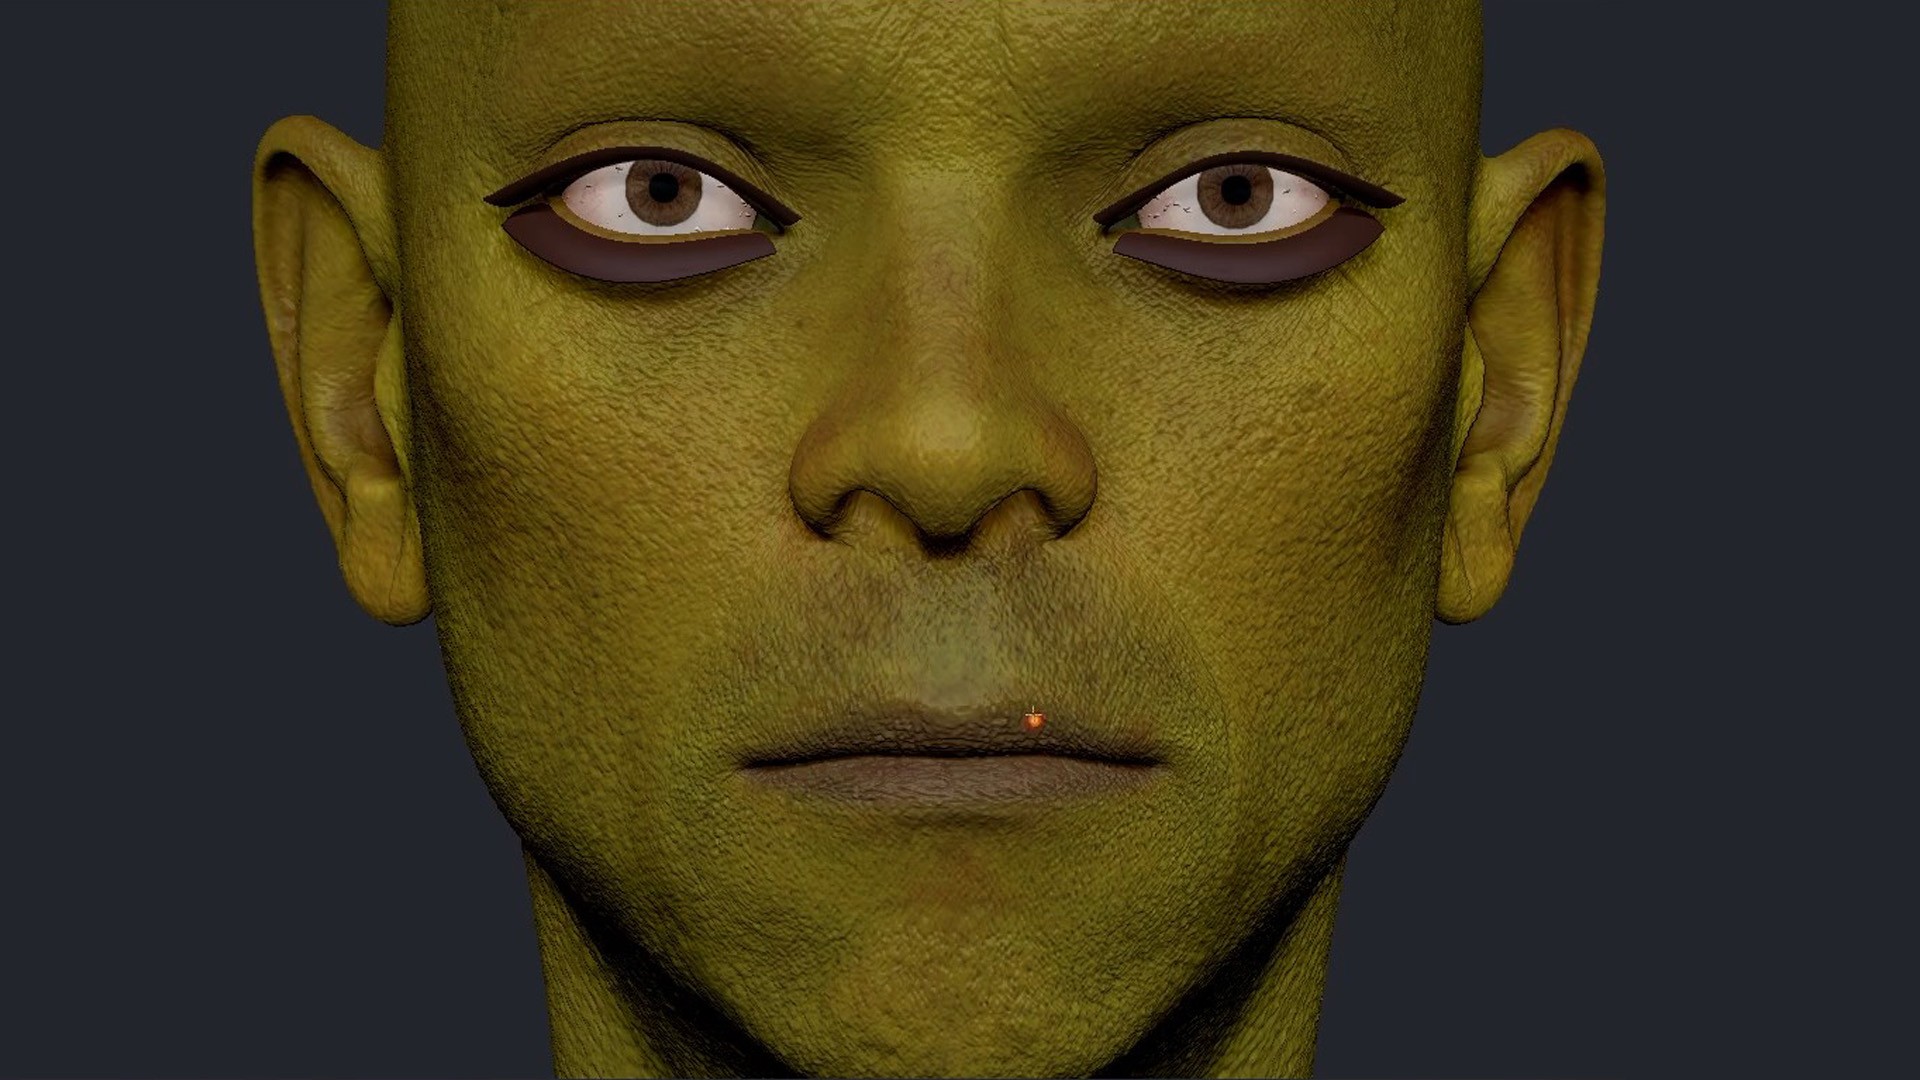
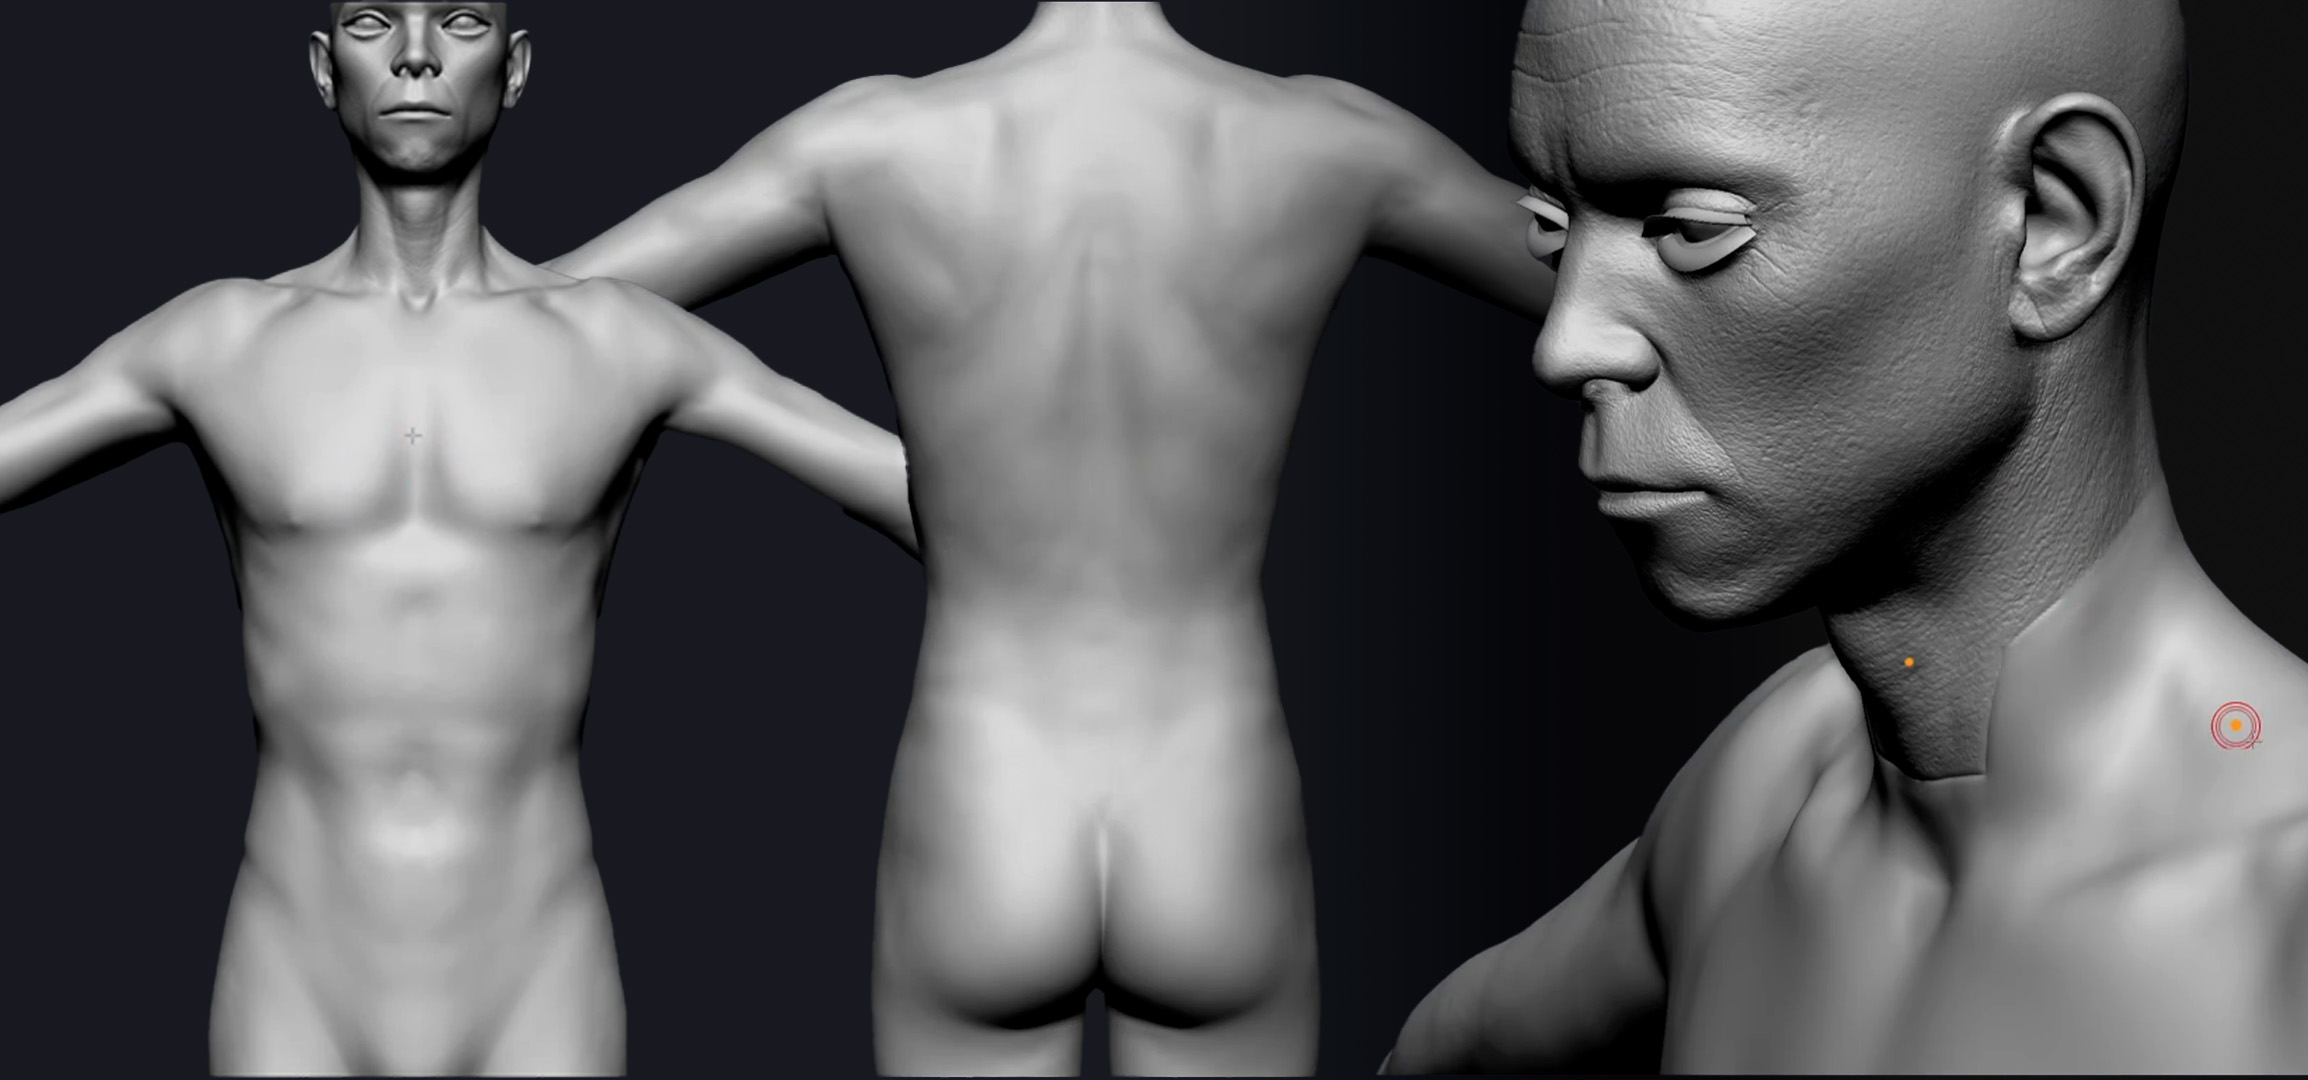
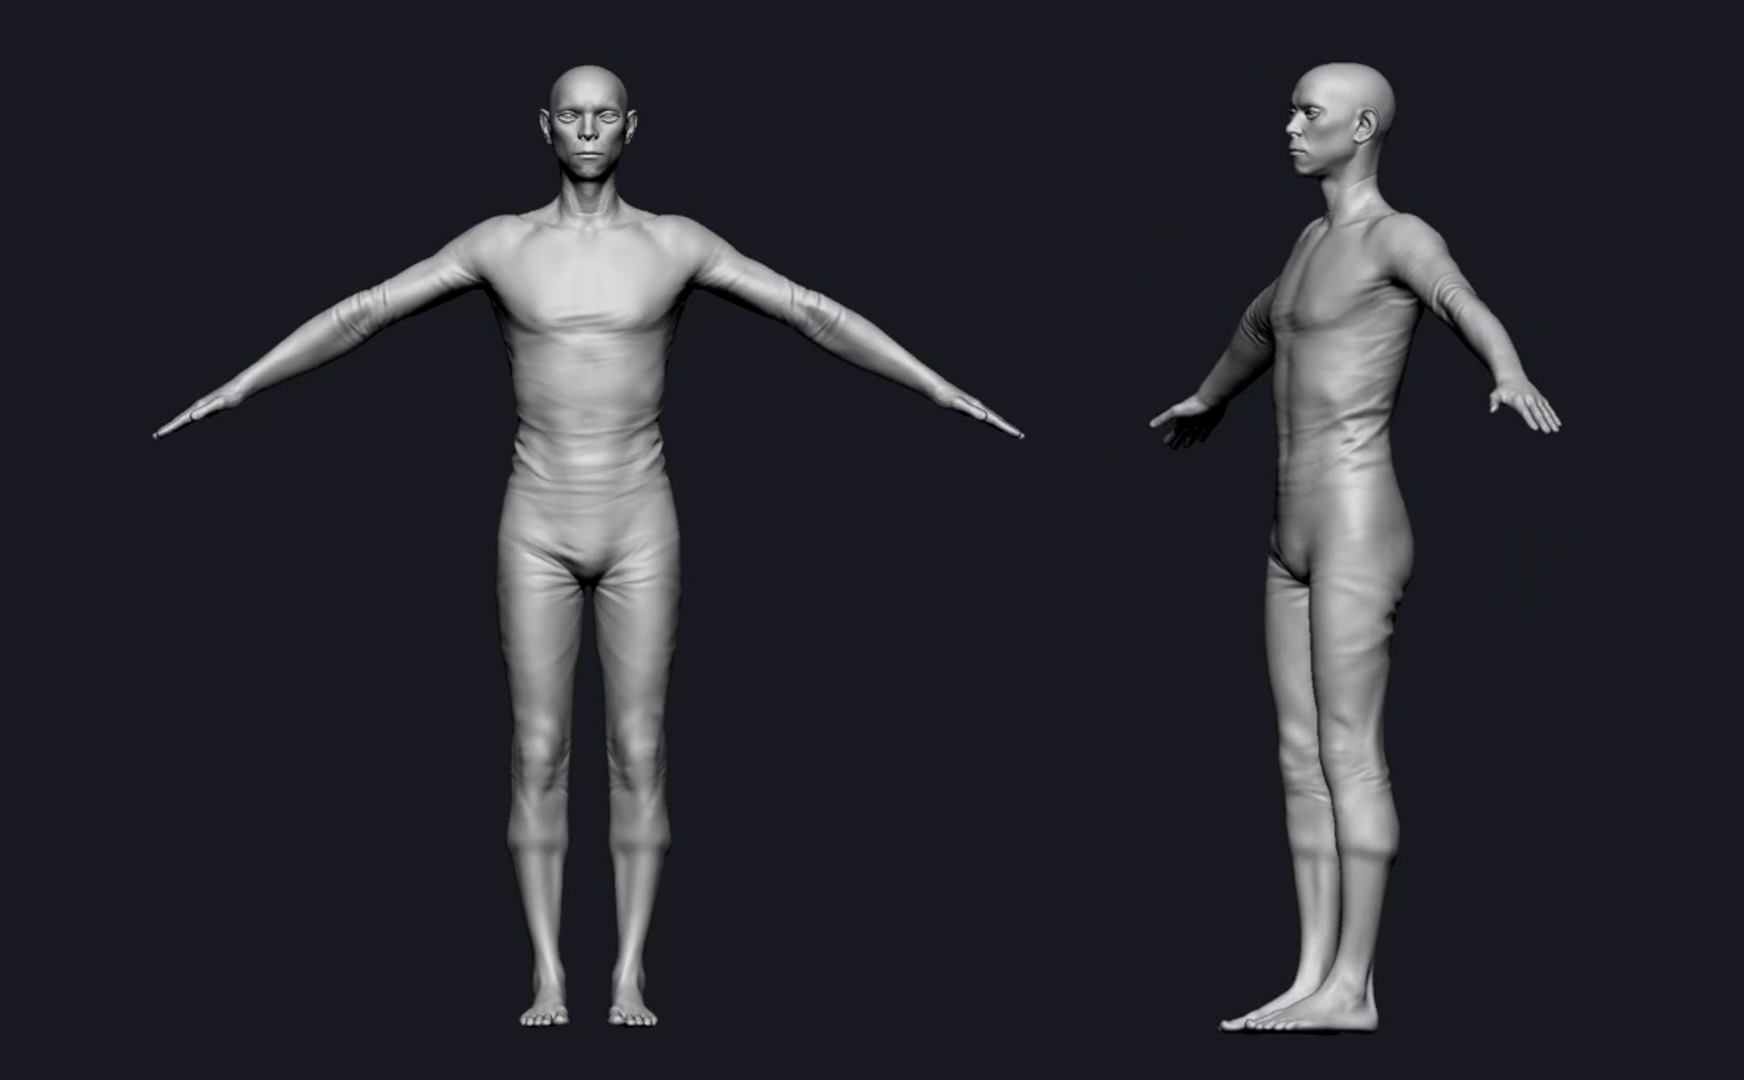
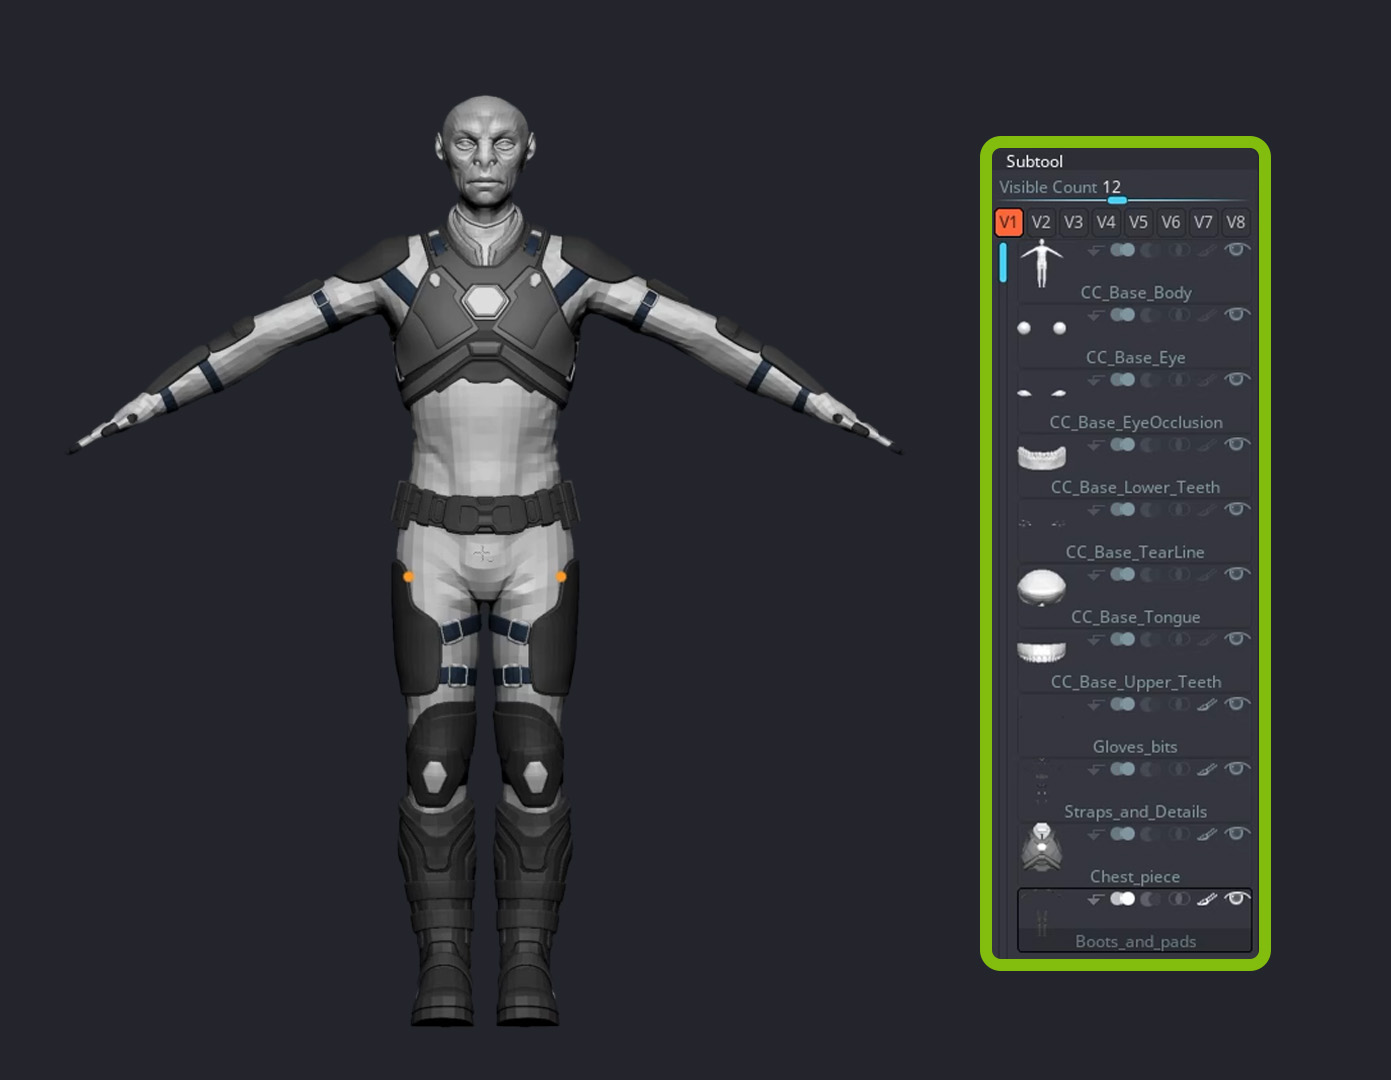
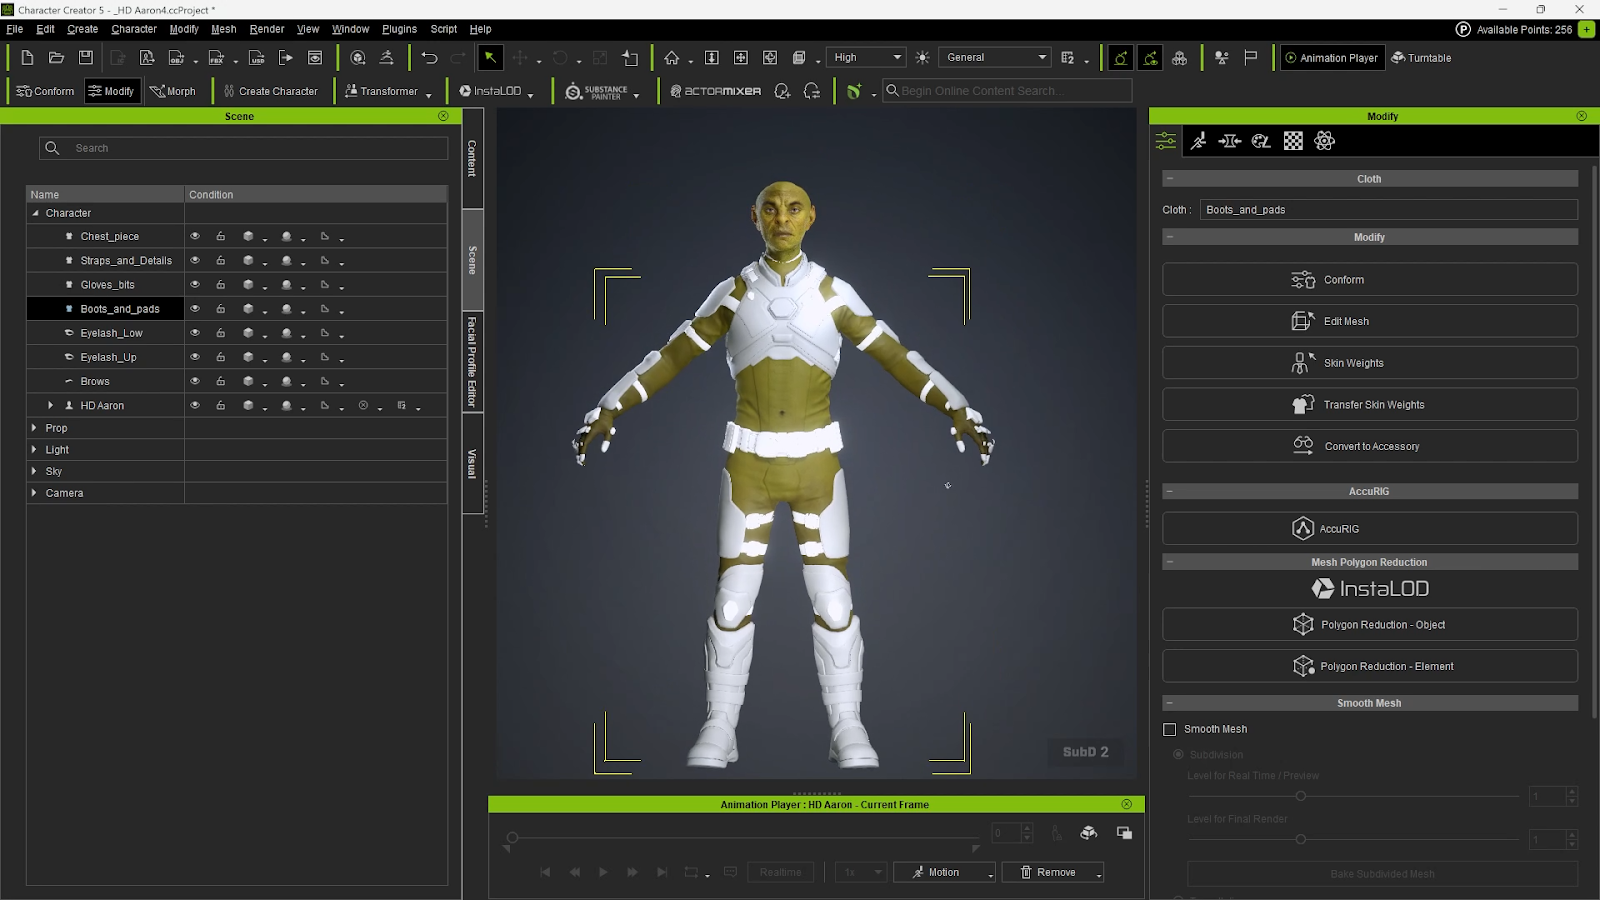
For a male creature, select an HD base such as the HD Aeron asset. Drag and drop it into the viewport. Once loaded, remove any geometry you won't use so you are working with a clean base mesh.
Fast Morphing with Viewport Click-and-Drag
Character Creator offers slider-based morphs, but my preferred approach is to enable the morph switch and edit directly in the viewport. Hover over parts of the mesh and drag to push or pull the shape, neck thickness, jaw length, eye spacing, and so on.
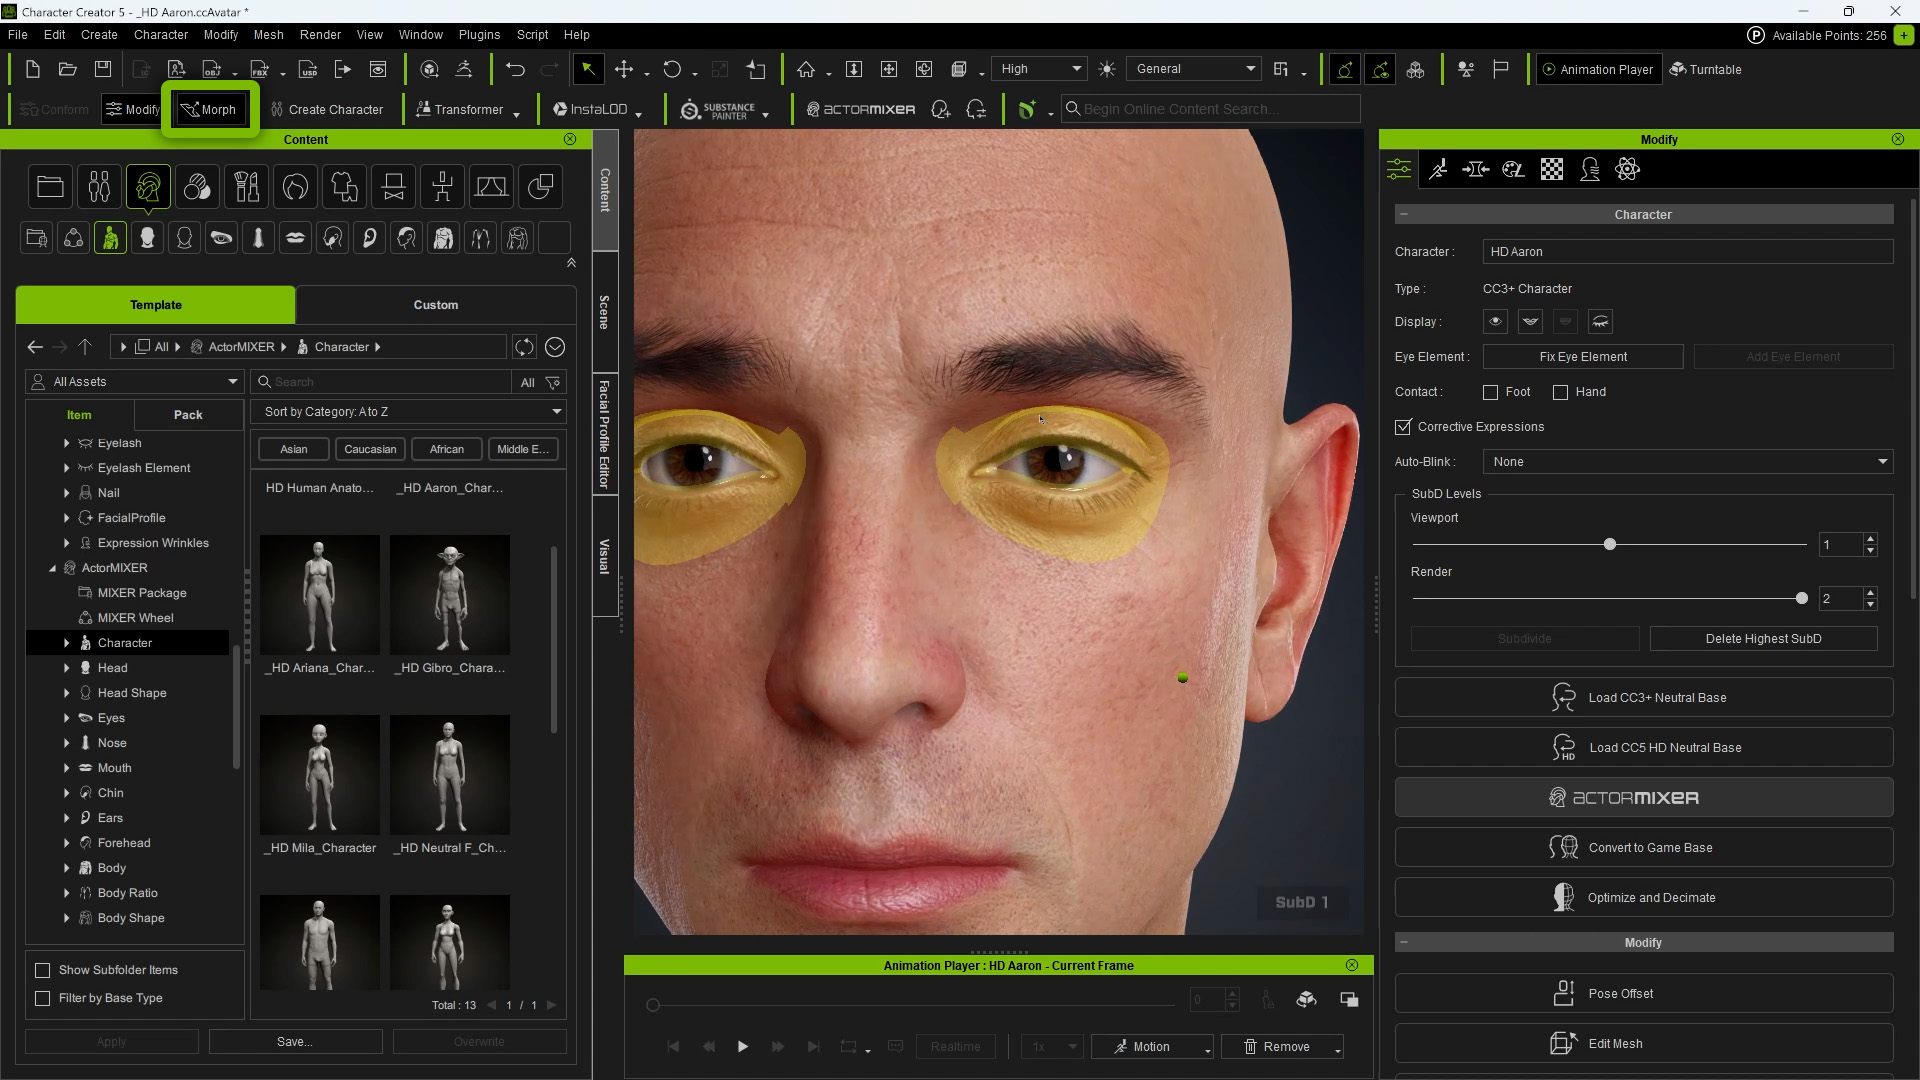
This direct manipulation is ideal for exploring exaggerated or stylized proportions quickly. Small adjustments give immediate personality without fiddling through long slider lists.
Actor Mixer: The Big New Feature
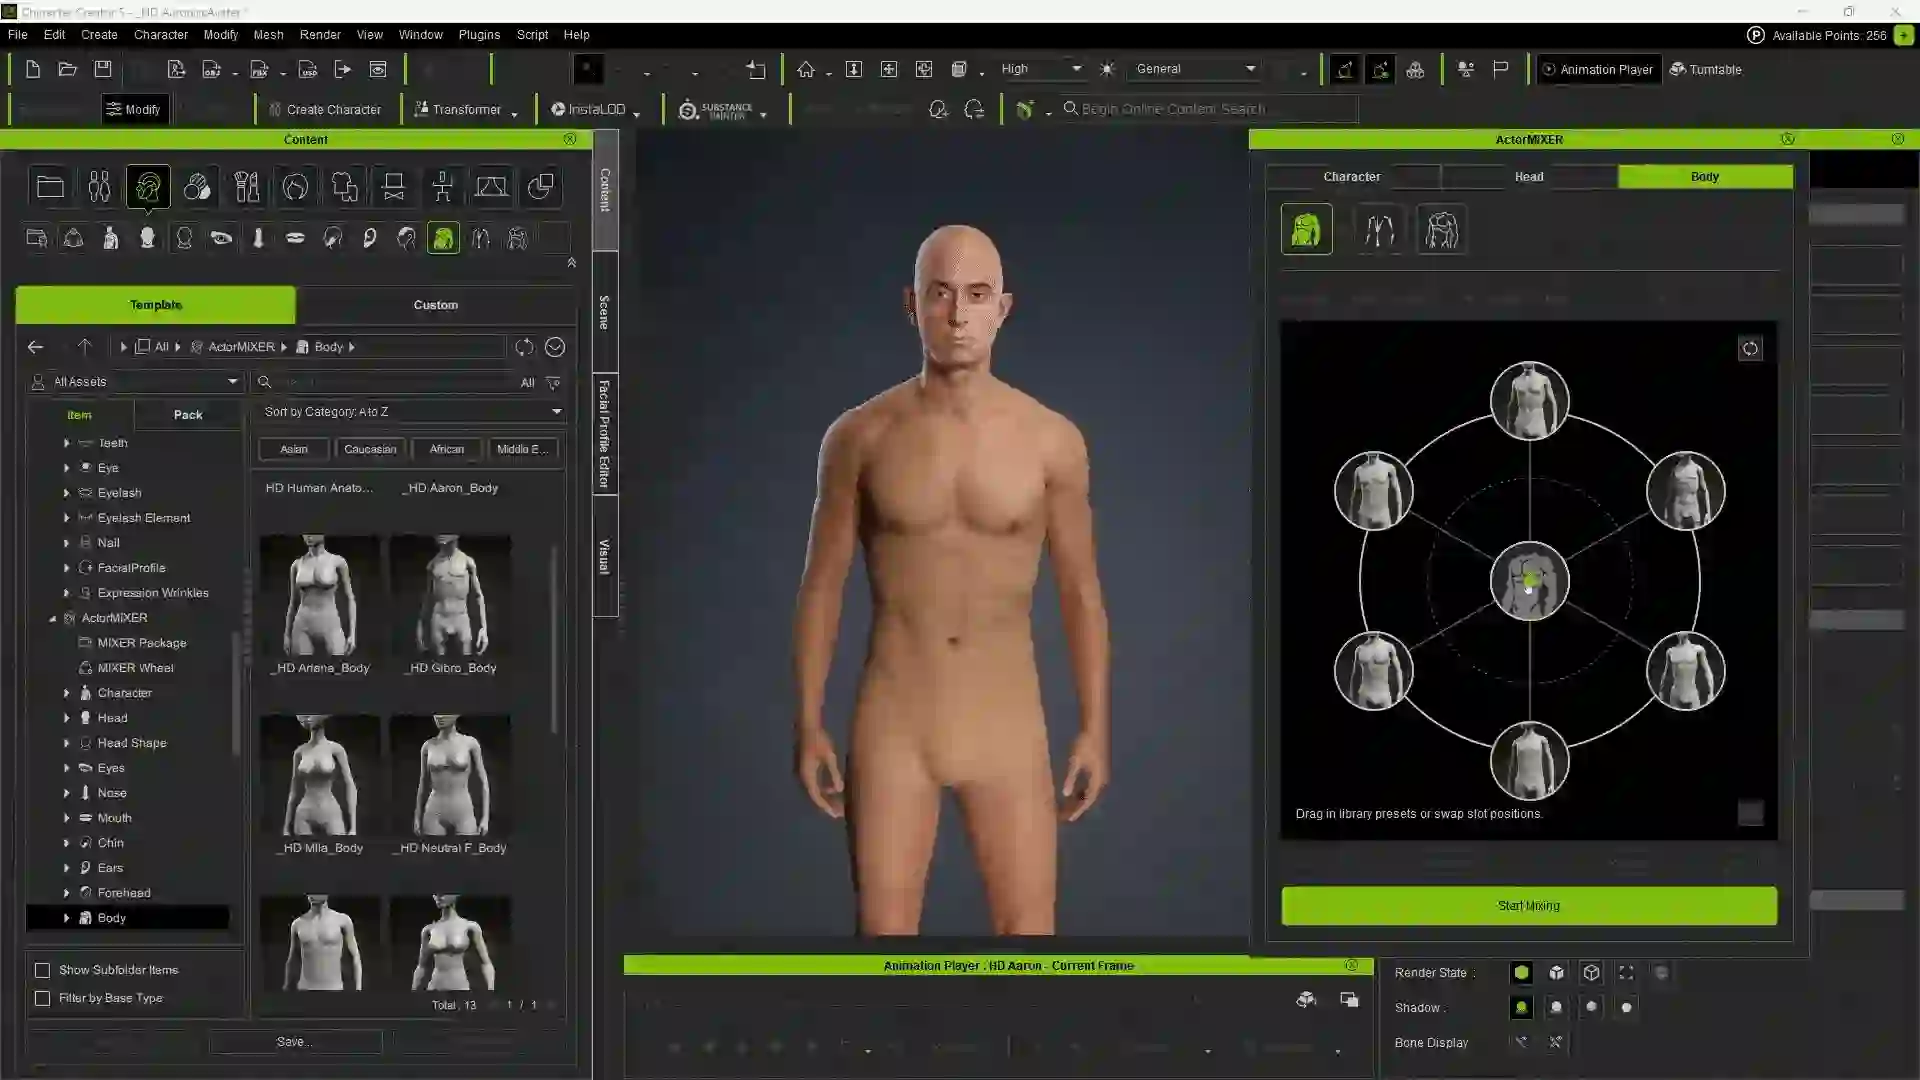
The Actor Mixer is one of the standout features in CC5. It provides a radial visual controller that lets you mix multiple body or head presets and refine the results quickly.
Open the Mixer from the Modify window > Settings tab and choose Current to start mixing. You can choose to work on the full character, only the head, or only the body. Drag the central control point toward different zones to blend presets, stylized, muscular, aged, or softer forms.
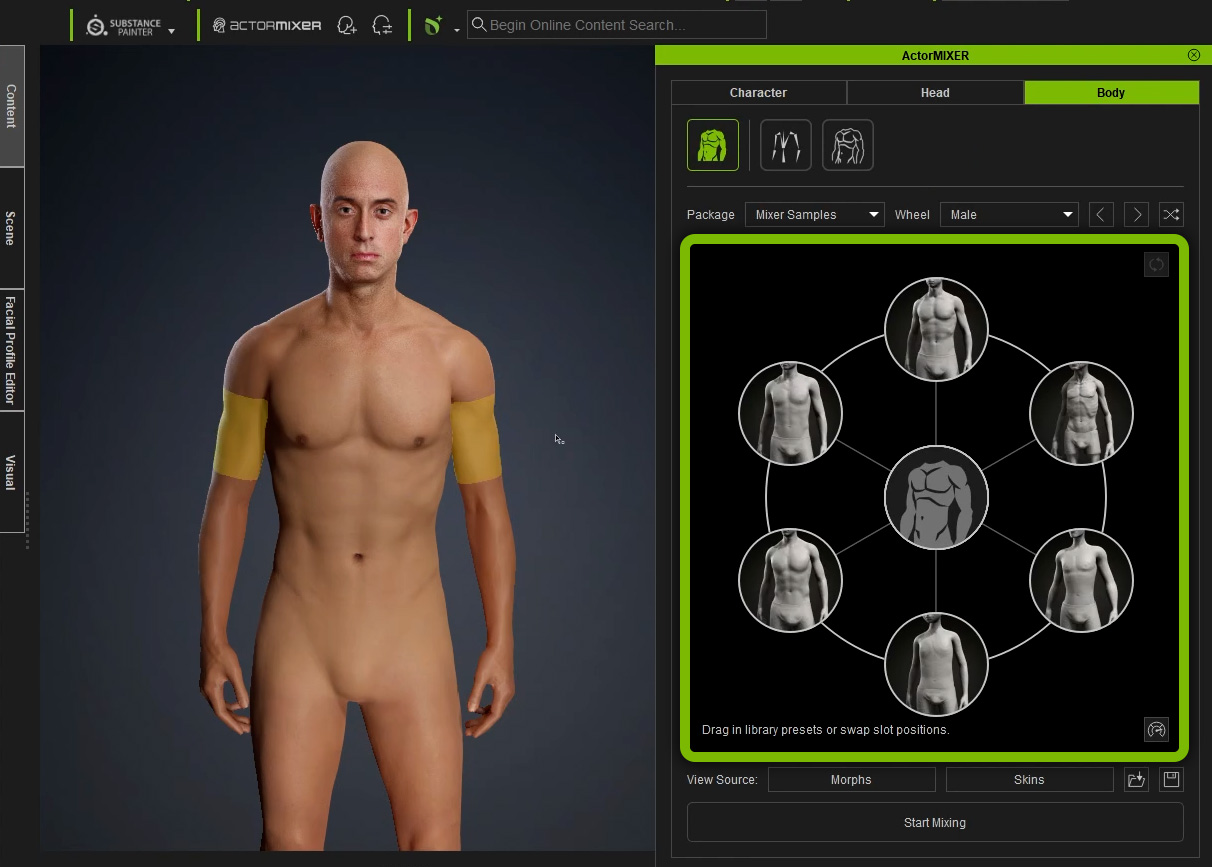
What's cool about the Actor Mixer is that you have a visual graphic, which allows you to see and select precise in-between states rather than relying on abstract slider math. It provides the flexibility to mix the head and body independently, a workflow that is ideal for creating unique stylizations, such as pairing a realistic body with an exaggerated head.
The tool utilizes rig-aware ratios, ensuring that whenever you adjust the mesh shape, the bone proportions update simultaneously to keep poses and animations looking natural. However, if you want you can also adjust the rig and proportions.
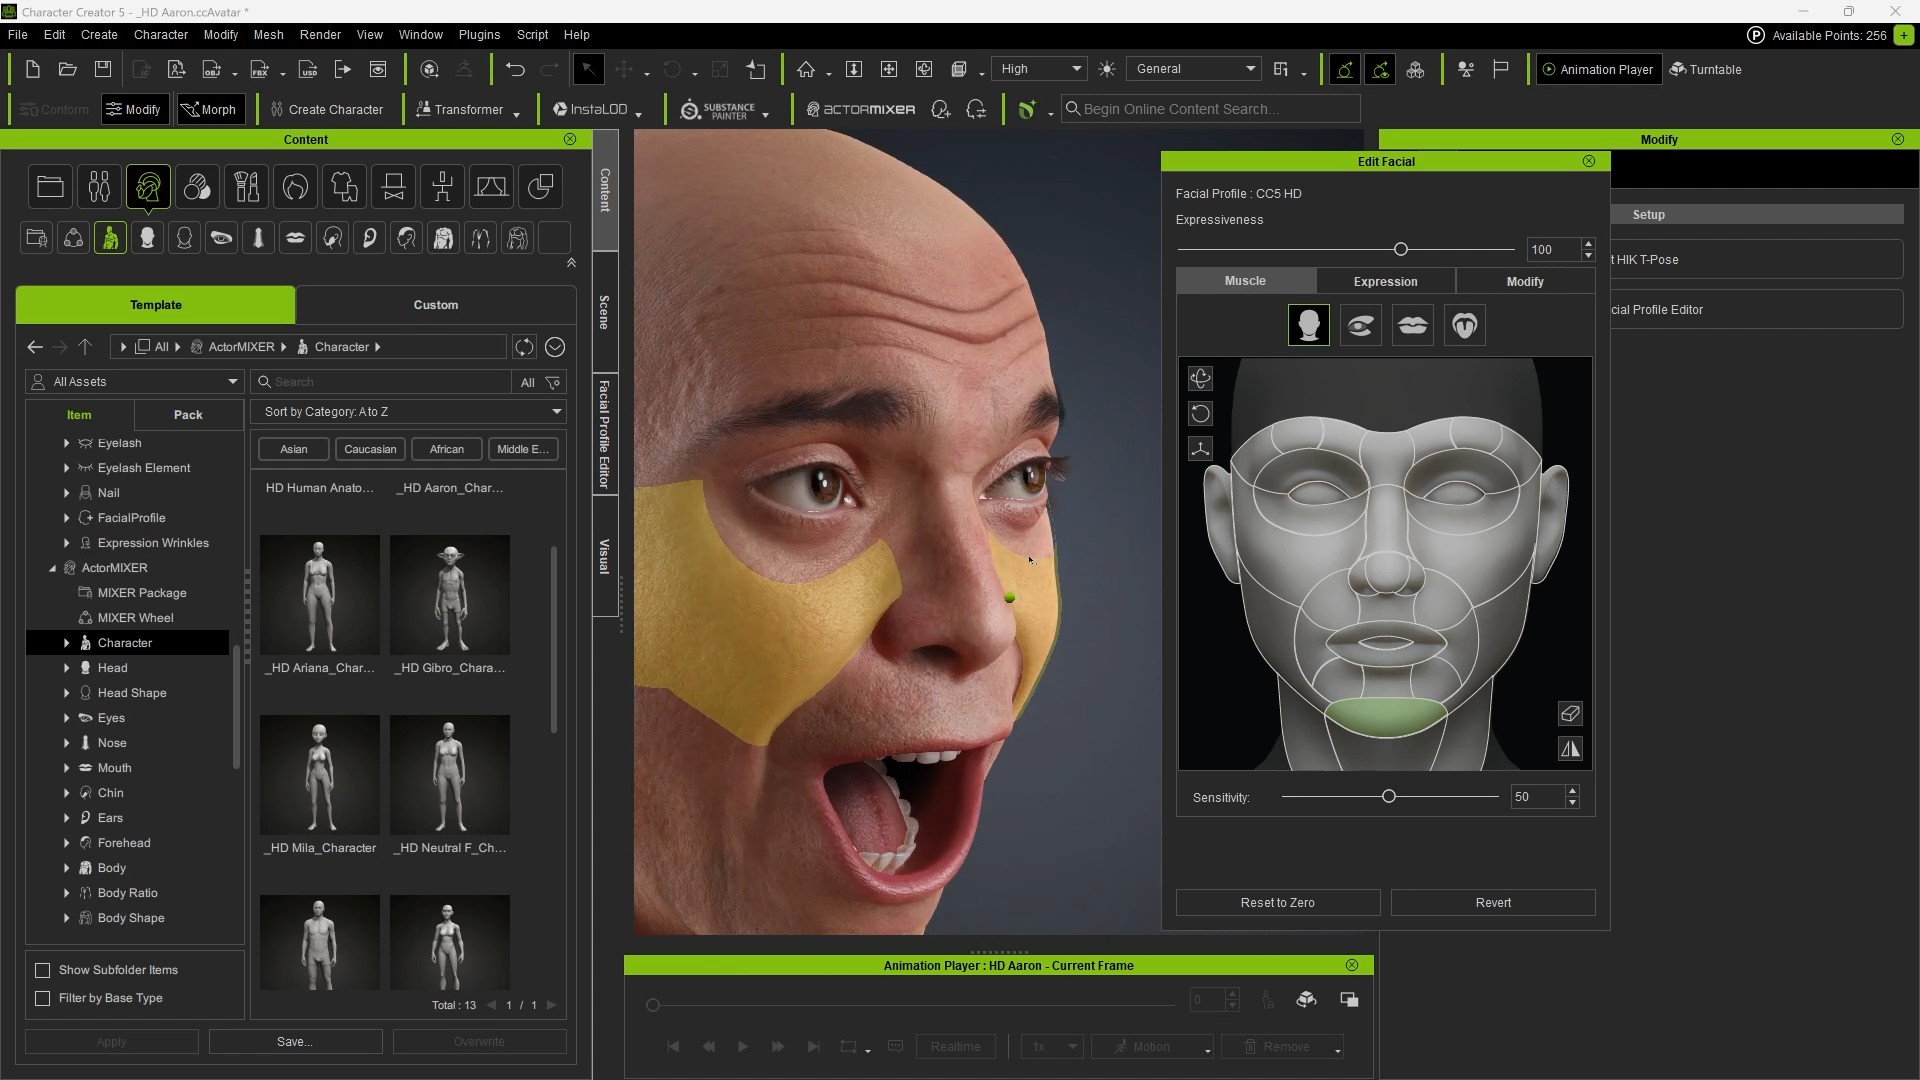
Refining Expression and Facial Rigging
Before committing to sculpting or clothing, test facial movement. In Modify > Motion, click Edit Facial to preview range of motion for jaw, brows, eyes, and more. Use the middle mouse button to drag controllers and watch how parts move.
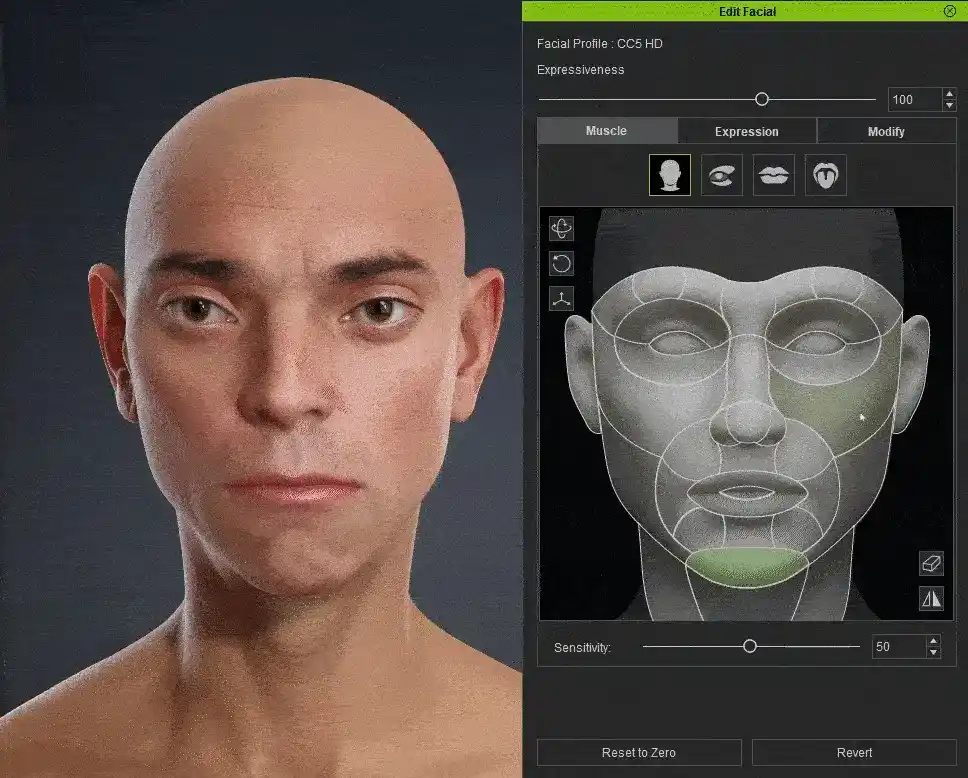
CC4 introduced dynamic wrinkles, which are calculated based on expression controllers. As you push a smile, frown, or raised brow, wrinkle maps appear and animate naturally. This is of course available in CC5 and this feature delivers much more lifelike expressions out of the box and lets you see where additional sculpting will be needed.
Also if you want to customize things even further, you could actually create your own set of dynamic wrinkles. I have another in-depth series on the YouTube channel covering this process specifically, in case you are interested.
Dynamic wrinkles are definitely a cool feature… not necessarily a new one, but they ensure that expressions read clearly in both static renders and full animation. Beyond the final look, they could also provide a clear sculpting roadmap for ZBrush, indicating exactly where to exaggerate folds or dampen details based on natural movement. By starting with this solid foundation, you significantly reduce the need to manually apply wrinkle alphas, streamlining the detailing process while maintaining realism…. Plus you are not restricted to one sculpted expression.
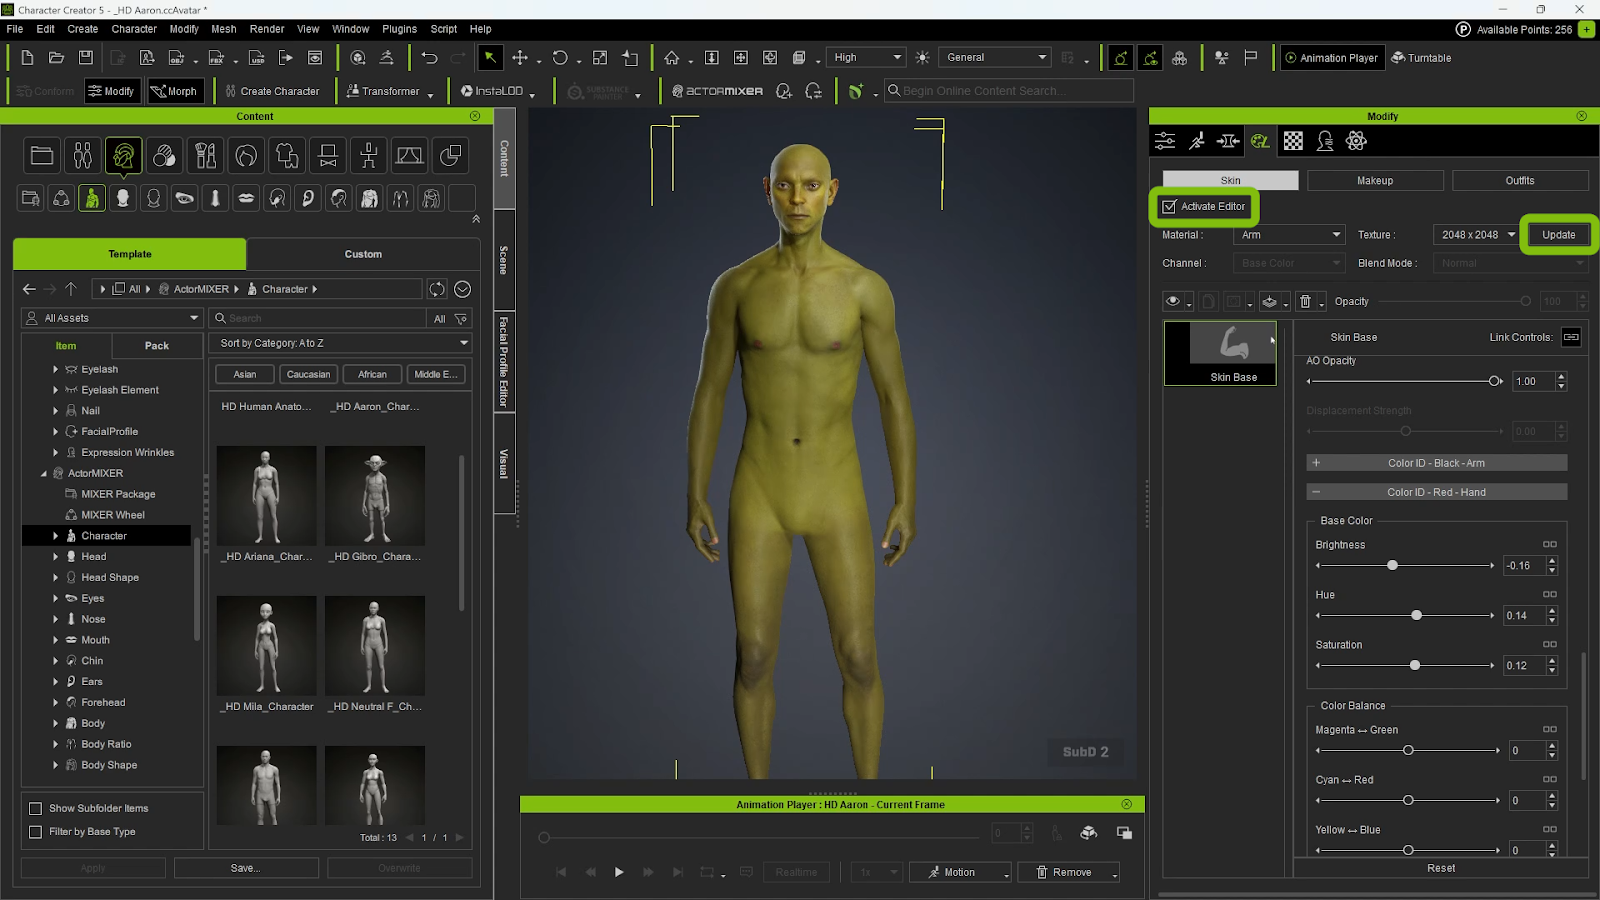
Skin Editing with the Activate Editor
The skin editor is also very powerful and flexible. Open the paint palette section and click Activate Editor to access base textures, IDs, and material resources.
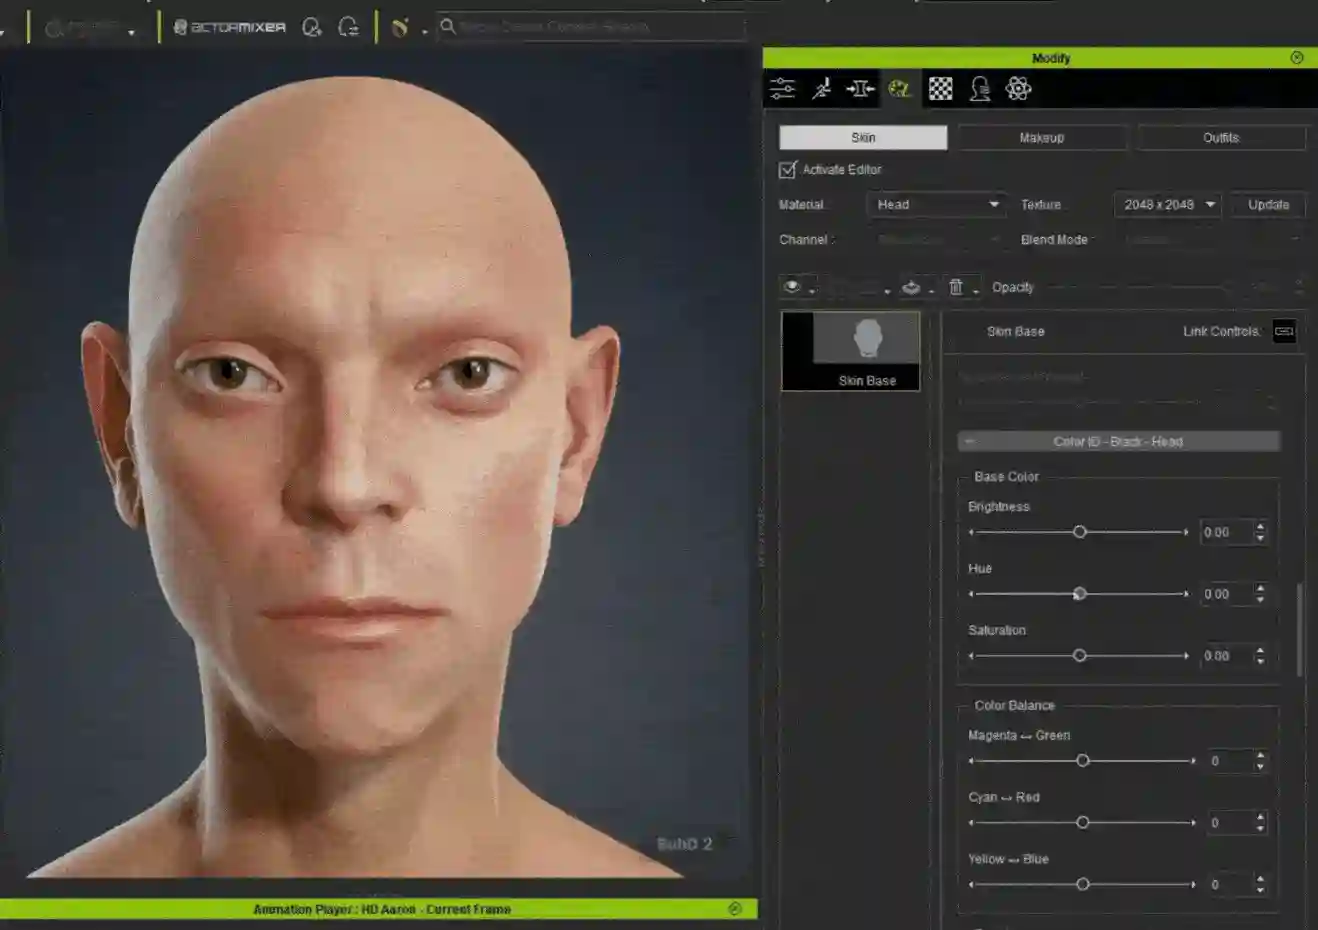
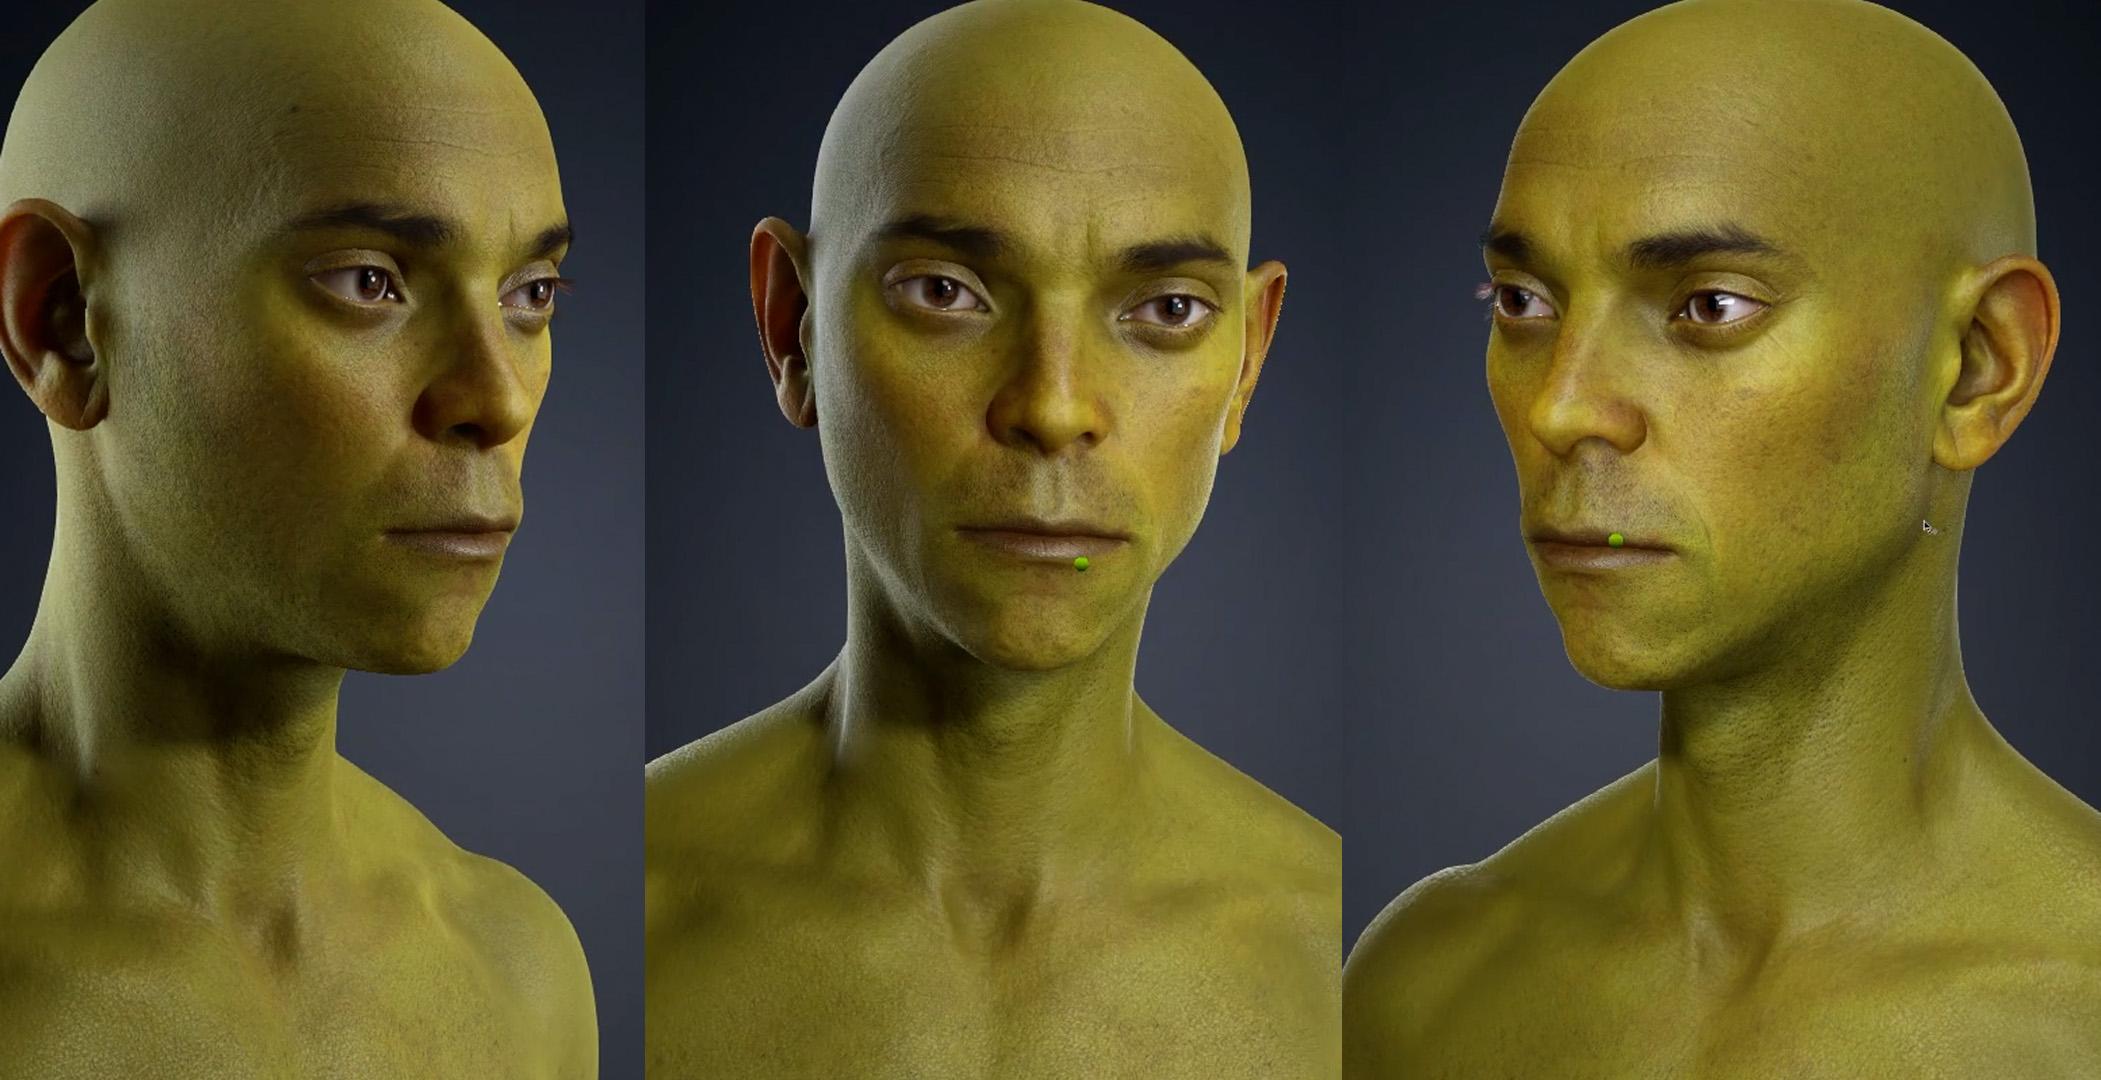
I like to work on the face first, especially since in this project the body will be covered by a suit or armour. Use brightness, hue, and saturation to push toward a stylized tone. Remember that different regions like lips or specialized body parts might use separate material IDs and therefore require individual editing.
When finished, click Update to apply face changes across the body. Uncheck Activate Editor to bake edits into textures so your look is consolidated.
I always recommend checking specific areas like the lips, eyes, teeth, and accessories immediately upon import, as these often come with separate IDs that require manual adjustment to function correctly. Of course, none of this is necessary for the project but I wanted to share with you because the options are in there and are quite useful to know.
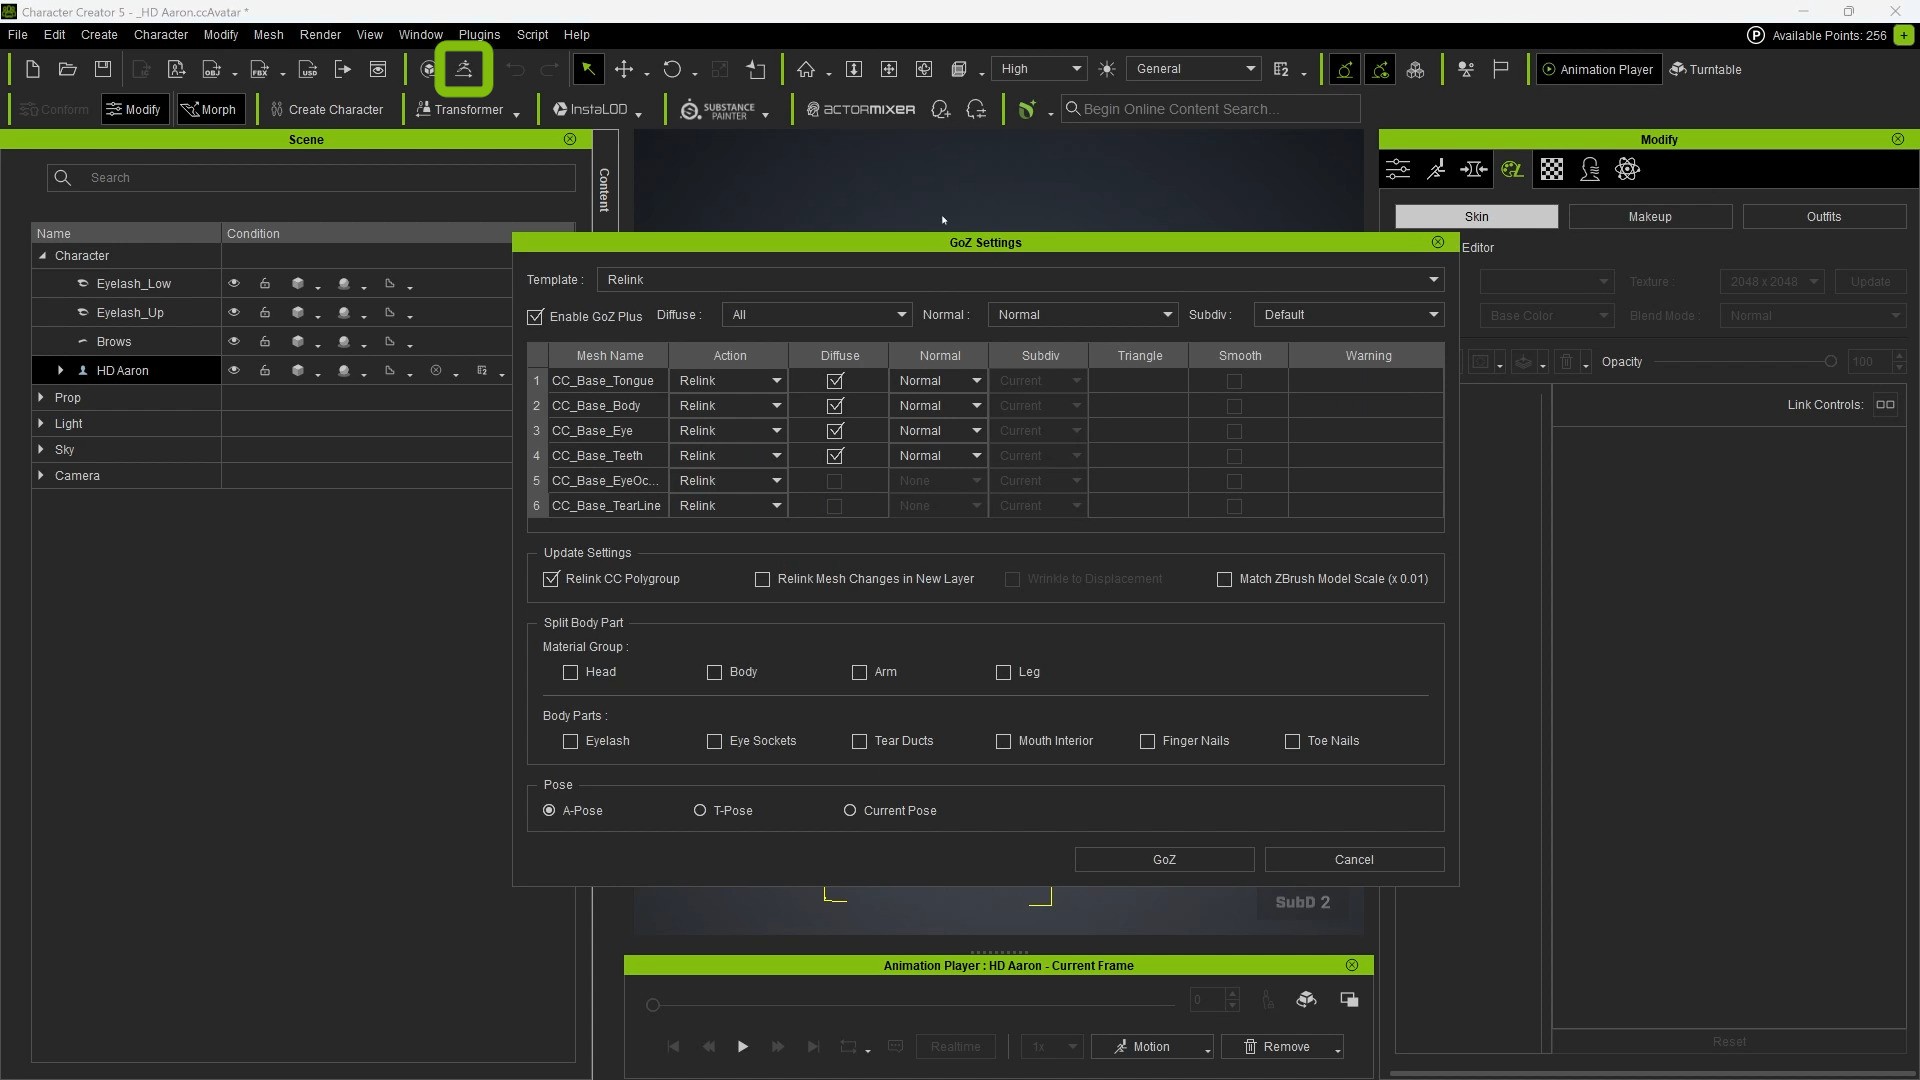
Exporting to ZBrush with GoZ
When the base is ready, you can send the mesh to ZBrush for sculpting and asset creation. Use the Go-Z (GoZ) button in the Scene tab. Choose the Create template and set A-pose for a more natural pose if you want better sculpt readability in ZBrush.
Character Creator transfers normal map details into a ZBrush sculpting layer as high-frequency detail. That means pores and micro-skin texture are preserved and editable as a layer, very useful for toggling intensity or removing detail during broad-form sculpting.
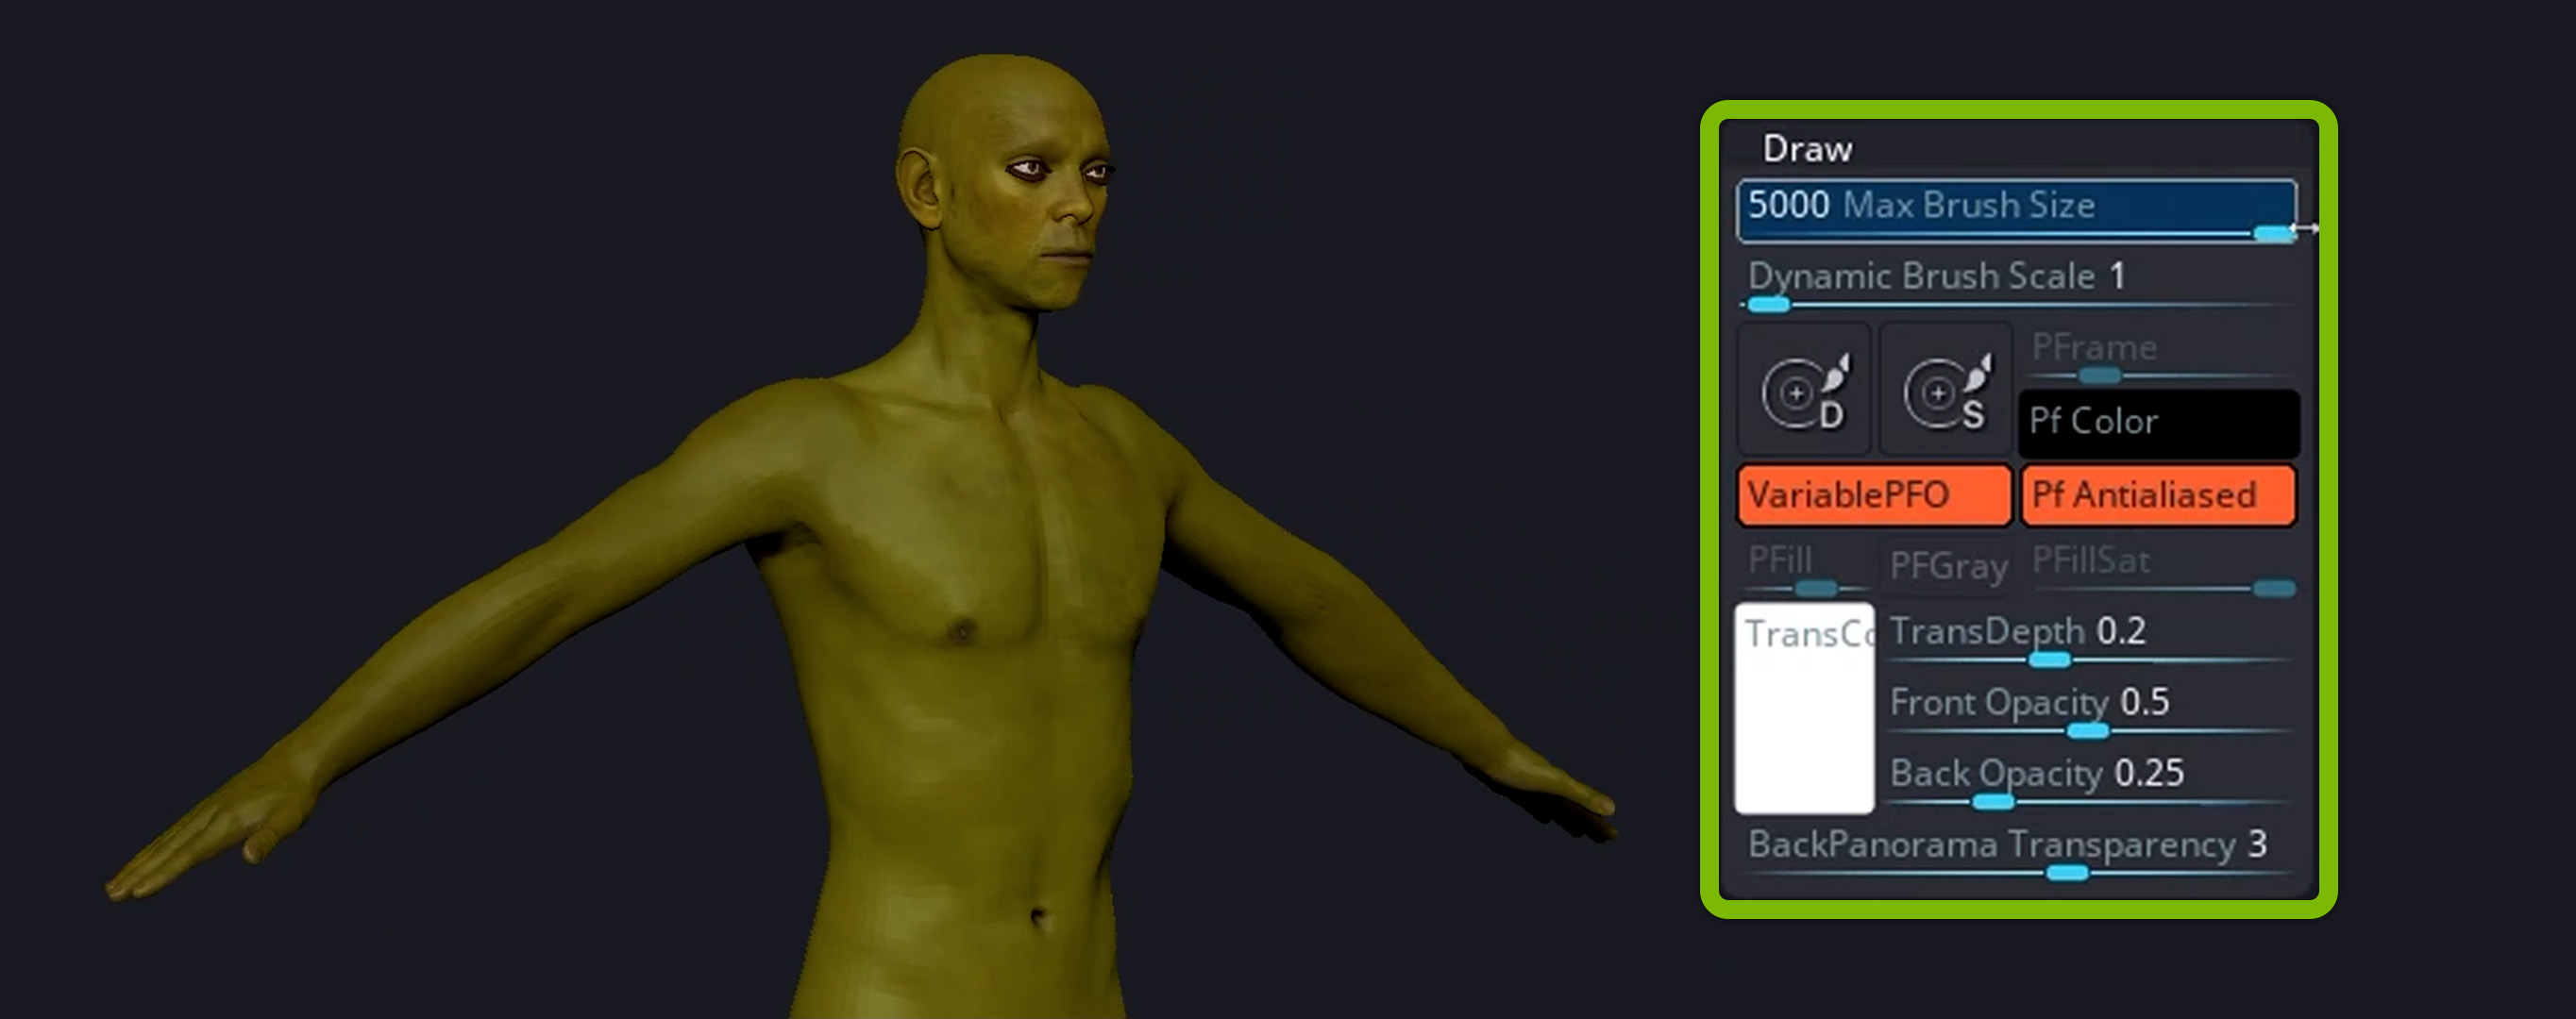
One thing you need to be aware of is that because of the CC5 scale, the ZBrush brushes might feel too small even at maximum, but that is a simple easy fix by updateing preferences: Preferences > Draw > Max Brush Size to 5000, and set Dynamic Brush Scale to 50. This allows larger brush strokes for proportional edits on full-body meshes.
After importing the CC5 mesh into ZBrush, I stored a morph target and bake your sculpting layers so I can selectively bring back the transferred normal details only where needed, typically around the face. Use the morph brush to paint that original microdetail back in, while keeping broader changes to the rest of the body.
The idea is to just take advantage of the CC5 normal details but only on the face… the body will be covered by the sci-fi suit so I don't need any of the skin details.
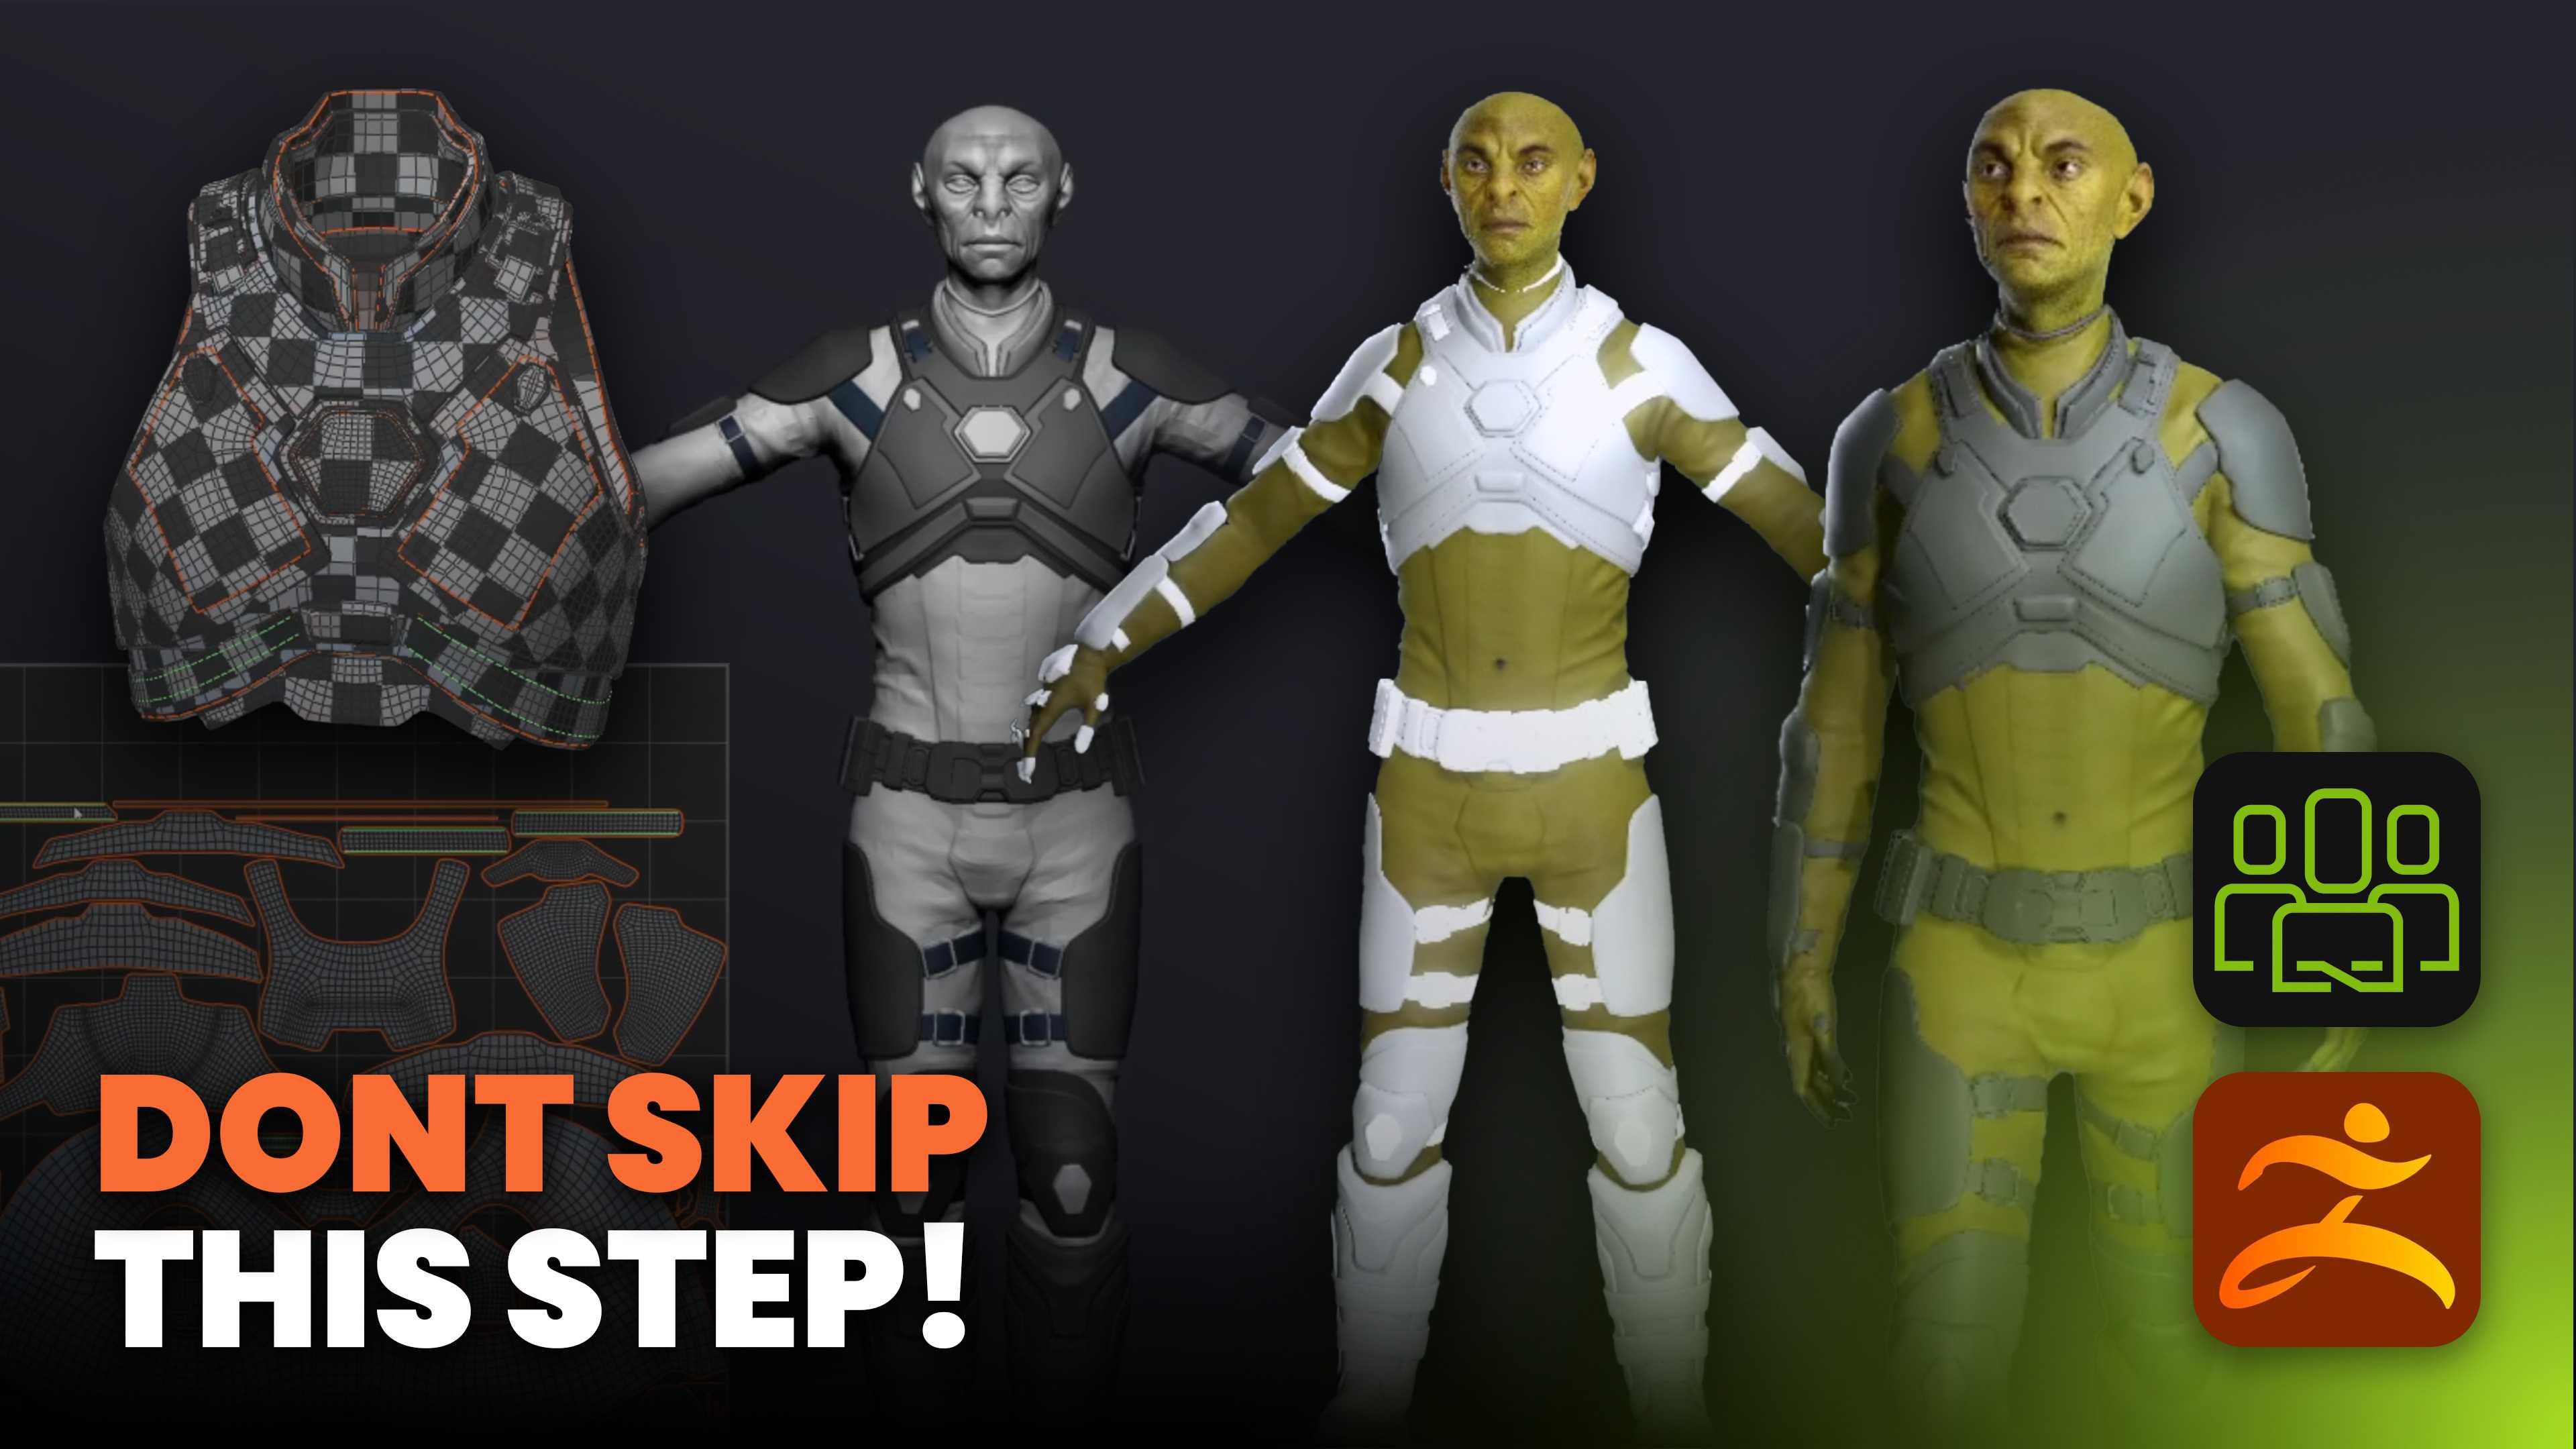
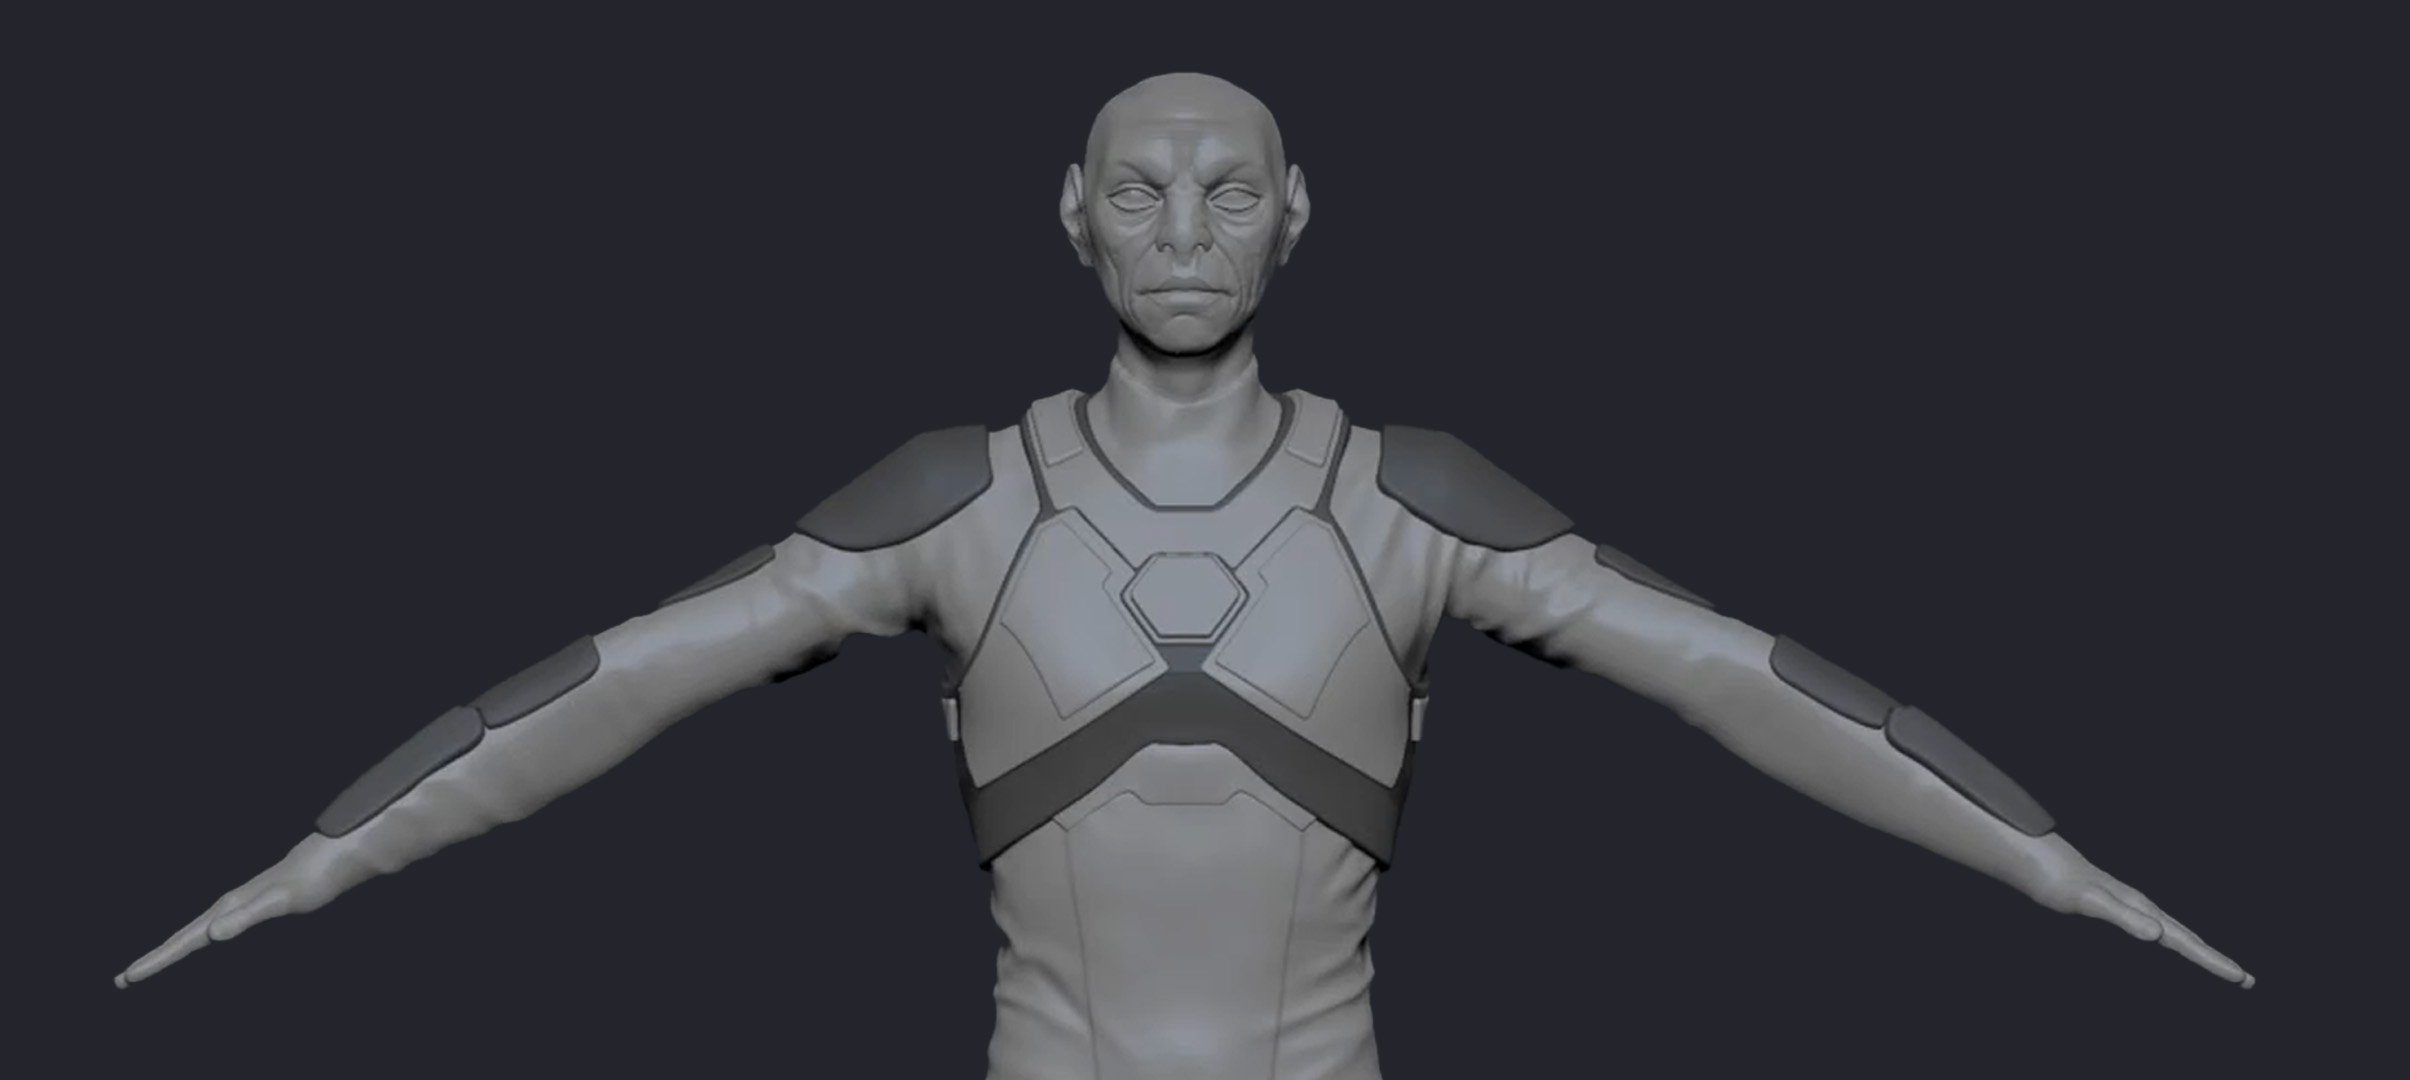
Blocking out the suit: Softening anatomy without losing structure
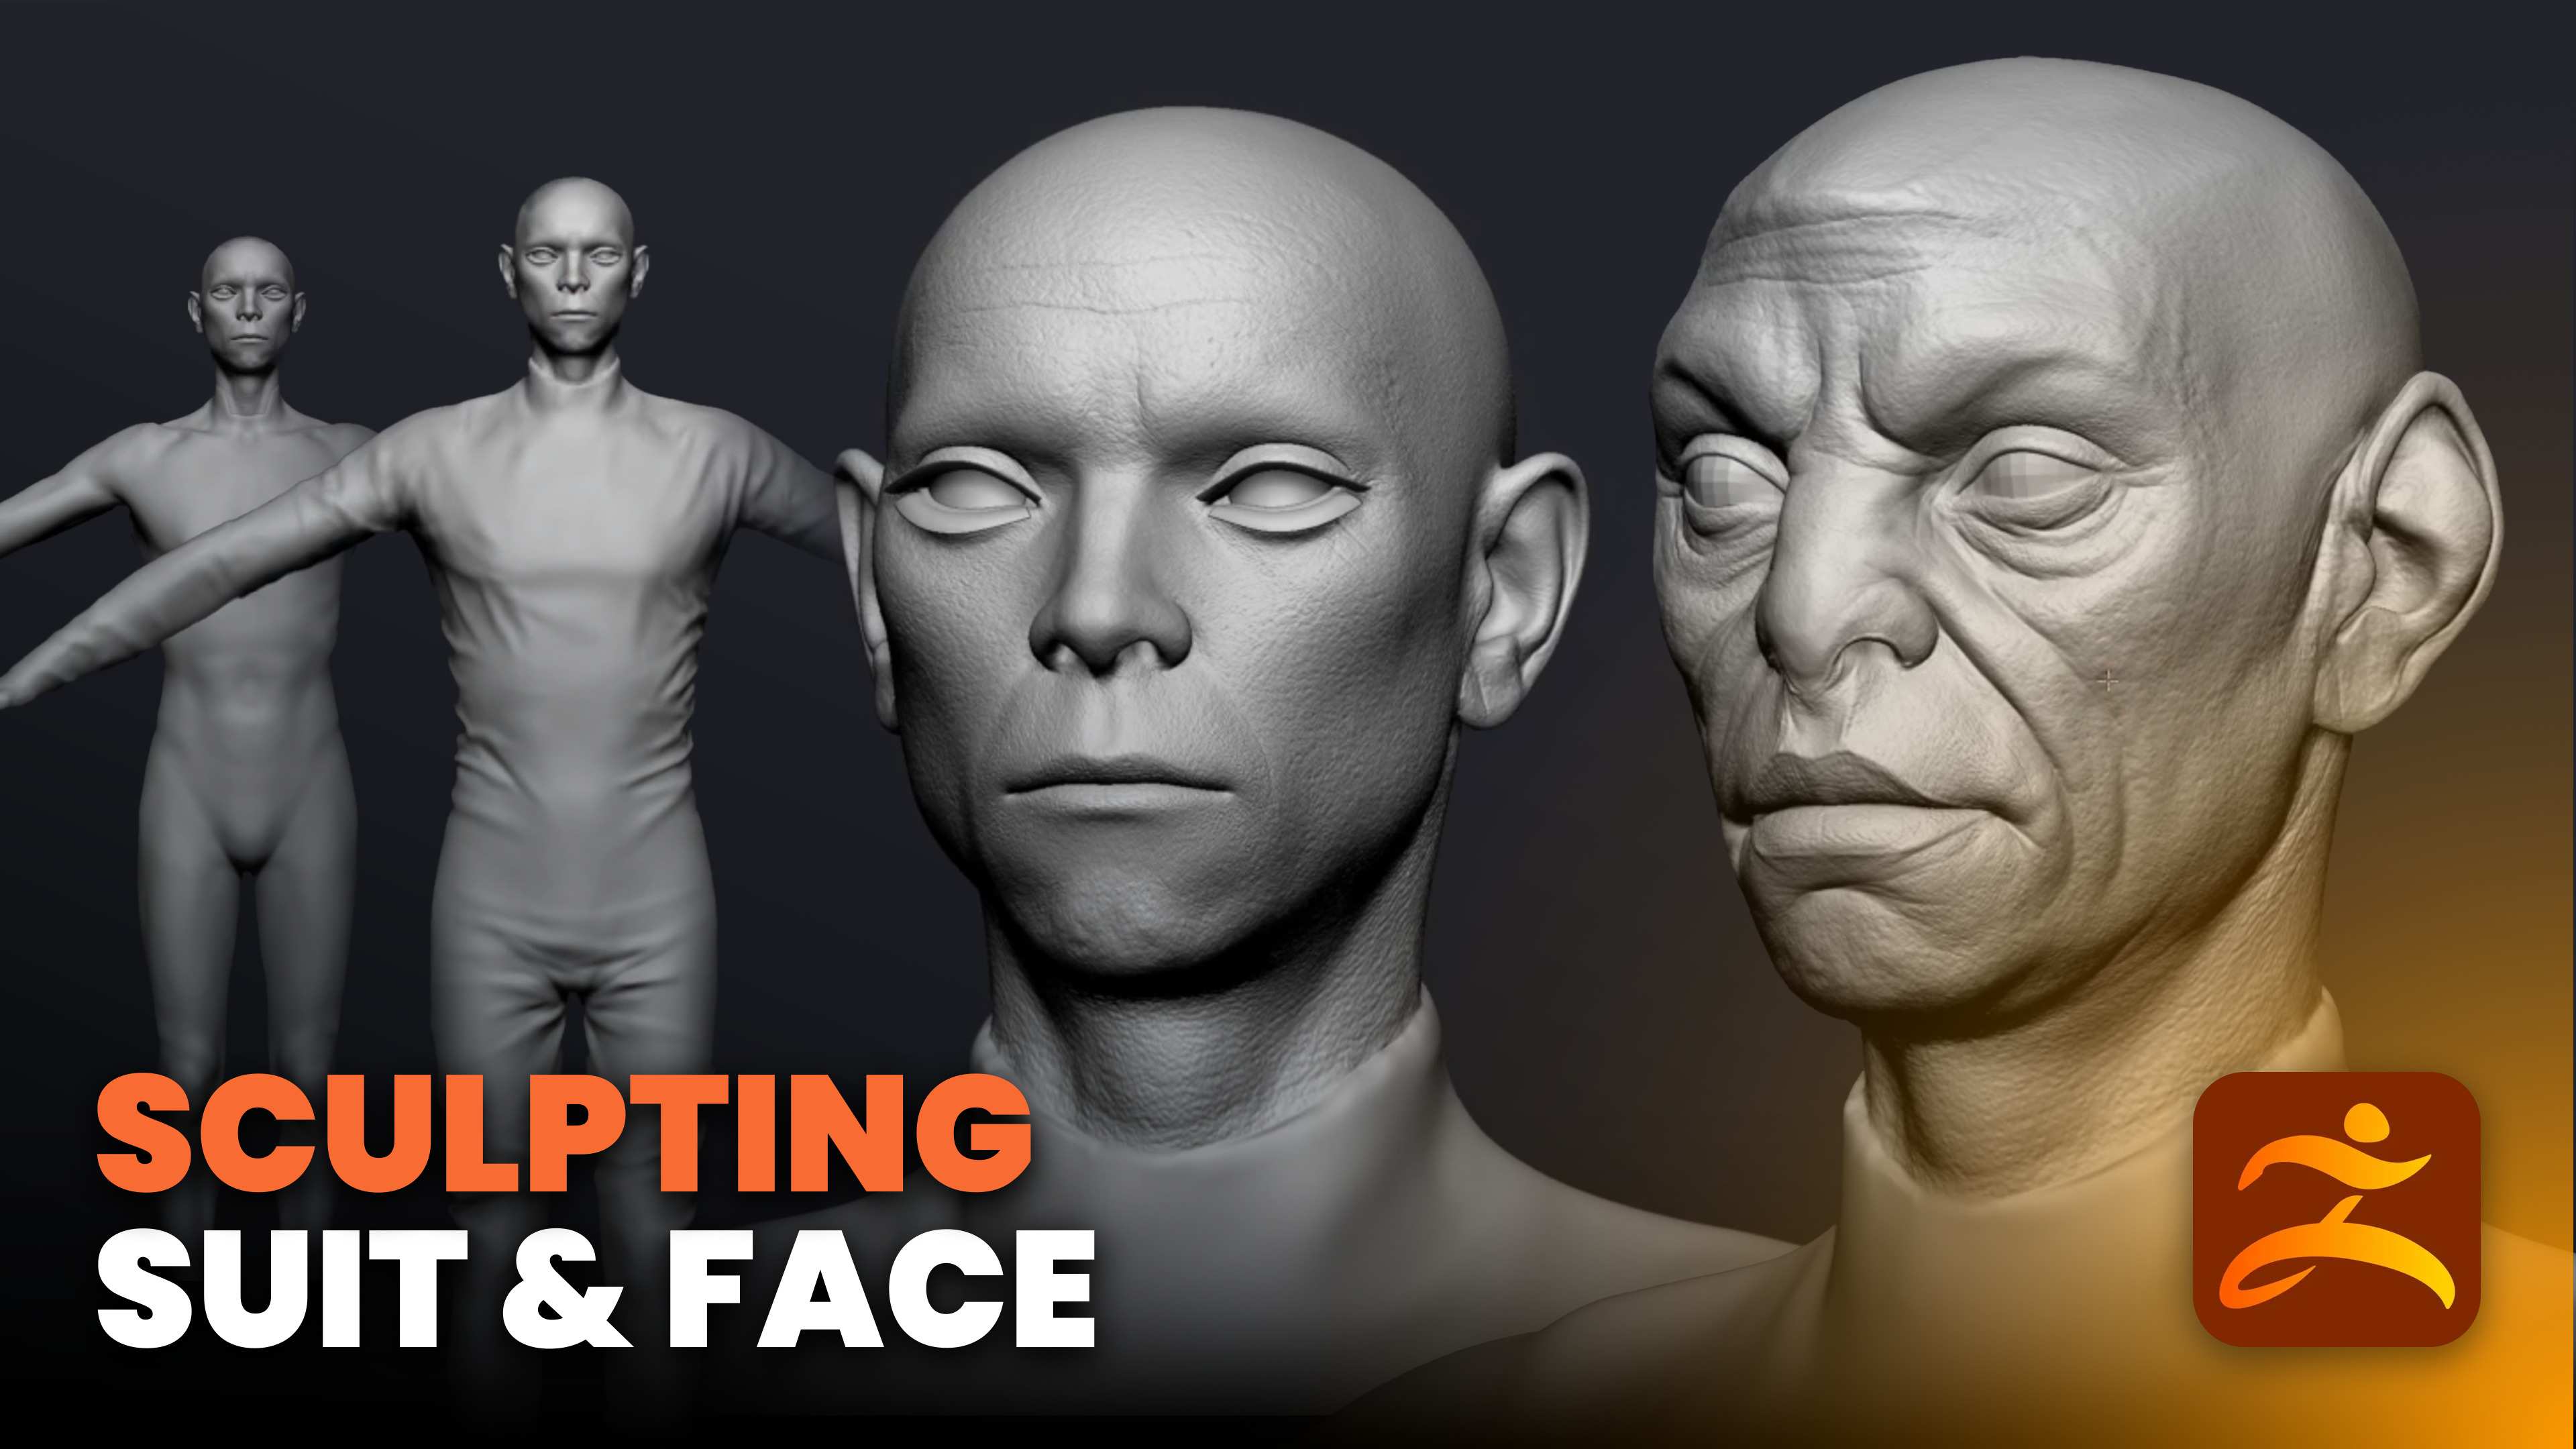
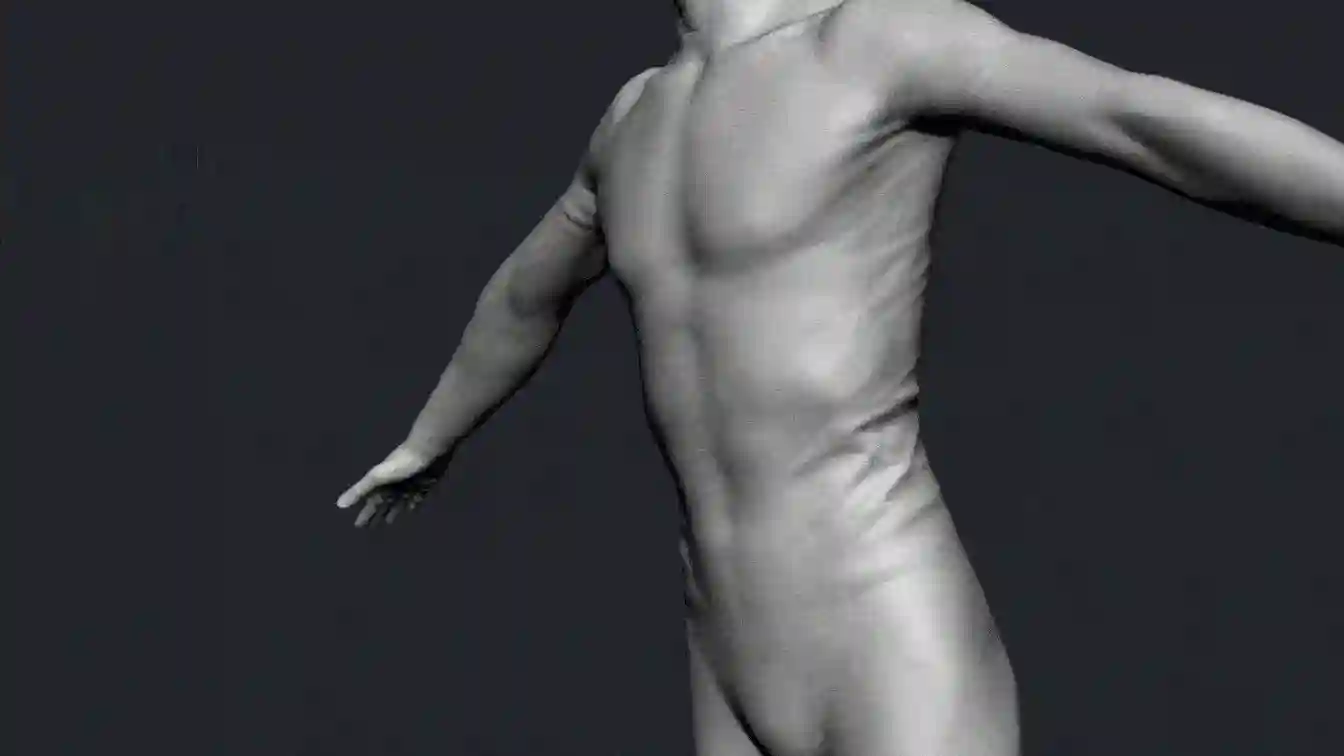
The suit should feel like a material layer over the body, not just painted-on muscle. So I started by reducing anatomical definition: smooth transitions, soften muscle separations, and suggest seams like a neck trim with a few clay buildup strokes. Using a standard brush I indicated the primary wrinkles and the general compression of the suit.
It is worth noting that this mesh has over 14million polygons, so I needed to use a stronger smoothing brush like the Smooth Strong brush that comes with ZBrush when working at very high polygon counts.
Use references and targeted masking
References are essential. For this project I collected images of wetsuits, surf suits, and dive gear to study where fabric naturally compresses and folds. Later, you can refine wrinkles based on the character’s pose and how material stretches or compresses around joints.
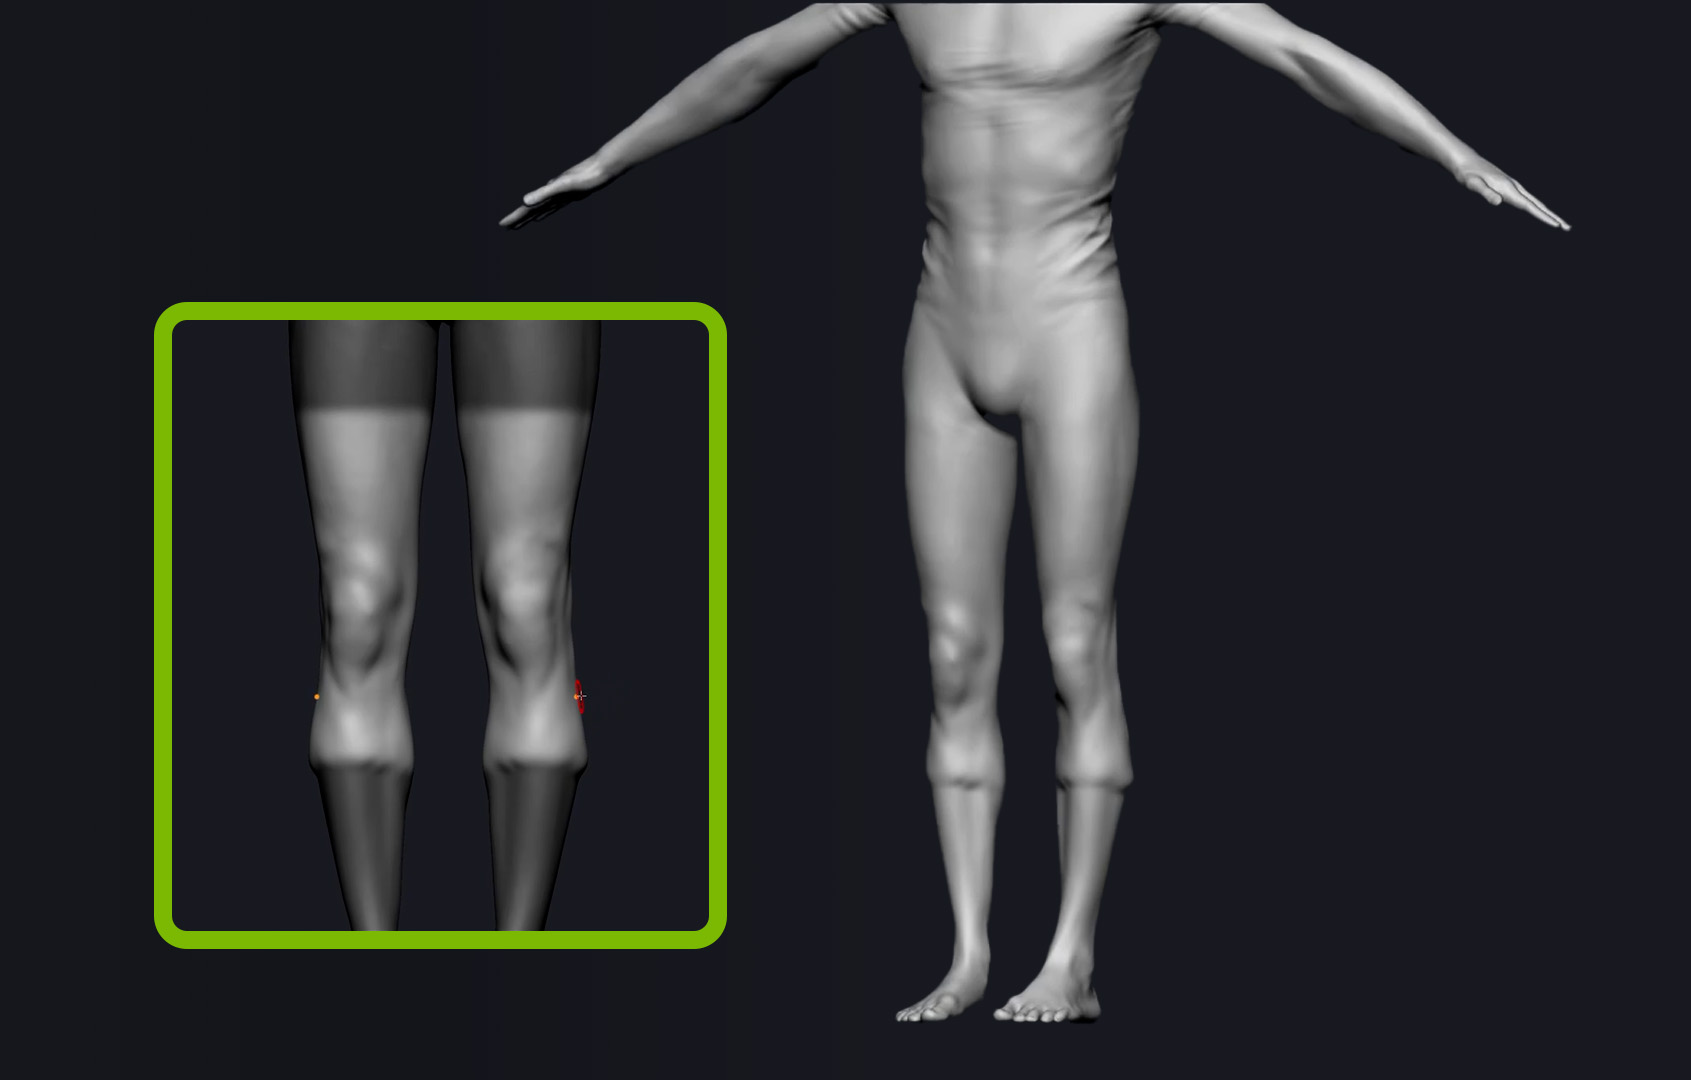
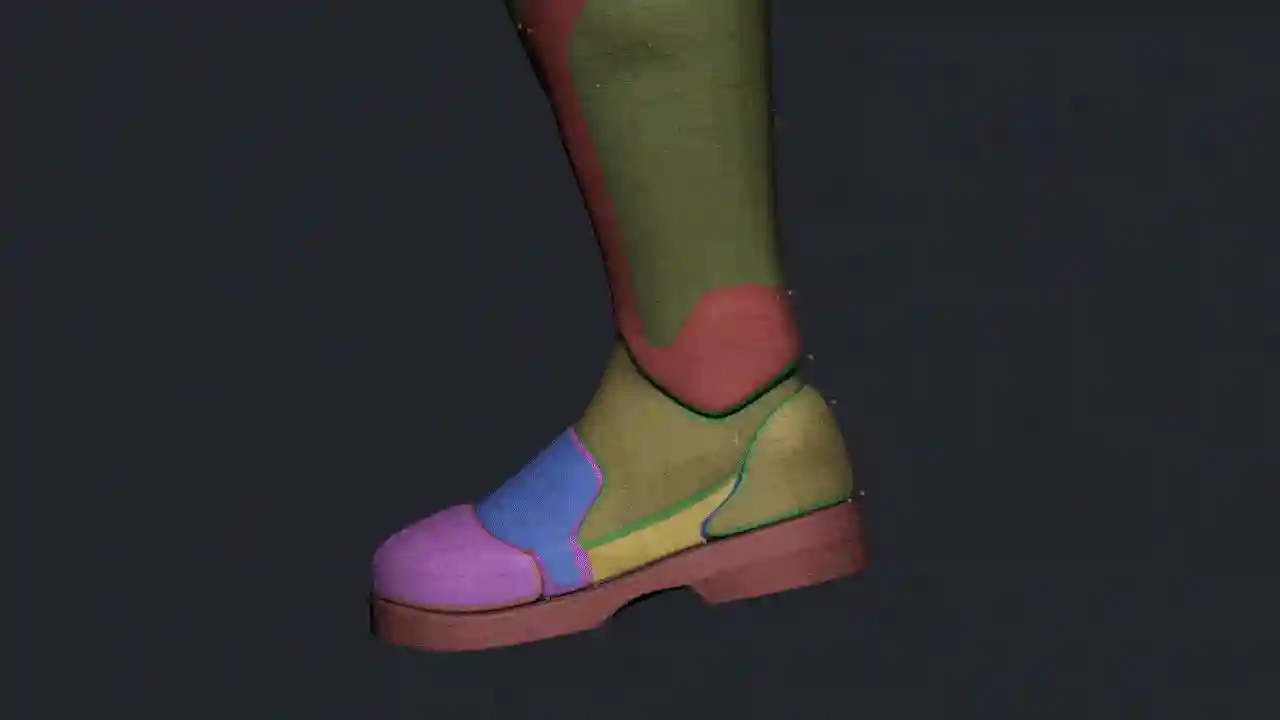
Masking is a fast way to simulate local compression. For example, I masked and inflated the calfs areas to suggest the effect of boots. Remember: this stage is a blockout. Precision comes later.
Brushes and tools that speed up believable fabric details
Beyond ZBrush’s native toolkit, a few custom brushes can make a significant difference in the speed of the sculpting workflow. The Gio Brush acts as a refined version of the Dam Standard, producing subtle, controlled creases and ridges that are ideal for defining main seams and accents. For drapery, Compression Falls is perfect for quickly generating small, generic wrinkles, helping to speed up the creation of believable material tension. When it comes to building volume, I rely on the Clean Builder Brush to construct forms without the heavy stacking artifacts of standard clay brushes, while FormSoft is essential at high subdivision levels for shifting volume while preserving surface detail.
I also like to alternate stroke types to suggest both ridges and fall lines around seams and panels using the Alt key.
When to use Marvelous Designer and how to bring the simulation back
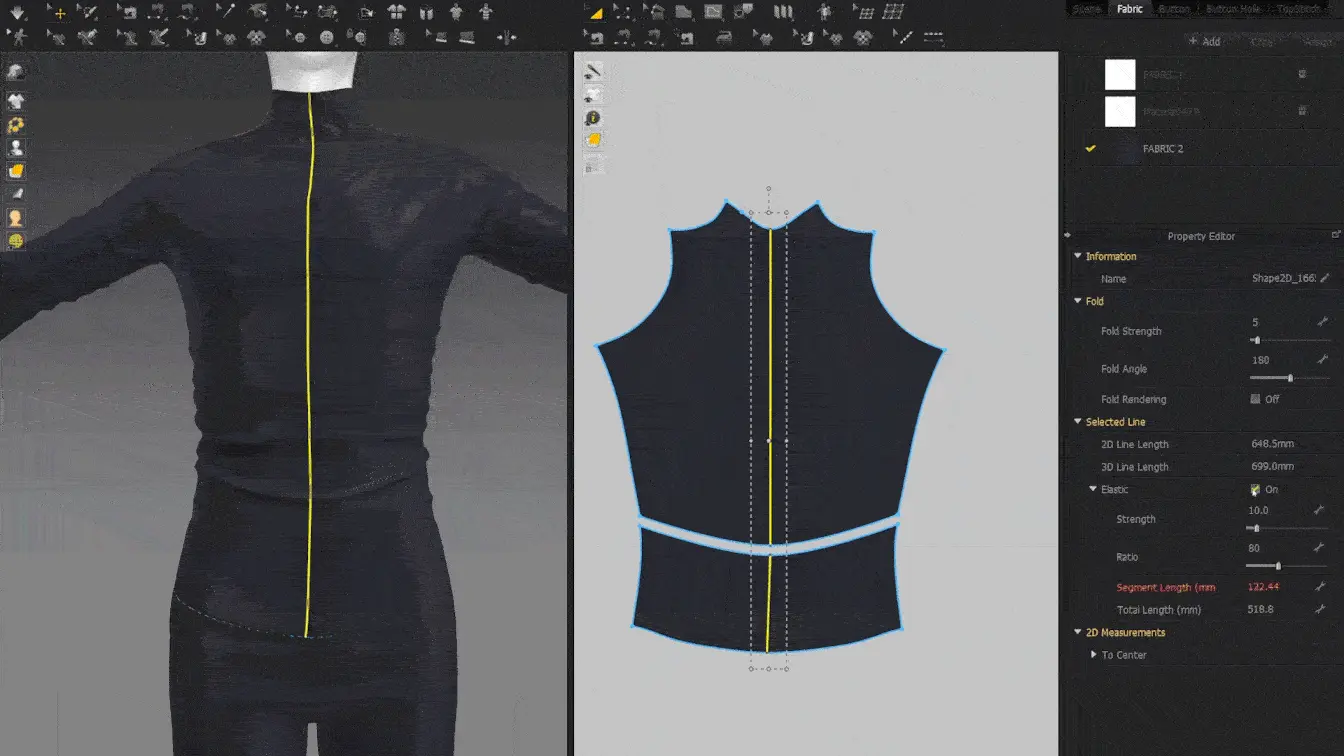
Simulating the suit in Marvelous Designer is a lot of fun and produces a more physically accurate set of folds and material behavior. The process begins by duplicating the base mesh and isolating the suit area before running a quick ZRemesher pass to lighten the geometry. I exported both the avatar and the suit to Marvelous Designer, if the suit has existing UVs, you can use them as 2D patterns to facilitate immediate stitching and simulation. You can then refine the look by tweaking shrinkage width and warp values to manage horizontal and vertical compression, allowing you to dictate wrinkle density without changing the garment's actual size. Once ready, export the simulated mesh back to ZBrush for cleanup, including ZRemeshing, projecting details from history, and polishing the surface into clean quads.
Project the simulated suit onto the base mesh
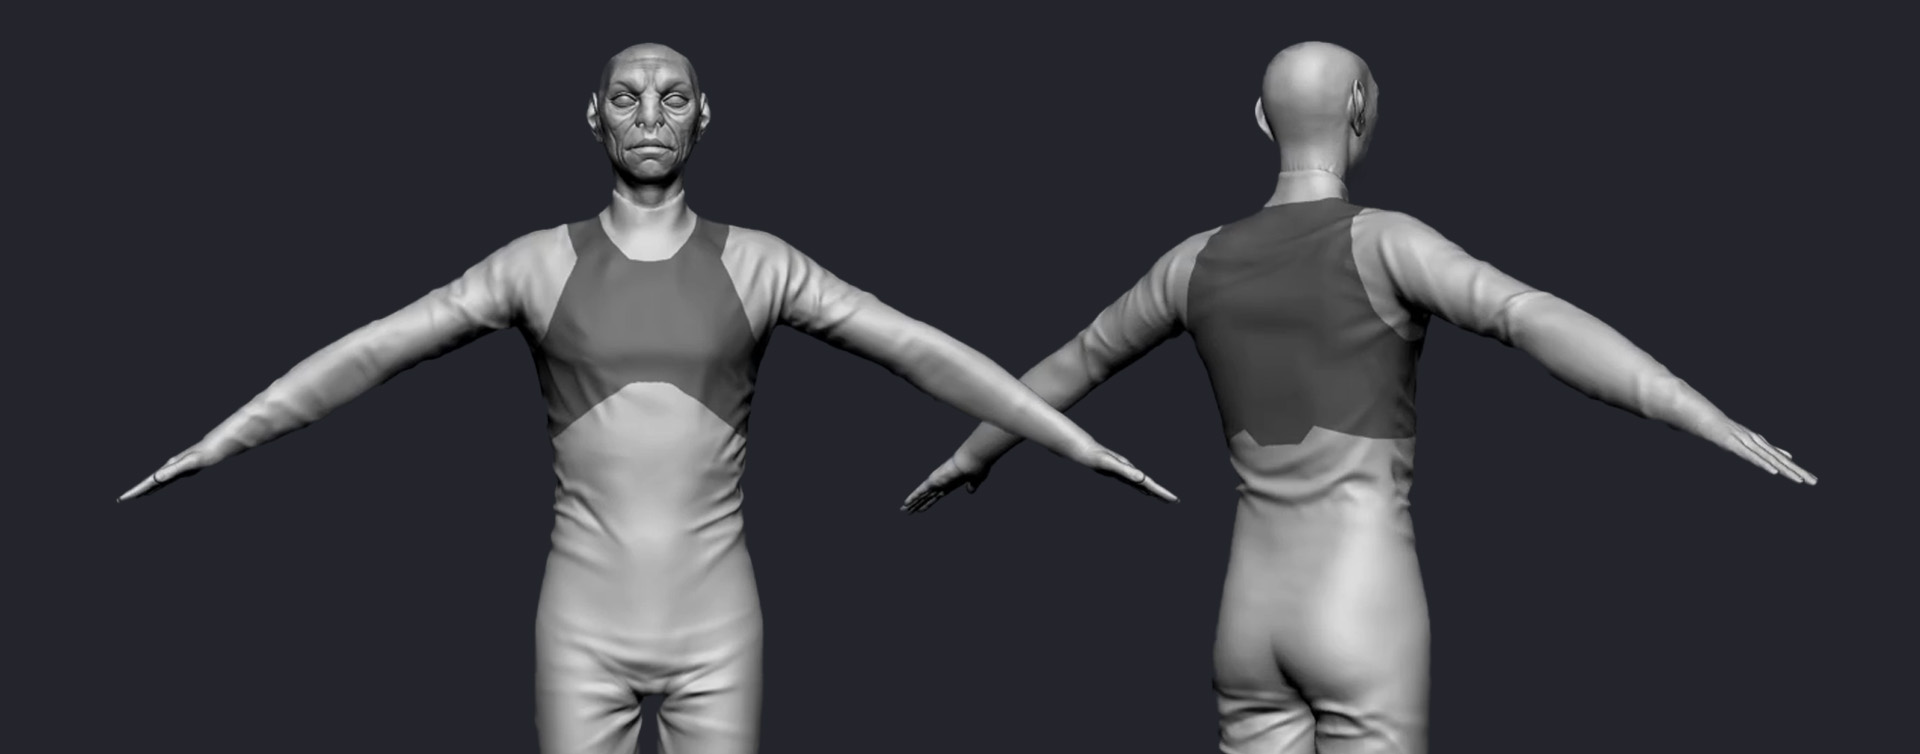
Character Creator 5 now supports subdivision levels up to 2 on the visible geometry. To fully leverage that and showcase the capability, I wanted the suit to be part of the main base mesh, not a separate object. I projected the simulated suit details onto the base at its highest subdivision level so the wrinkles and falls become part of your sculpting geometry.
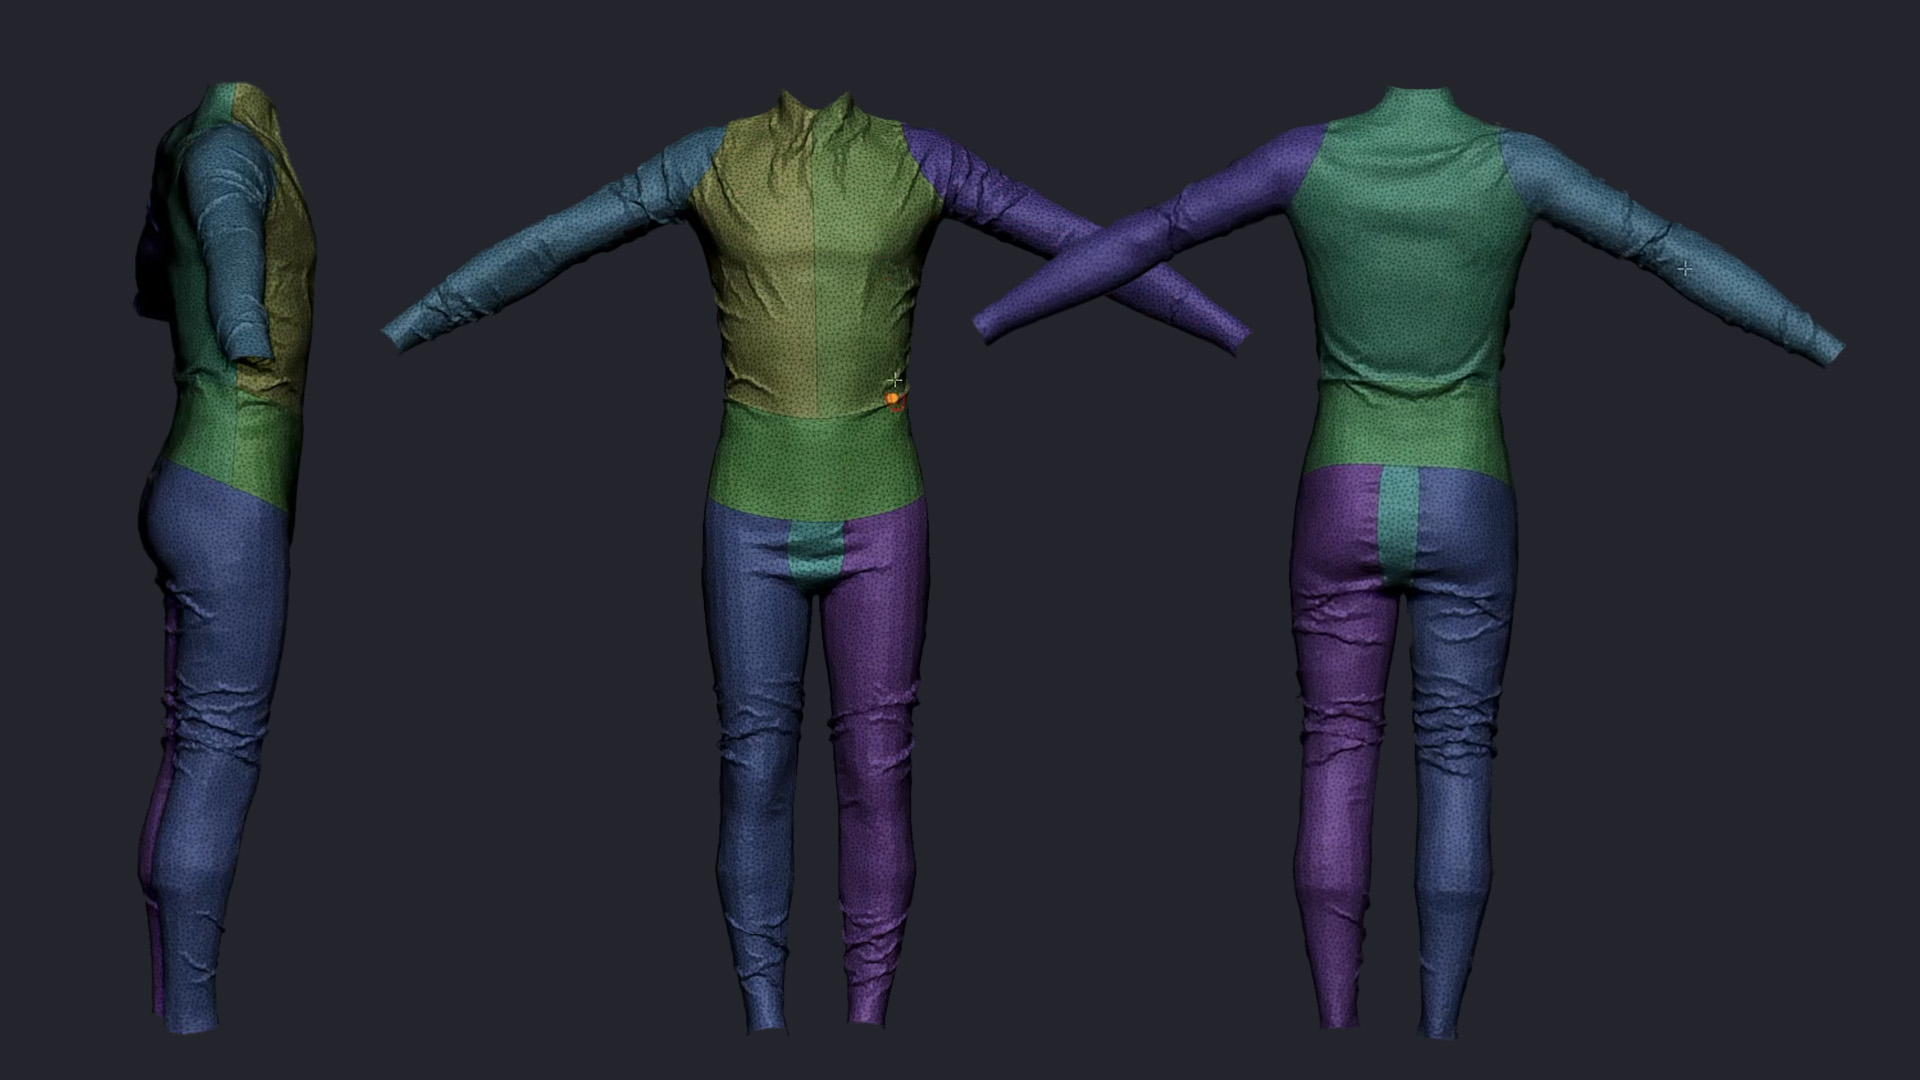
Once projected, you can hide or delete the separate suit mesh and continue refining compression and detail directly on the base. This approach preserves the original CC5 topology and ensures that subdivision data moves cleanly between ZBrush and CC5.
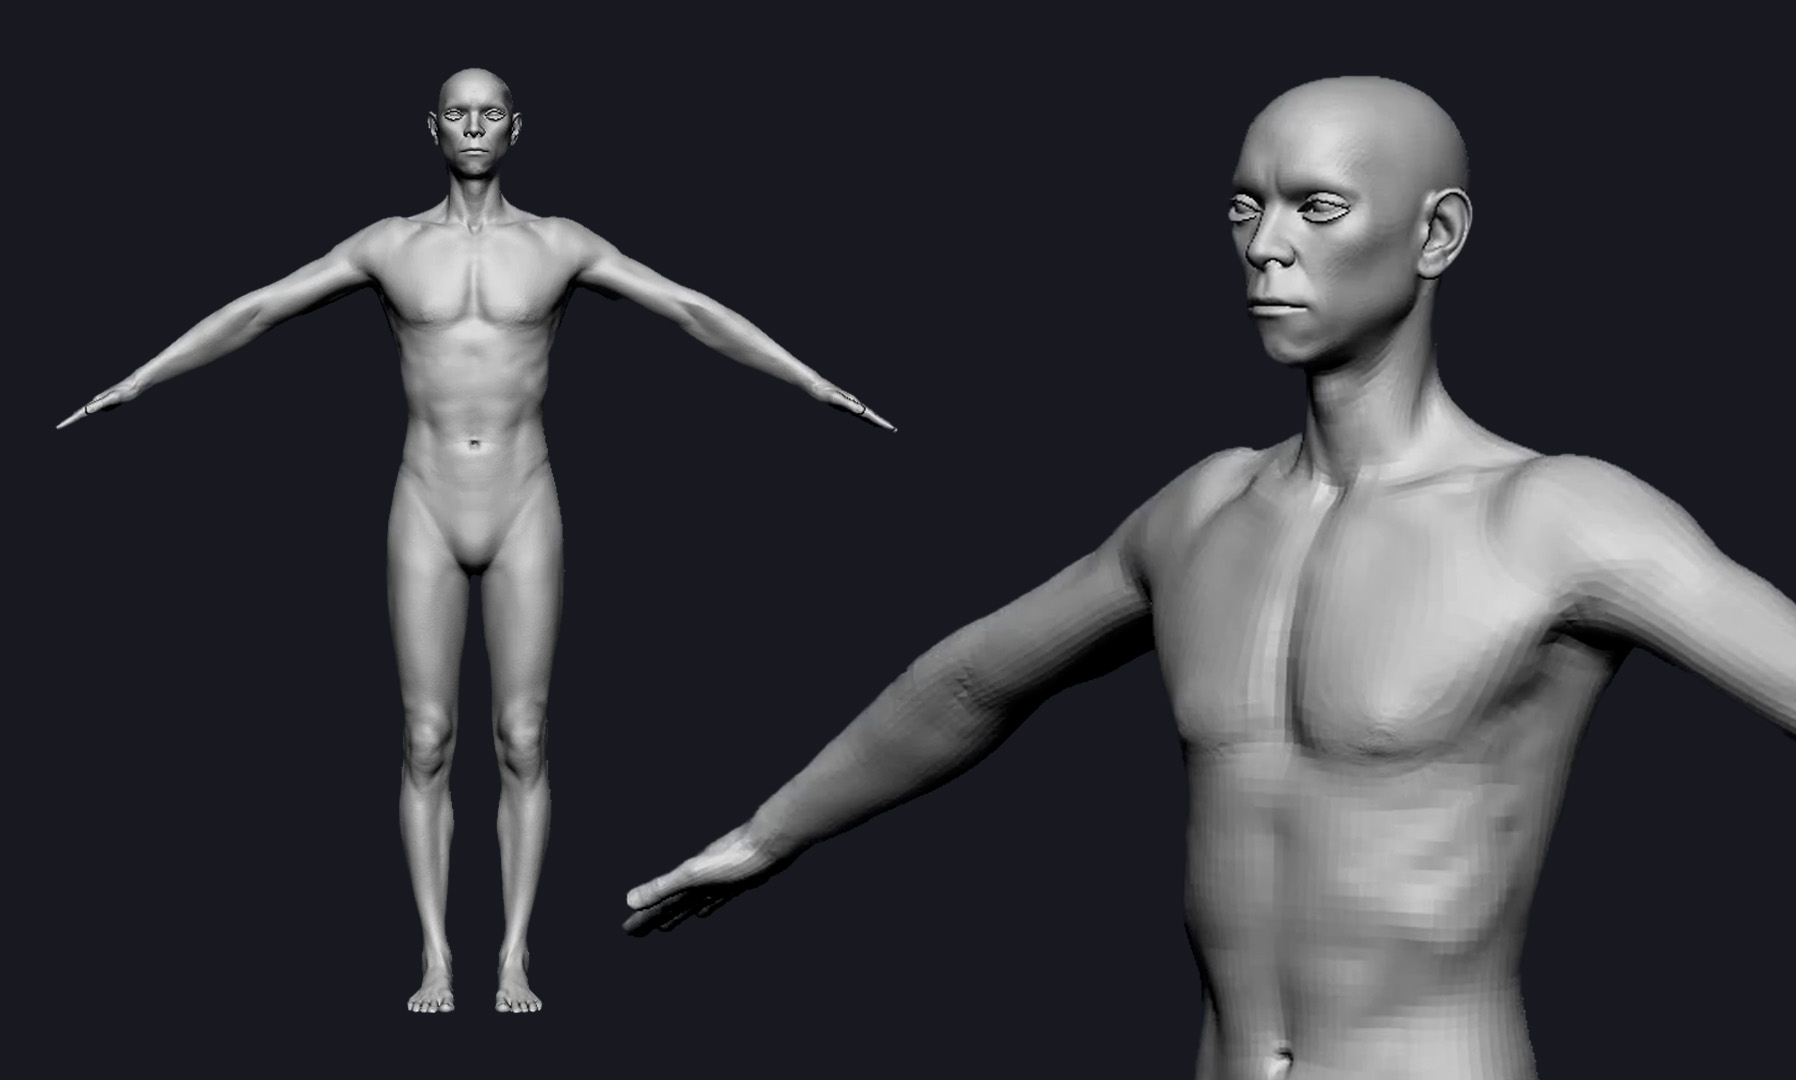
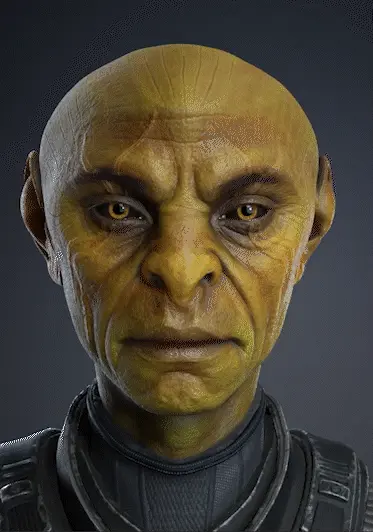
Sculpting the face, pushing toward a slightly alien look
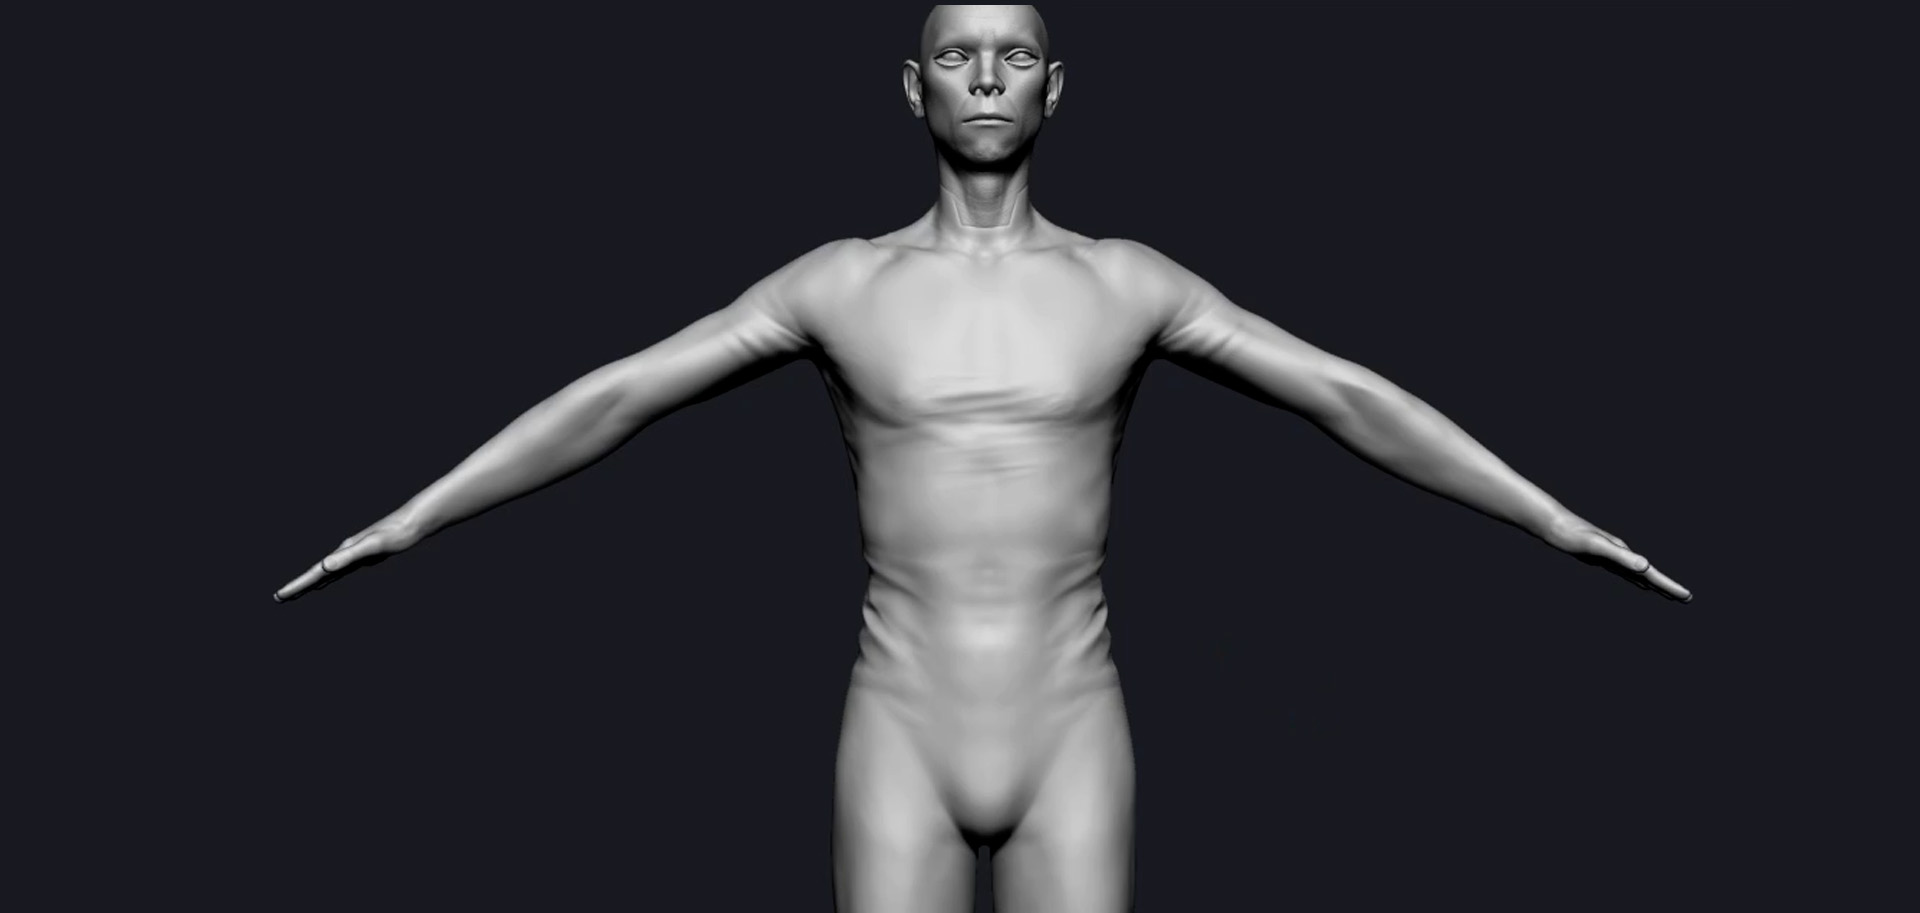
I wanted to maintain a humanoid silhouette but push proportions subtly to achieve an otherworldly vibe. The CC5 base typically includes clean polygroups, which makes isolating and masking facial features quick and accurate.

If you follow along with this process, I suggest you work at lower subdivision levels to establish main volumes, then refine by carving sharper surface details and creases with the Clean Build Brush and a strong Dam Standard or GIO brush.

Use FormSoft at higher subdivisions to preserve the underlying detail while nudging forms into place.
Send it back to Character Creator 5: GoZ Plus and subdivision control
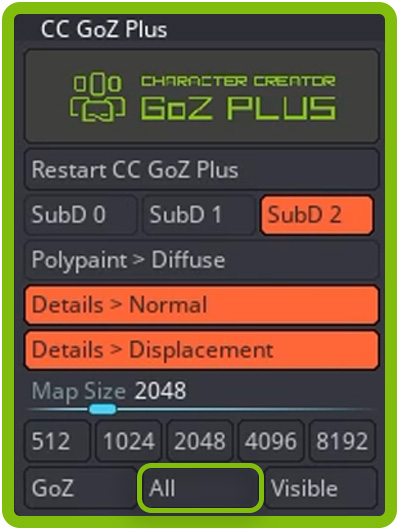
The GoZ Plus plugin is essential for automating exports back to CC5 with a single click, provided you configure a few key settings correctly. Since CC5 is now capable of handling higher resolution geometry, I recommend setting the export to Subdivision 2 to retain the best possible fidelity for both the viewport and rendering. Conversely, it is usually best to disable Polypaint to Diffuse unless your texturing is fully complete.
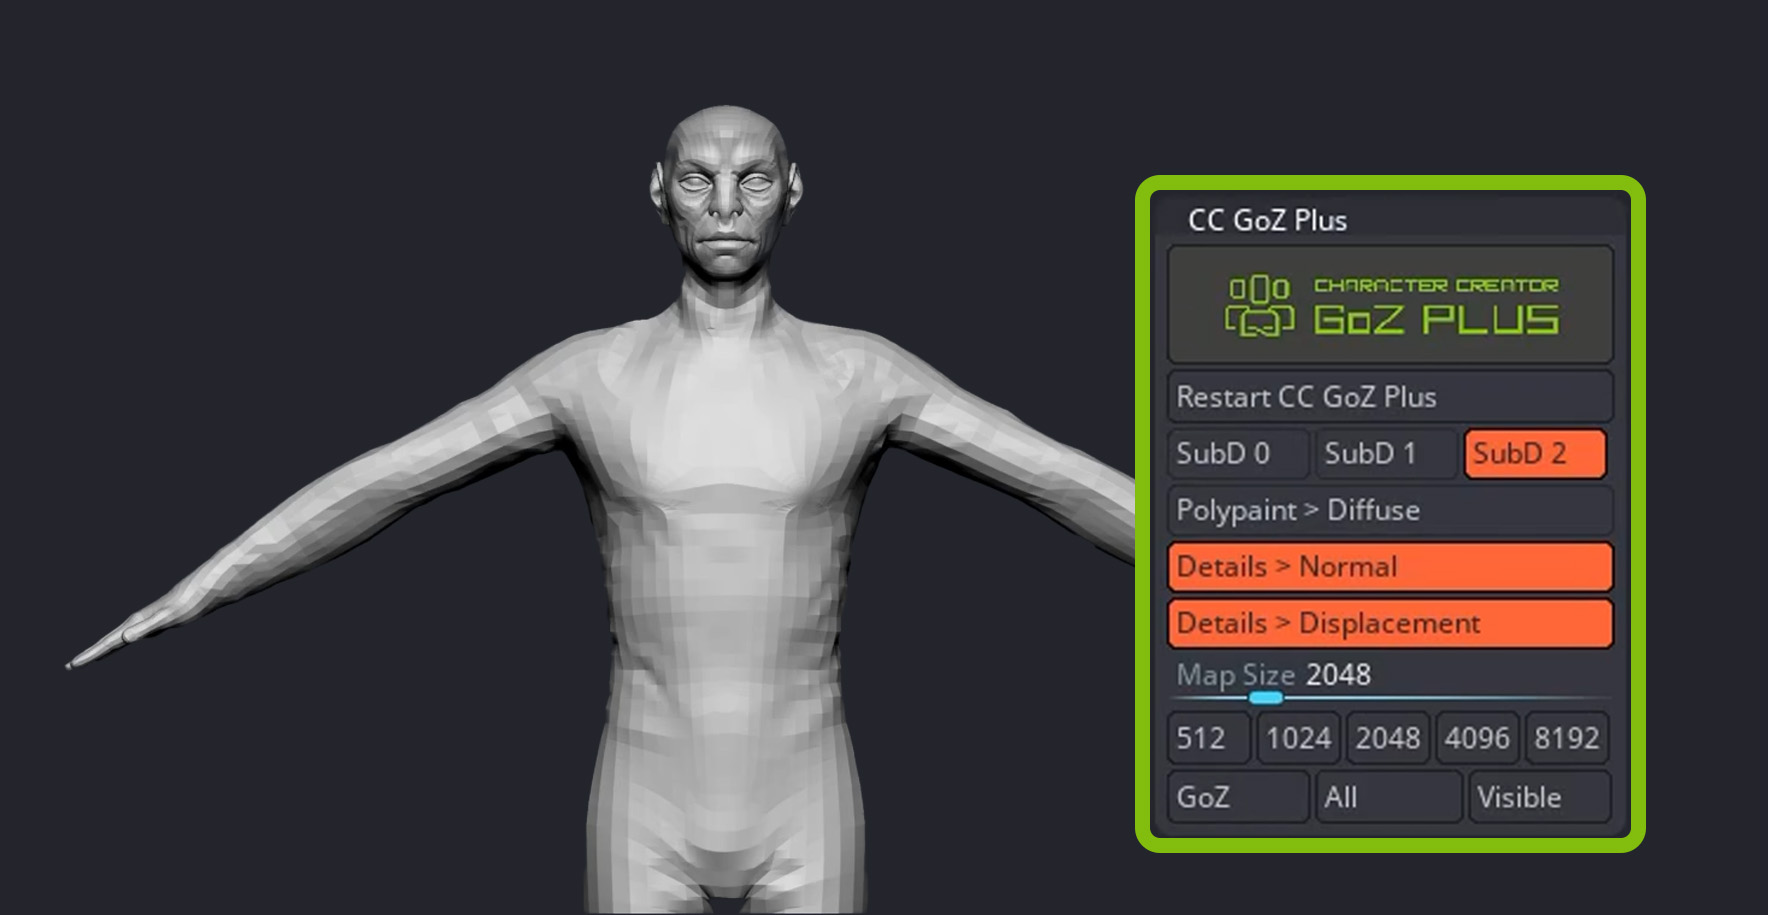
Finally, if you have altered the character's proportions during sculpting, ensure that you enable 'Adjust Bones to Fit Morph'; this helps automatically realign the rig to fit your new silhouette.
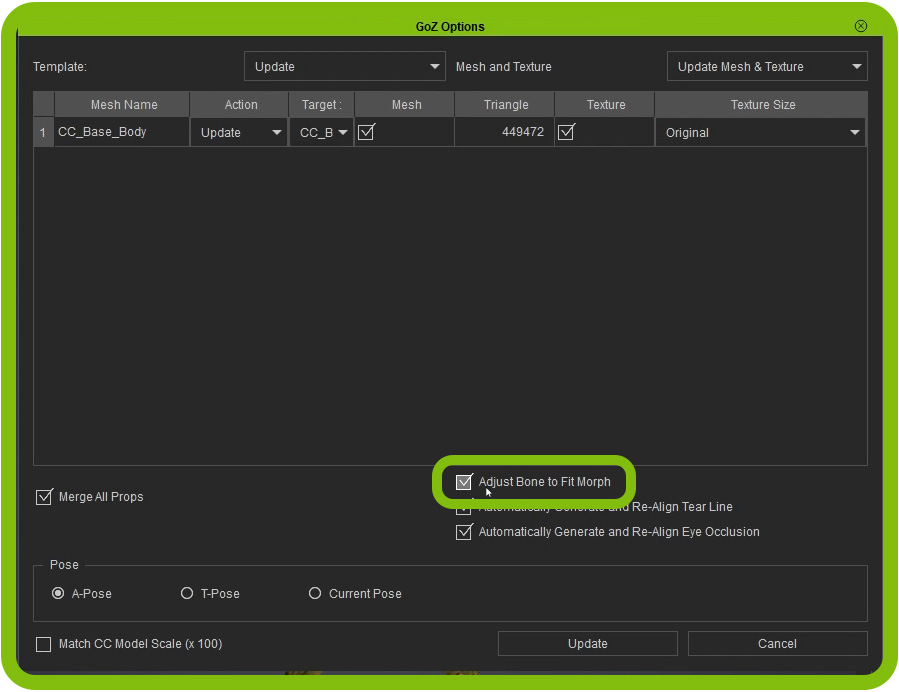
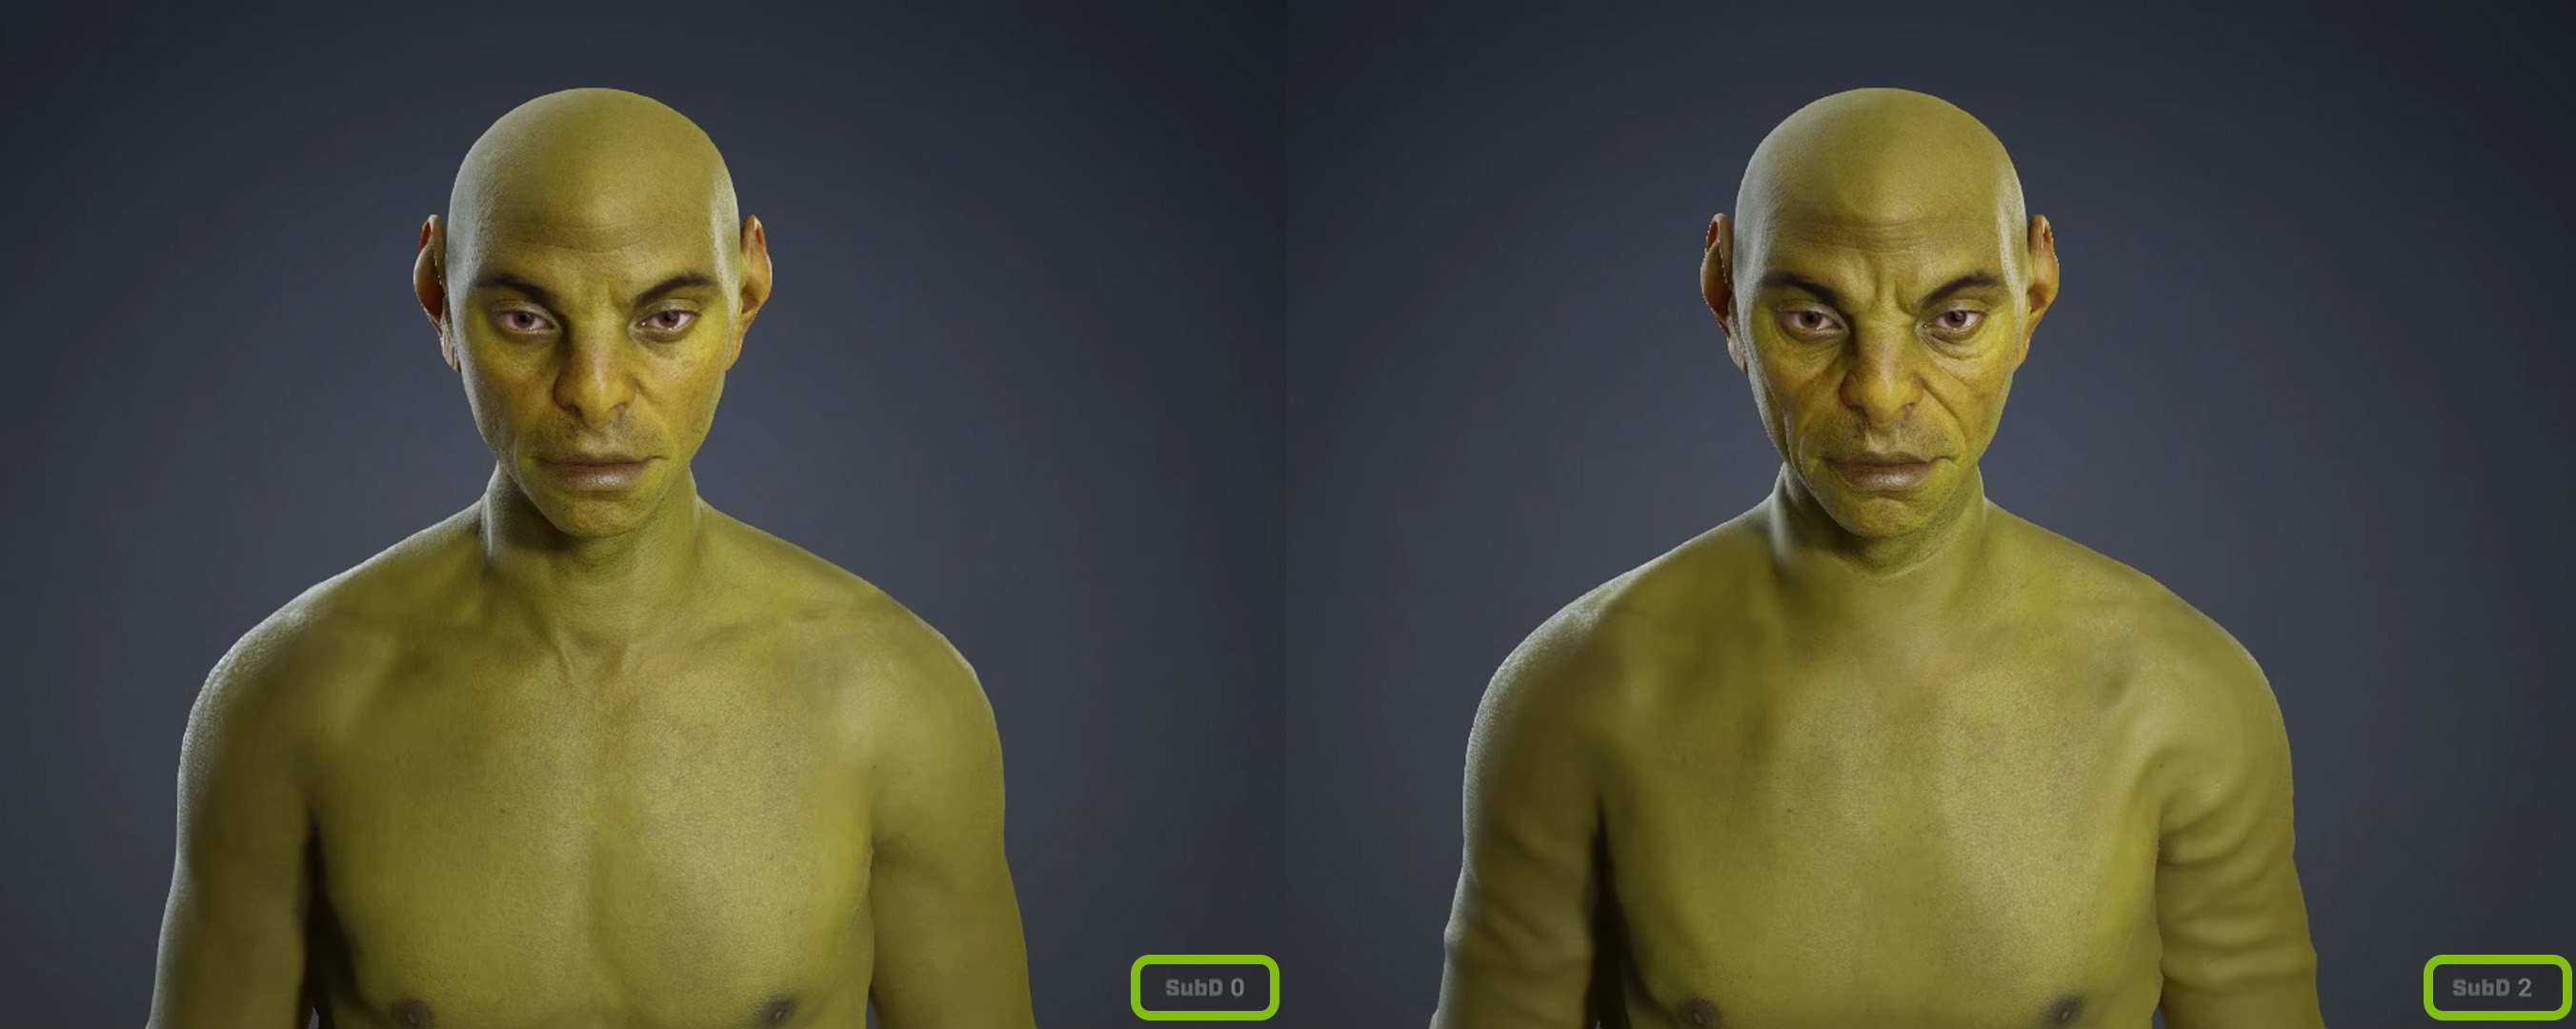
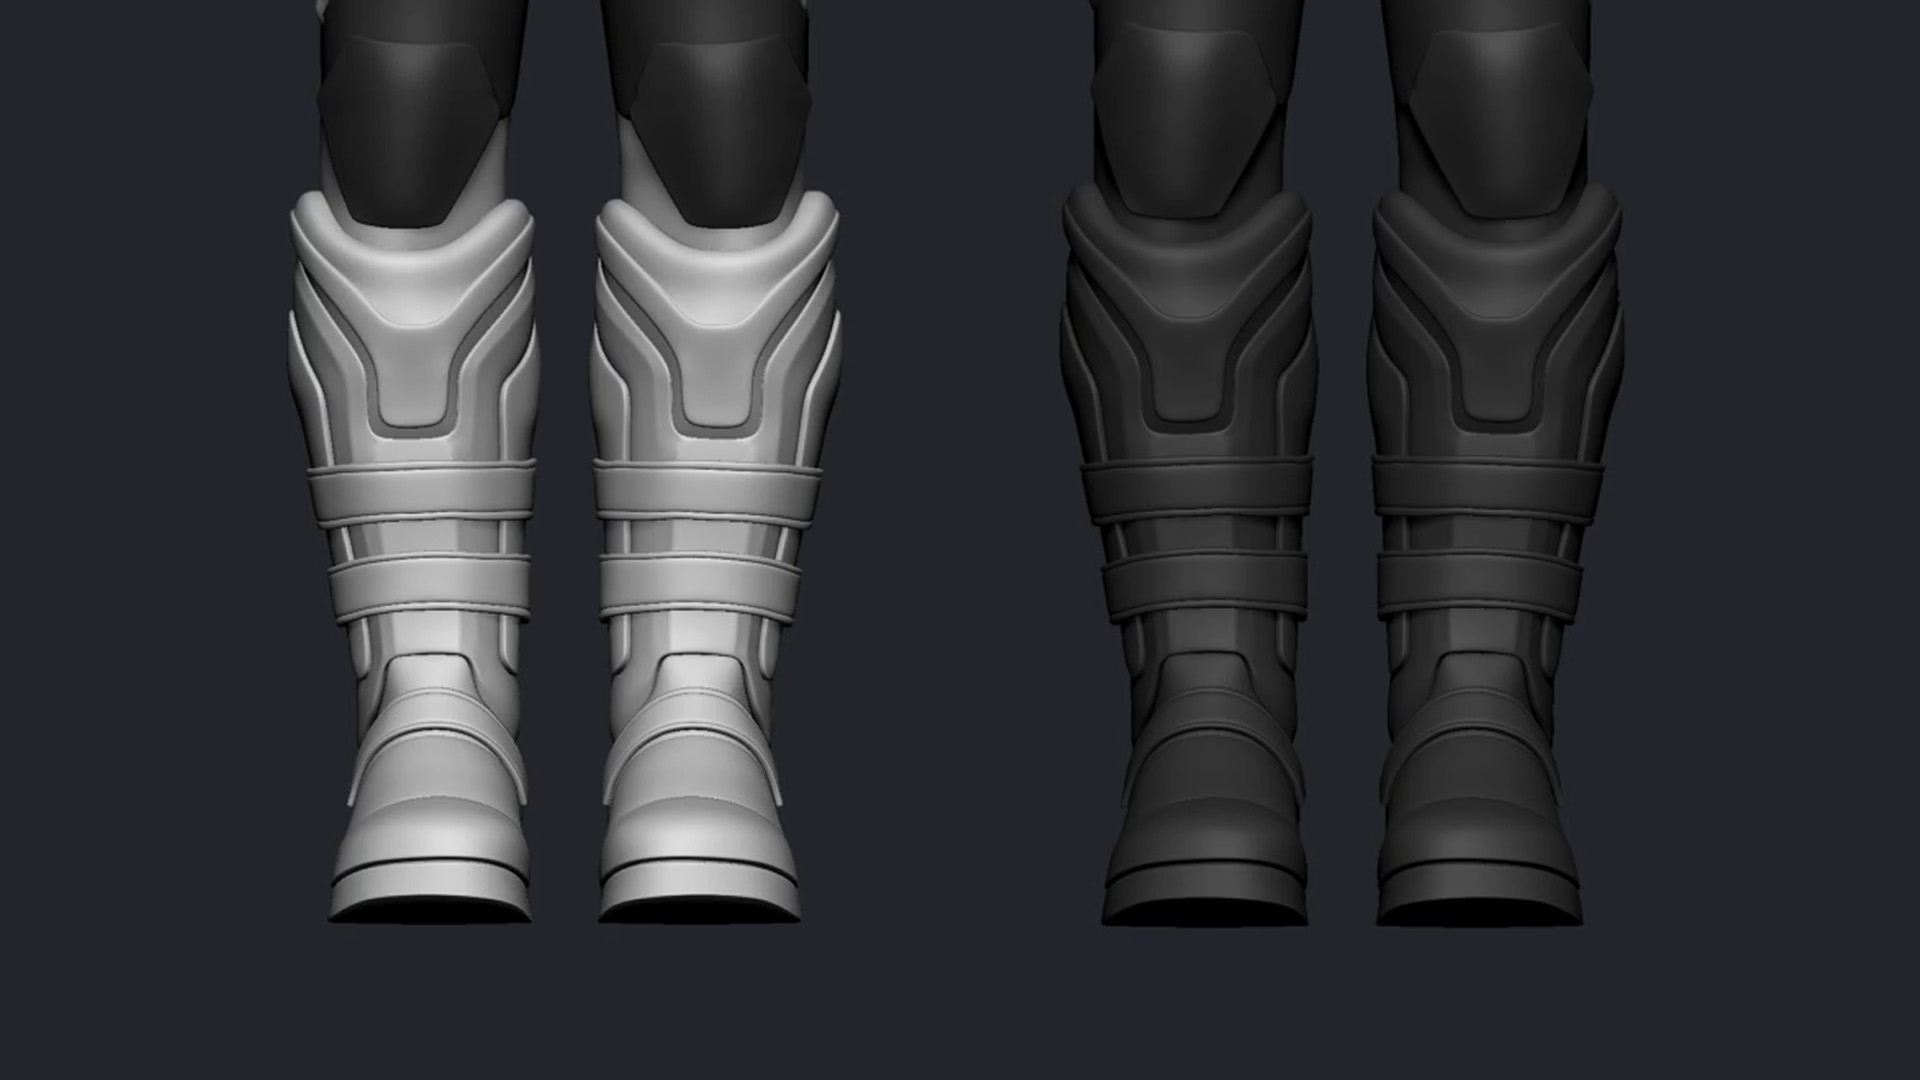
Once updated, the Modify panel in CC5 includes sub‑D level controls for viewport and render. When set to Subdiv 2, you view real geometry at that level, producing much cleaner silhouettes and deformations compared with the old workflow.
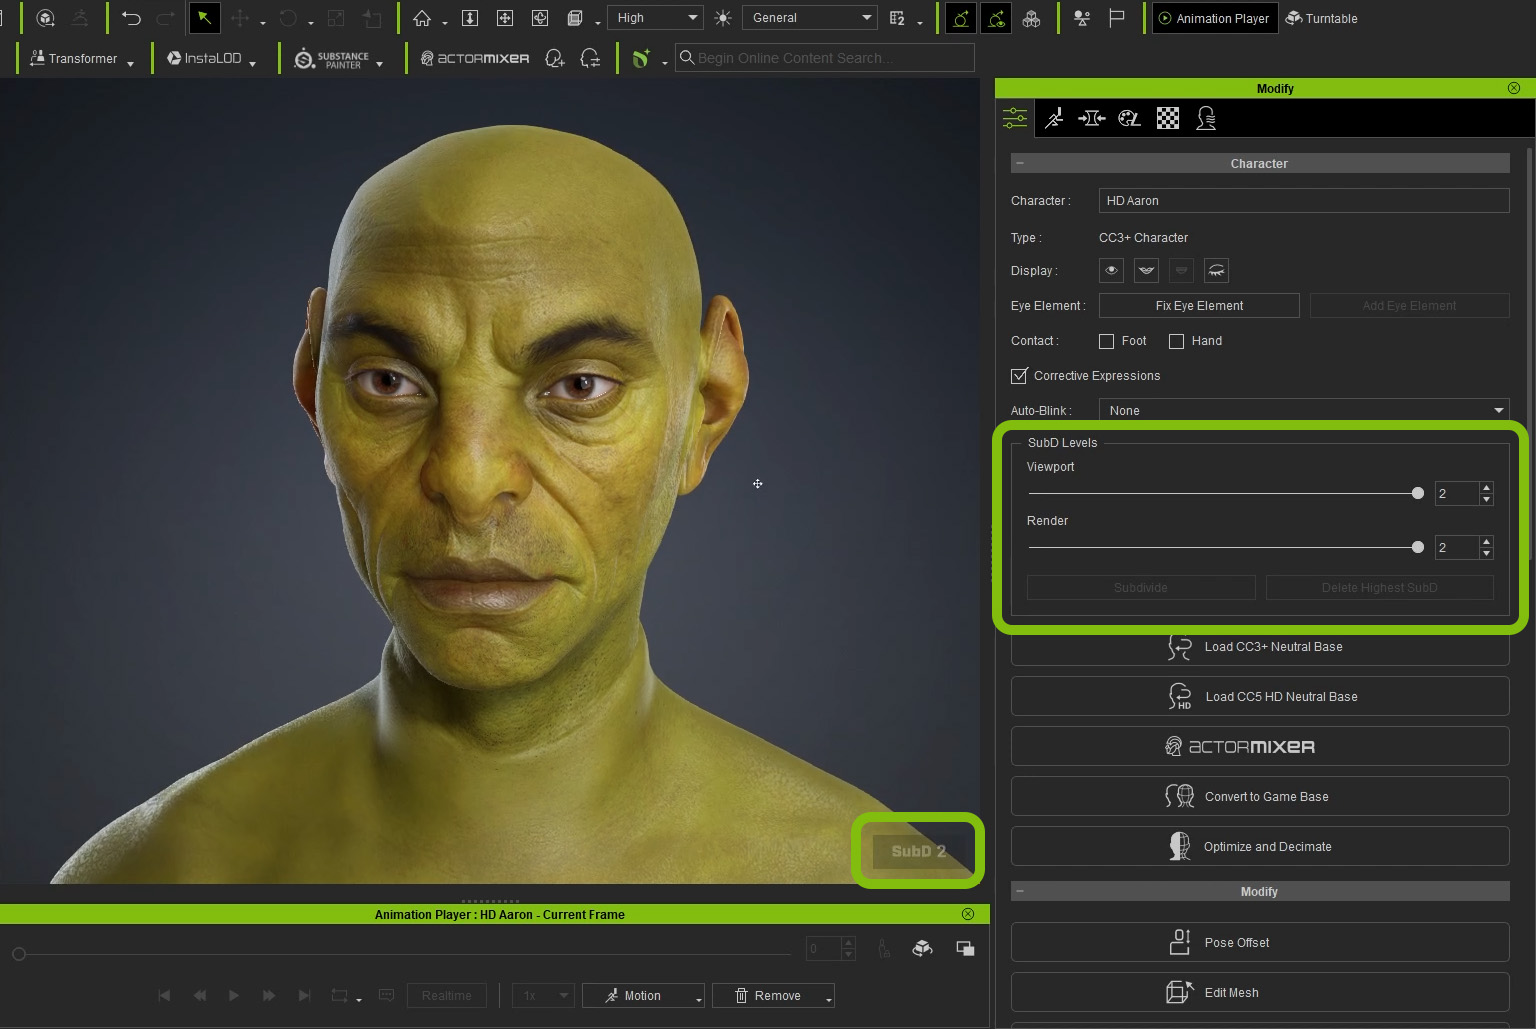
To maximize efficiency in this pipeline, I leverage several key features of Character Creator 5. The native subdivision level support is a game-changer, allowing me to view and render real subdivided geometry for superior silhouette fidelity without relying on displacement maps or things like that. The GoZ Plus automation is equally critical, streamlining the round-trip process between ZBrush and CC5. I also rely on Adjust Bones to Fit Morph to ensure the rig remains functional after significant shape changes. The ability to preserve polygroups and morph targets grants me precise control over facial and accessory isolation during localized edits.
Defining the Chest Plate with Masking and Extraction
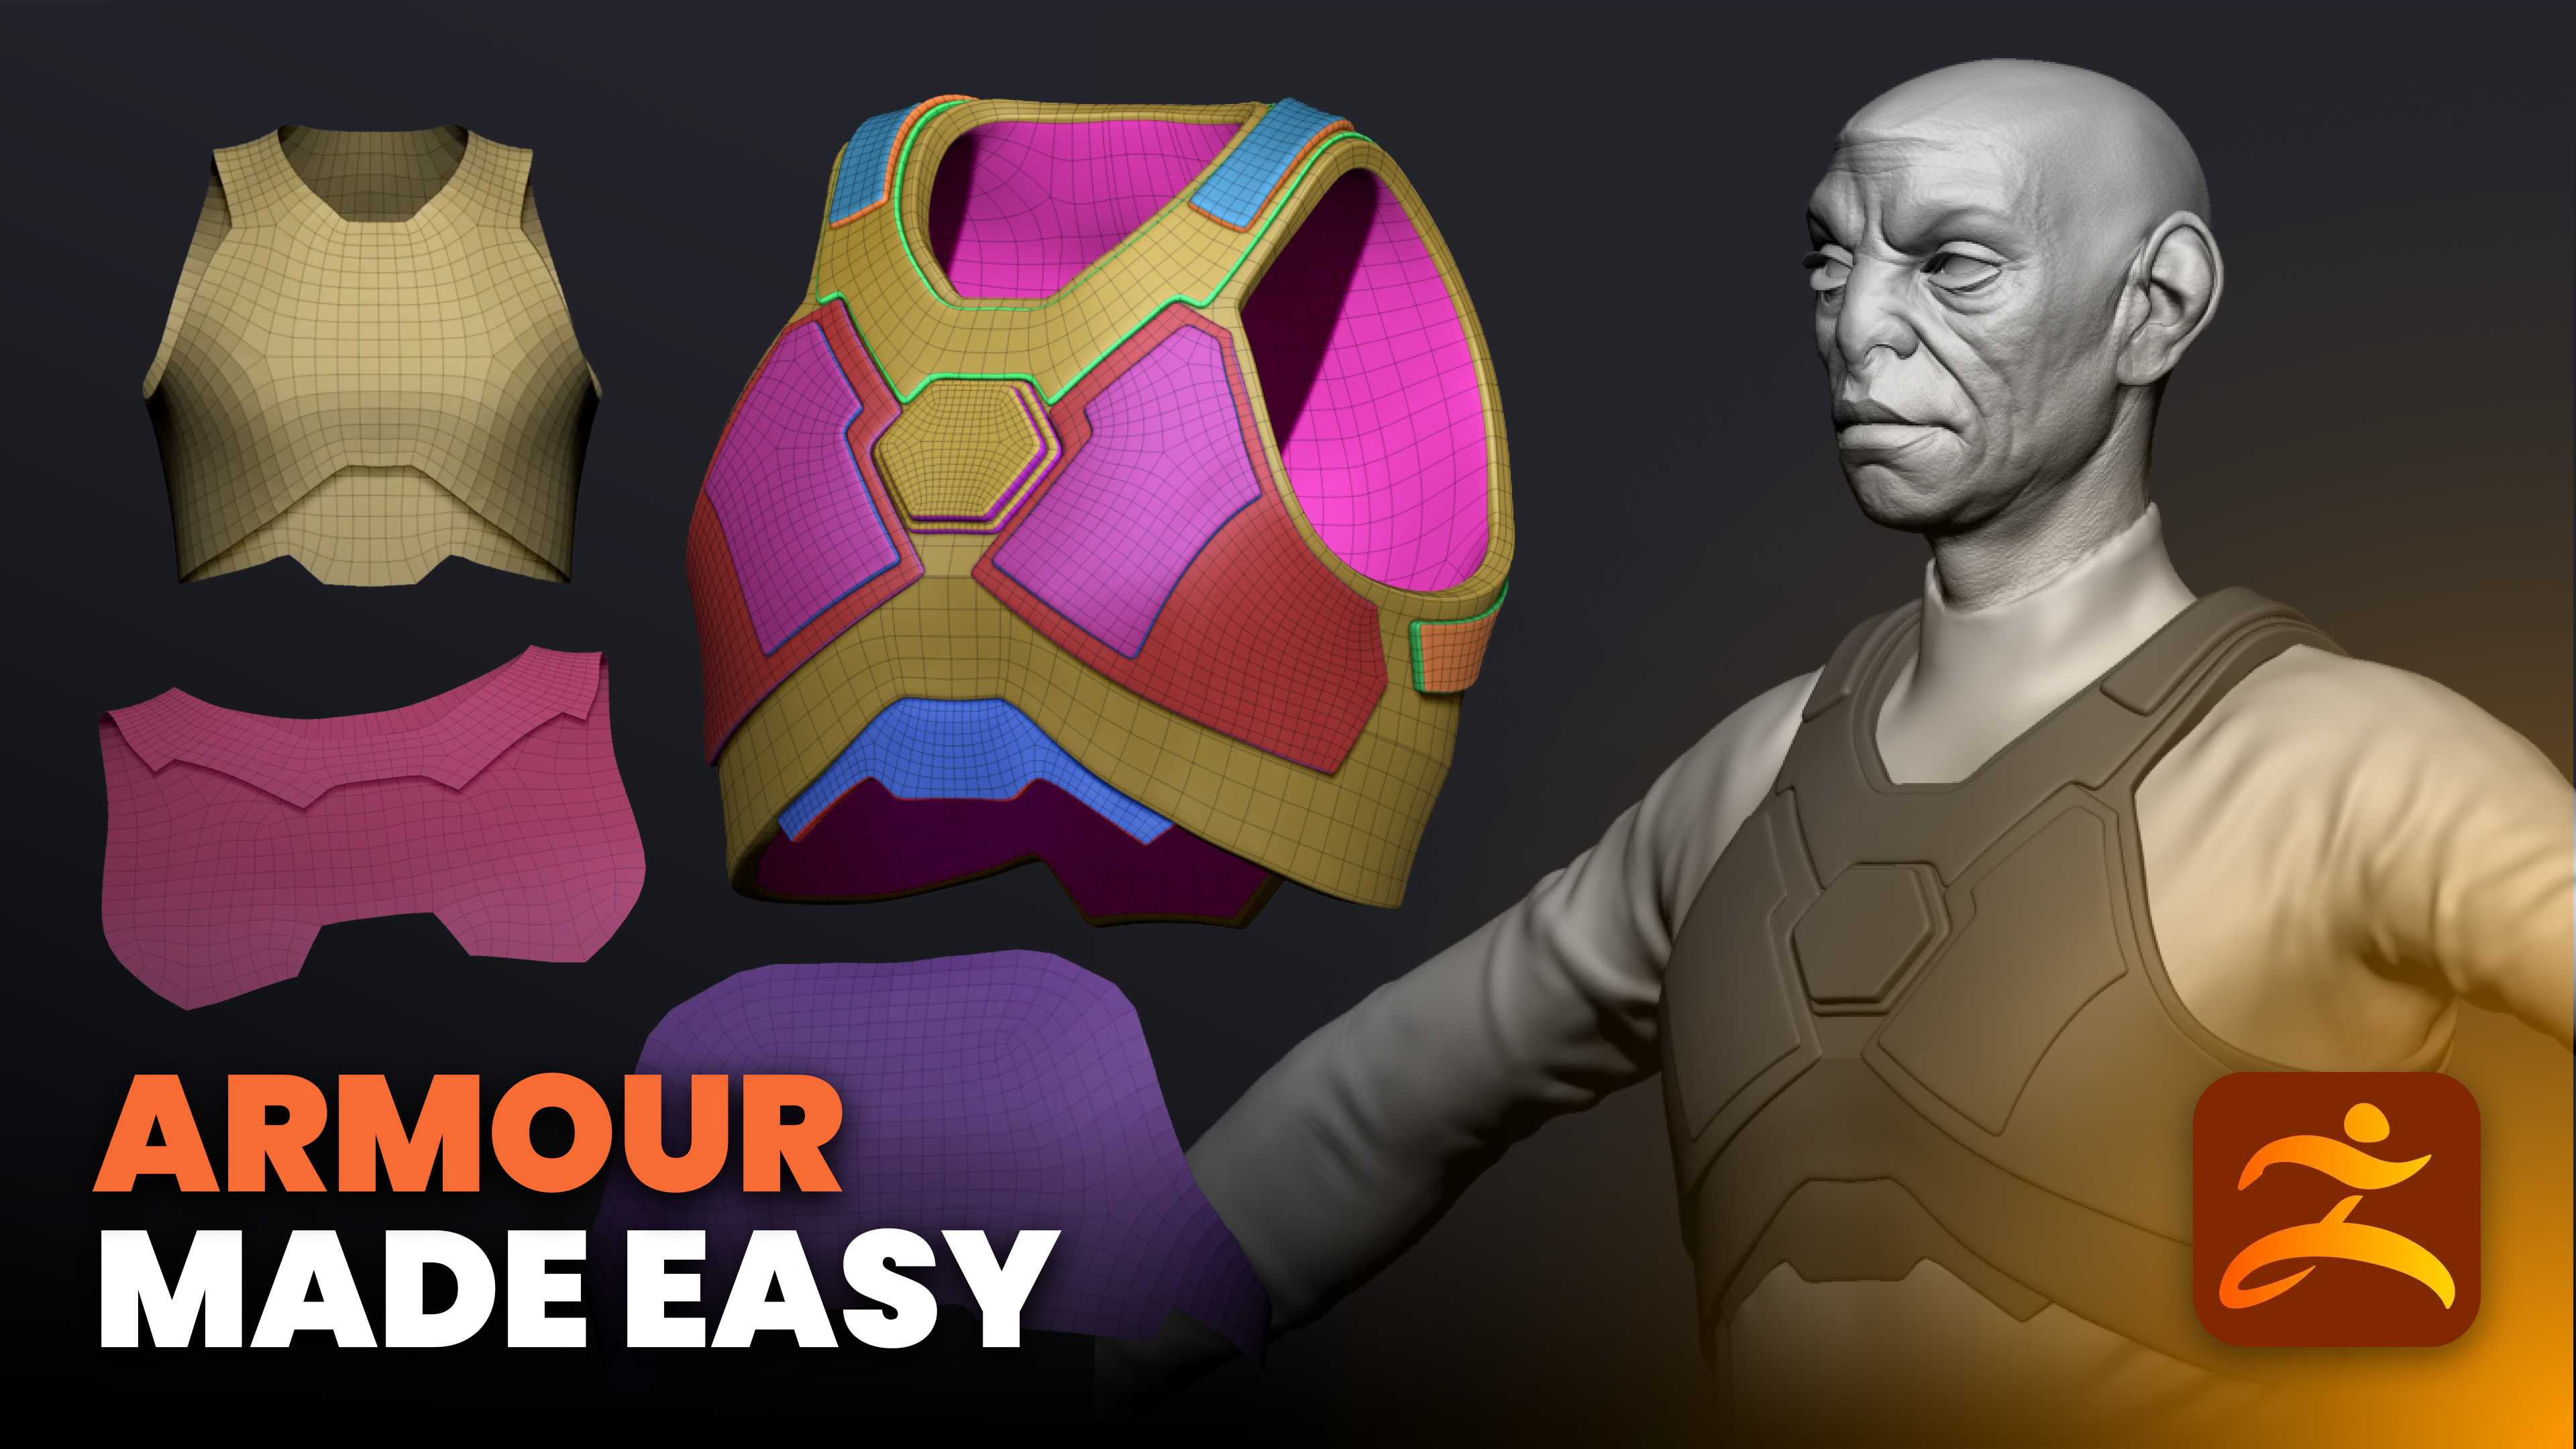
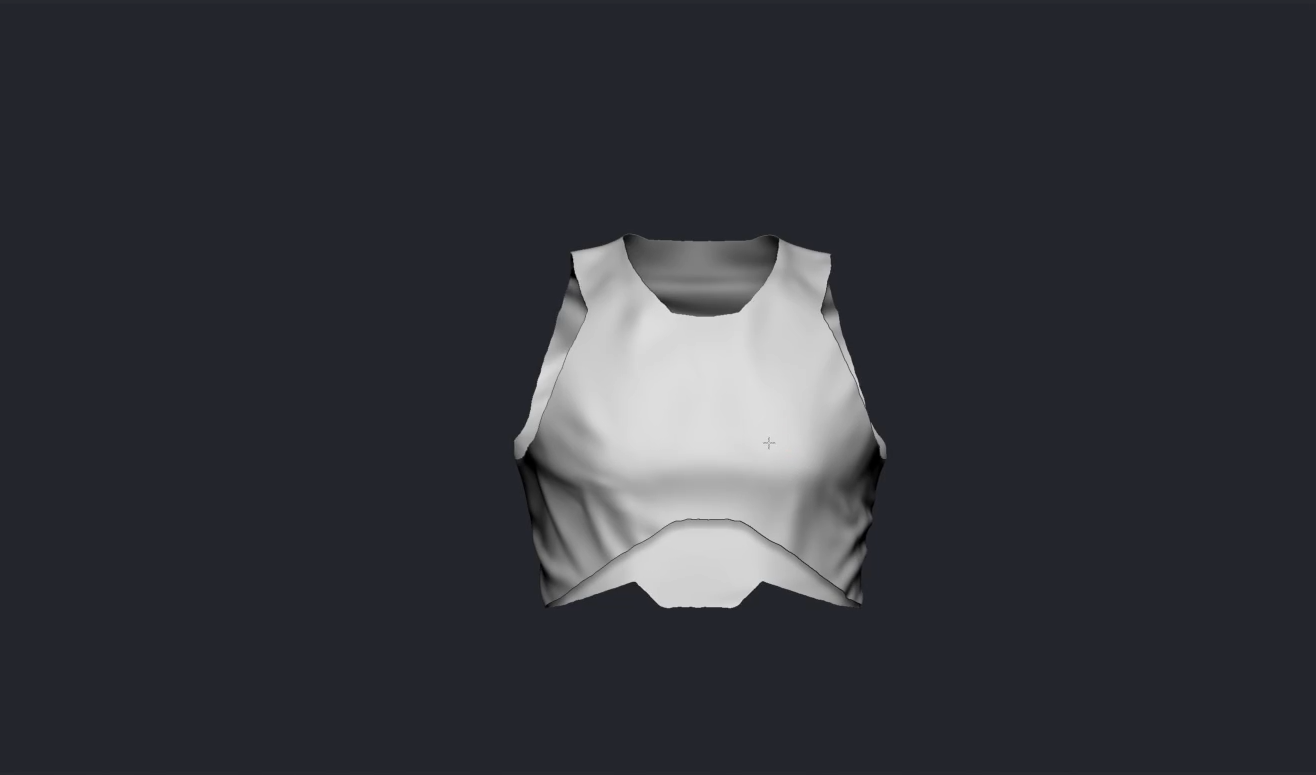
Now moving on to the extra assets. I went back to ZBrush and started building the pieces. The fastest way to create armor plates that hug the body is to work directly on the highest subdivision level of your base mesh and use masks as the blueprint. I start with Mask Lasso with symmetry enabled to block in the general silhouette of the chest plate. Then I refine the edges with a sharper masking brush to get crisp panel borders.
Once the mask is solid, I use the Extract function in the SubTool palette to create a new single-sided mesh from that mask. Set the thickness to zero for the preview, accept the extraction, and you get a clean, single-sided piece that perfectly follows the body surface.
From here, I run a quick automatic retopology pass. This cleans up the mesh and gives a usable base for later thickness and detailing.
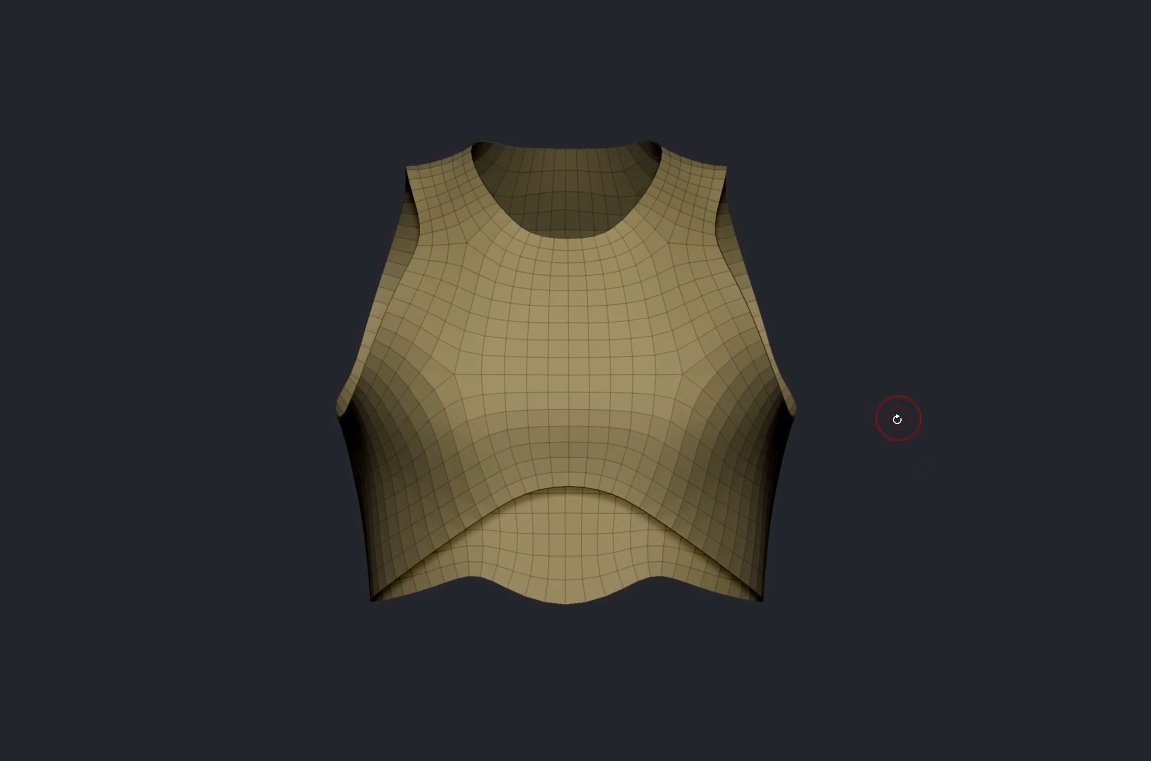
Rapidly Creating Additional Panels
For layered armor, I often duplicate a plate, subdivide it, and cut panel lines into the duplicated mesh. Using selection brushes, I isolate the new polygroup I want and delete the rest. It’s essentially an alternate route to extraction and gives the same result: a new, conforming piece with clean topology.
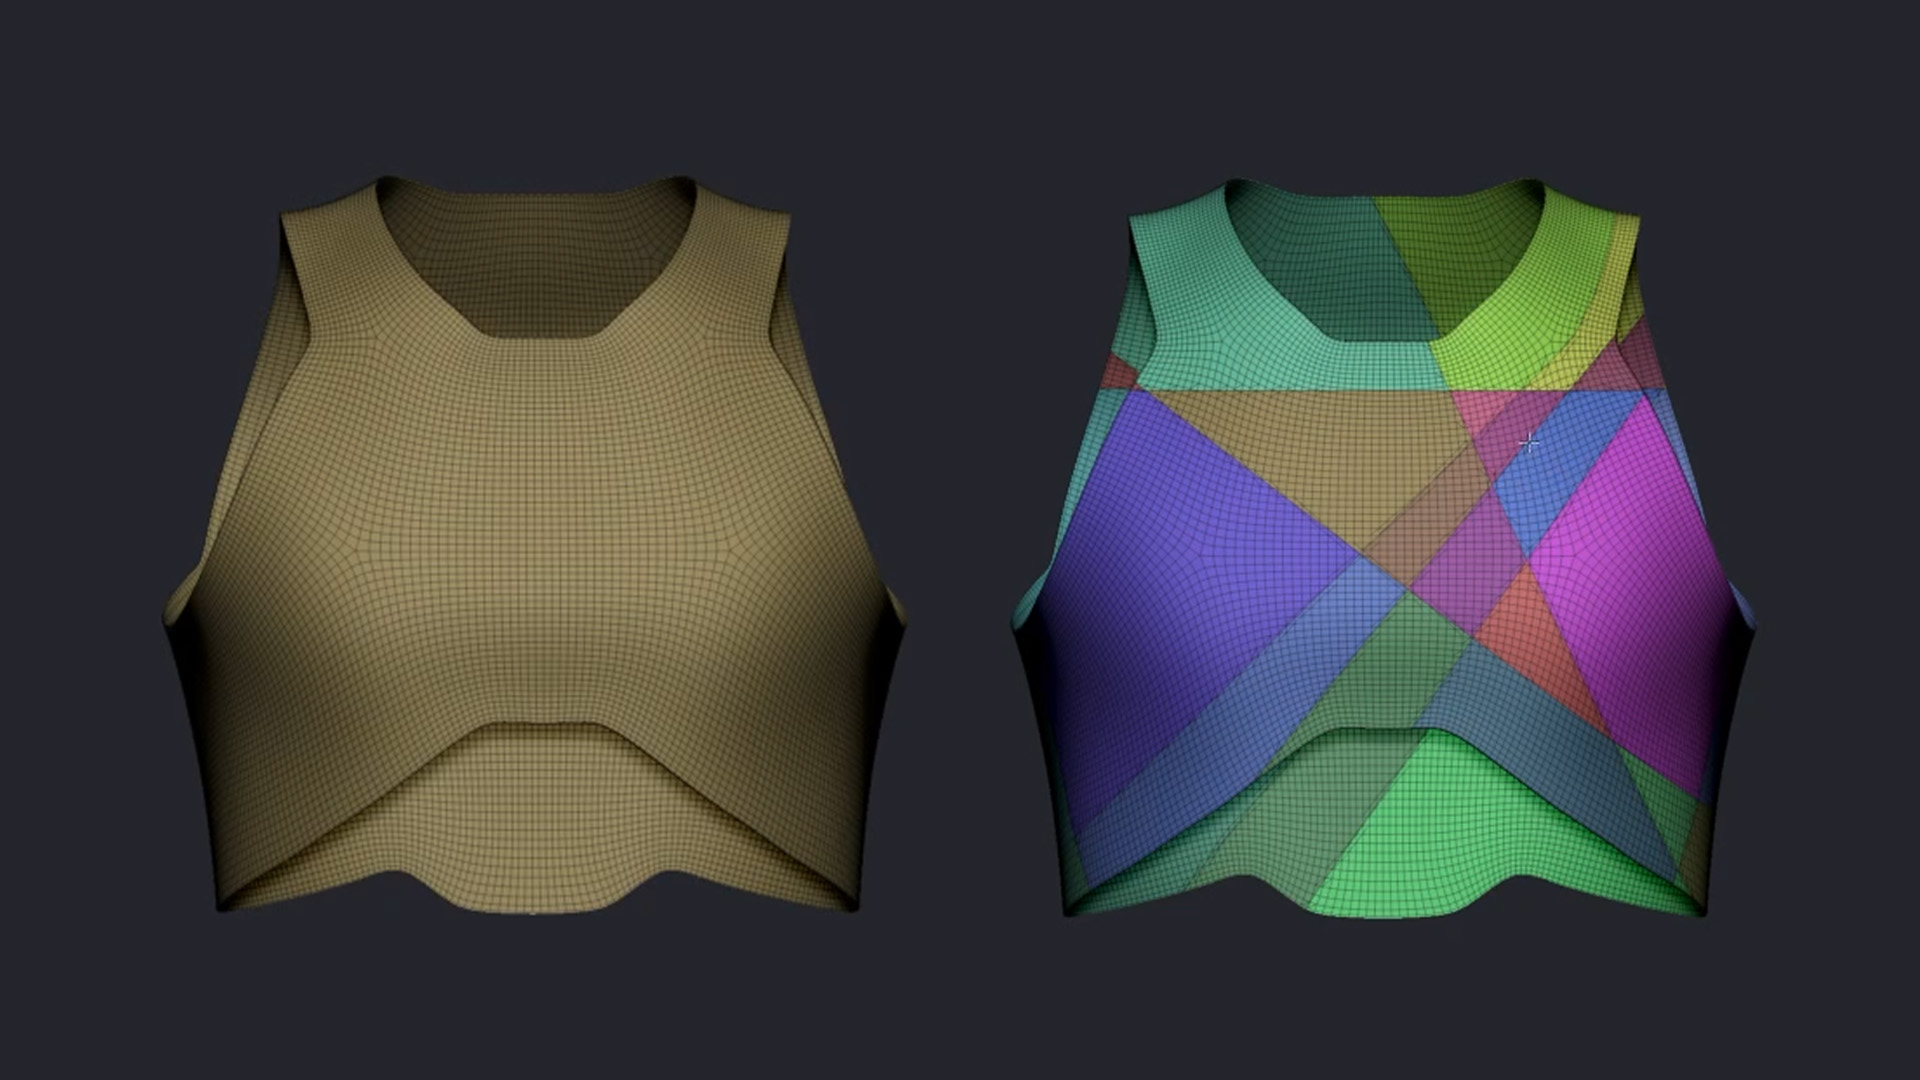
After tidying the piece with a second retopology pass you have a ready panel that stacks perfectly on the underlying plate. I find it useful to assign different display colors to plates so the hierarchy is visually clear when composing multiple layers.
Adding Thickness and Smoothness
The previous process creates single-sided meshes but they need thickness. I enable Dynamic Subdivision (dynamic of division under Geometry) to preview smoothness and thickness interactively. For final thickness, either apply the thickness via an inflate/inner extrusion workflow or convert the dynamic preview into an actual thickness-modified mesh and then polish the edges.
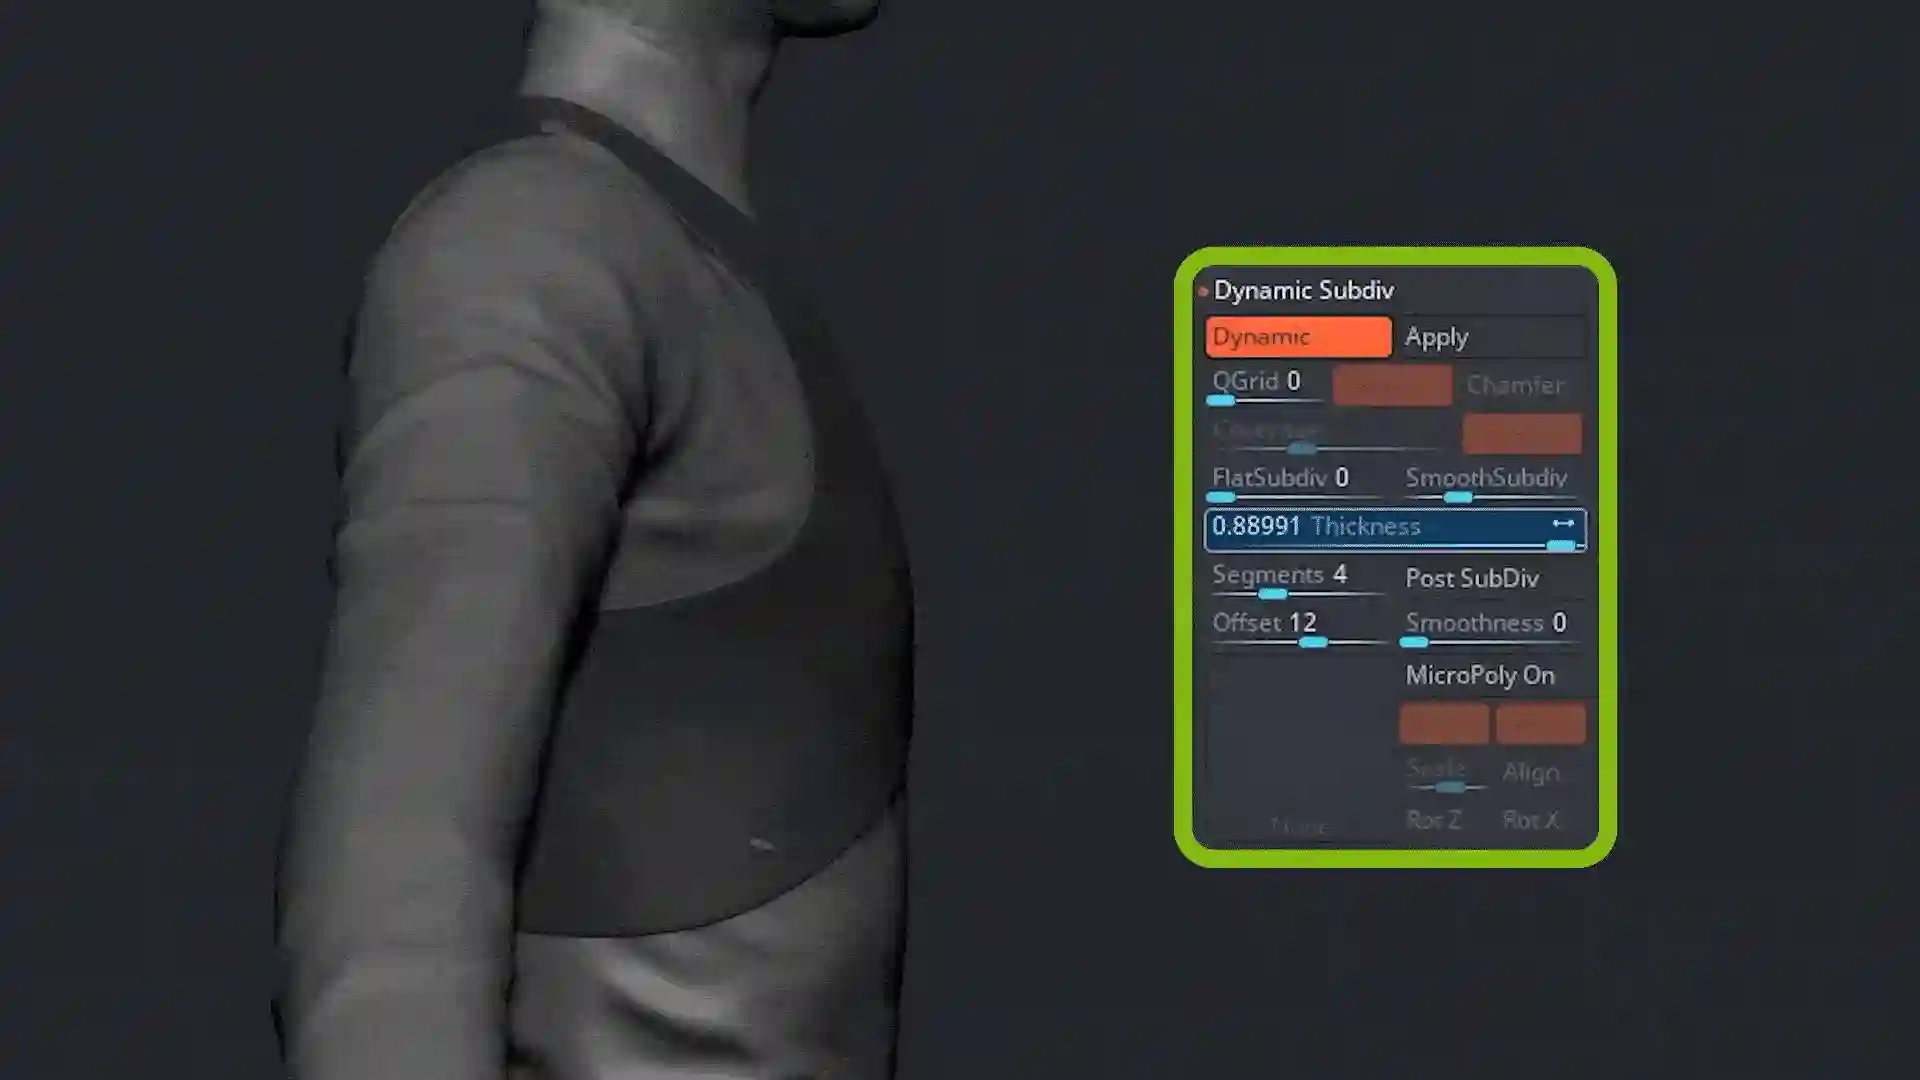
Once you have one side done, mirror and weld so you get both halves in place quickly. These two core techniques cover most of the armor panels I make.
Two Design Principles I Follow
When designing these types of armor, I adhere to a couple of principles… First, I keep things simple and separate; even the most complex designs are best broken down into simple components, with each part created as its own subtool or object. Building complexity from clear, isolated forms drastically simplifies editing, polishing, and the eventual UVing and texturing stages. Second, I always design with functionality in mind. Even when I am stylizing a character, I ground the design in believability; for example, it must look like it protects the torso while still permitting motion at the ribcage and shoulders. Letting the function inform placement, thickness, and joints definitely helps to sell the design.
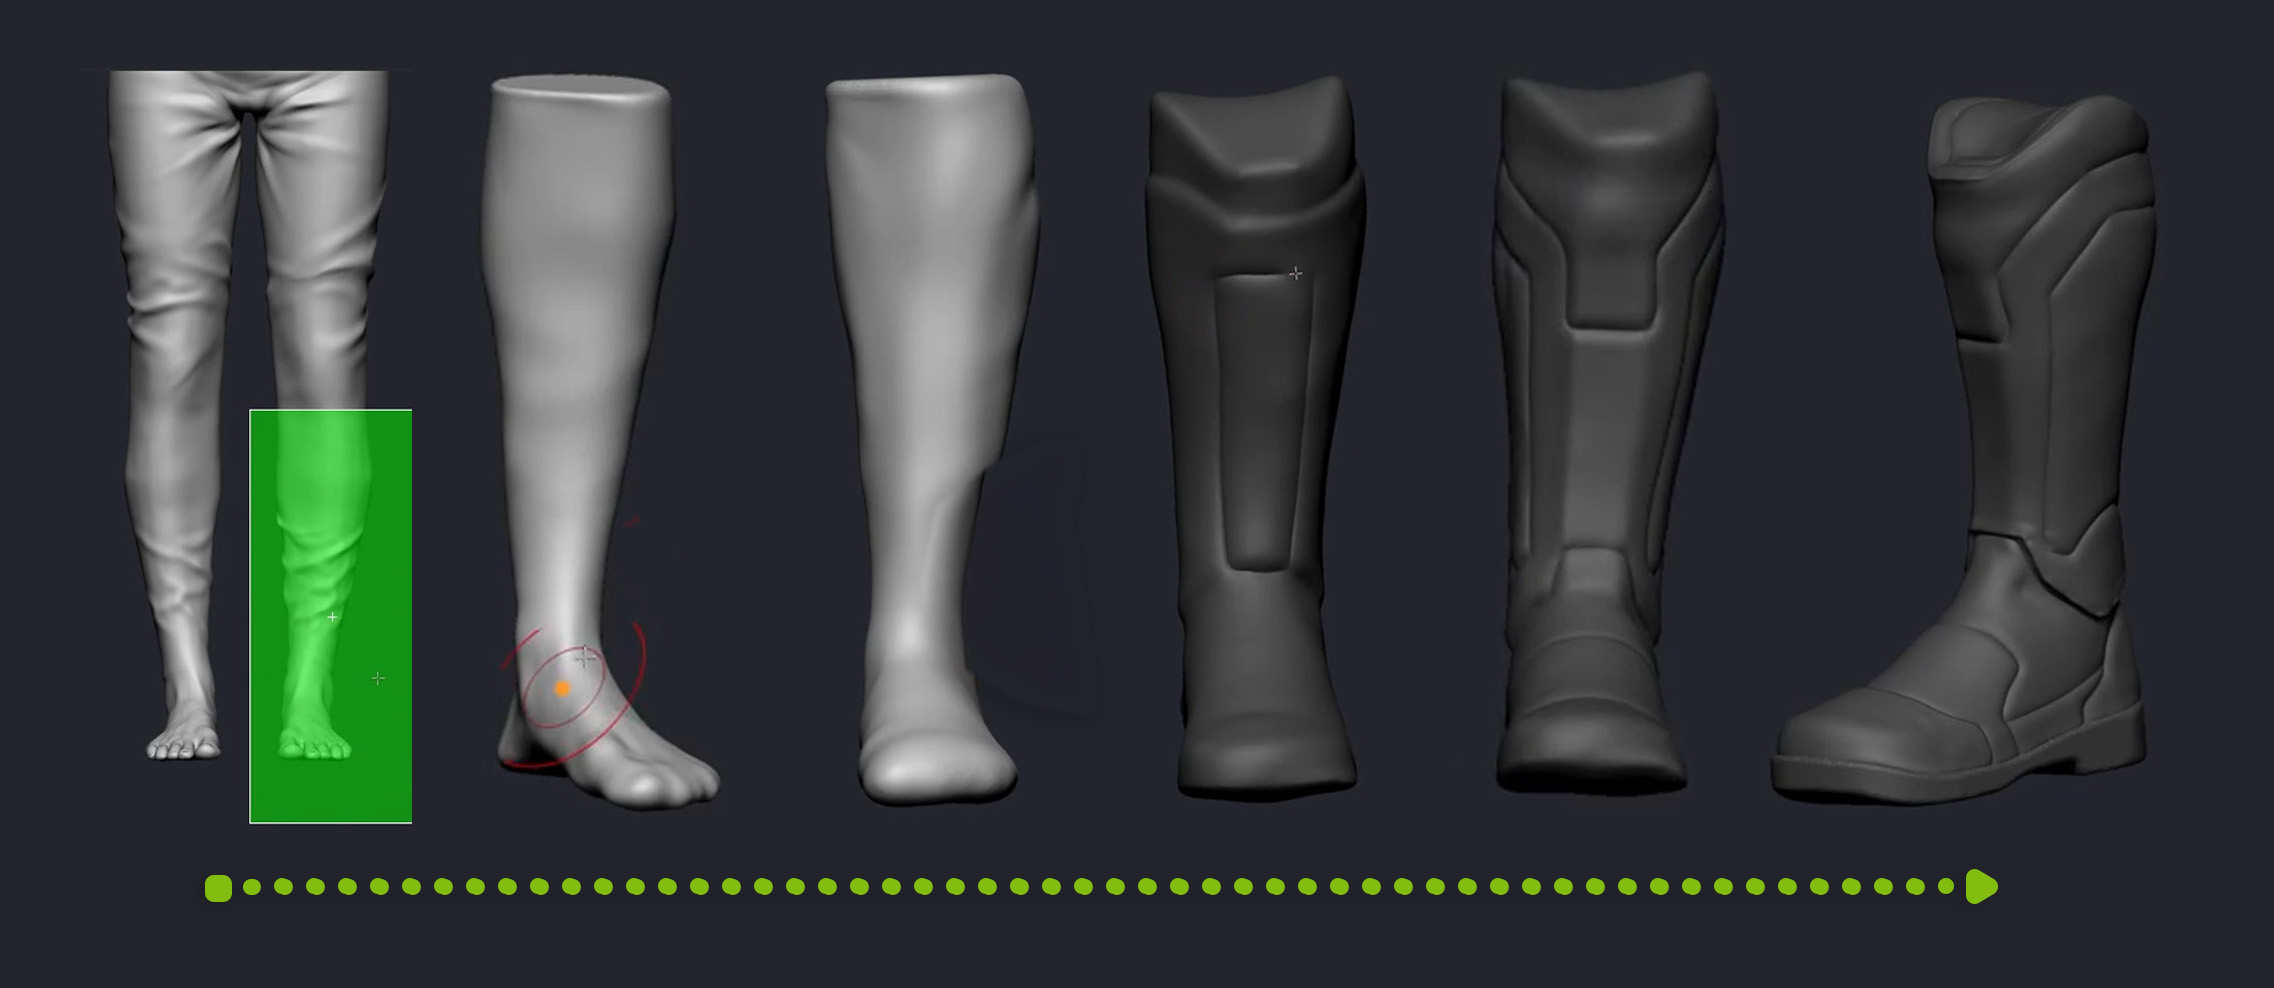
A Different Approach for Boots: Dynamesh + Manual Retopology
For assets where exploring form quickly matters, I clone the main tool and discard unnecessary parts so I can freely sculpt on a separate tool without risking the original. I dynamesh the leg/foot area to create a sculptural blob that defines the boot’s volume. Dynamesh lets you iterate without worrying about topology.I usually separate the sole as its own Dynamesh object so I can iterate on top and bottom independently. Then I sketch paneling directly with a cutter brush to mark divisions and cut lines, essentially sketching in 3D instead of 2D.
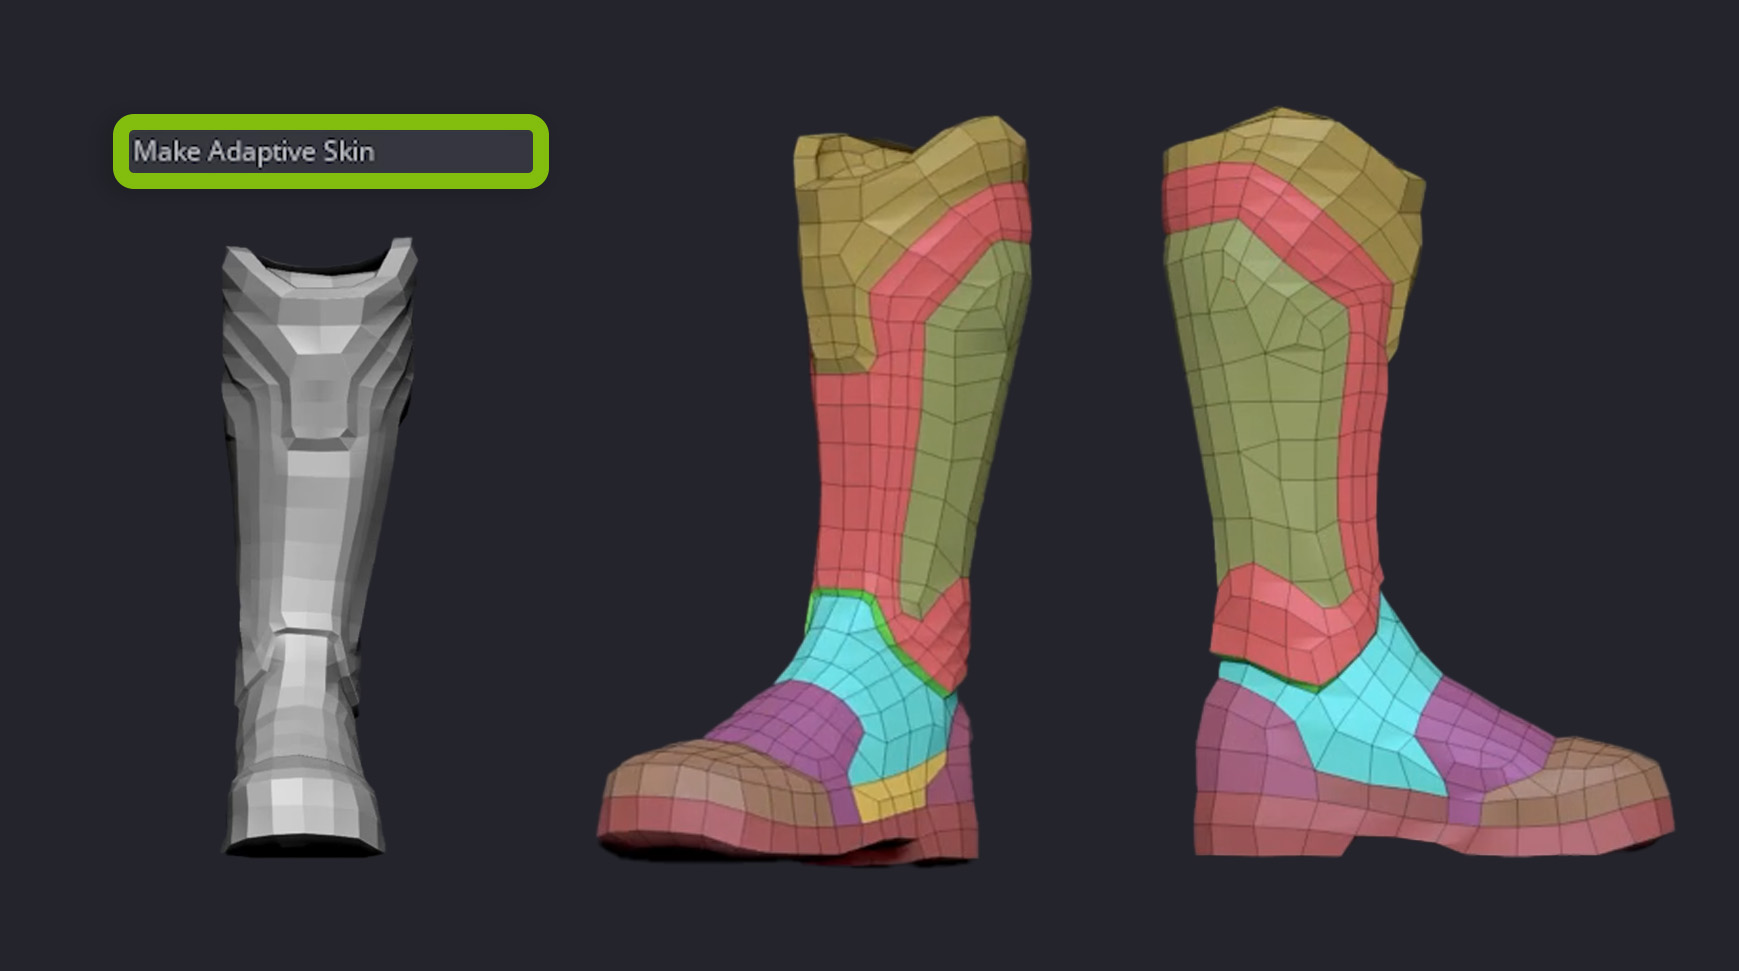
Manual Retopology with ZSphere and Creating Polygroups
After nailing the silhouette, I create a clean, concept-driven topology by appending a ZSphere and using its topology tools to place points and connect quads. This manual retopo approach is fast once you get used to it and allows you to control loop flow to match the sculpted volume.
Once topology is complete, I build an adaptive skin, set Dynamesh to zero, and use the topology layout to assign polygroups. These polygroups become the backbone for further panel extraction. With the ZMODELER, you can use Q-mesh or extrude actions targeting a single polygroup to pull out new panels, vary thickness, and add edge loops where I need sharper corners.
After finishing one boot, mirror and weld it to the opposite side and add finishing straps or buckles. This approach keeps the boot readable and modular for later material or UV work.
Once the armor geometry is finalized, the next phase involves importing everything into Character Creator 5 for setup and texturing preparation. CC5 significantly enhances this pipeline by streamlining asset organization, making it easy to rearrange multiple subtools into logical layers and groups. Additionally, improved auto-skinning and weighting tools minimize the time spent correcting deformations, ensuring armor moves correctly with the body. Finally, CC5 offers export-friendly options that preserve mesh separation and polygroups for clean baking. I highly recommend spending time here to organize subtools into folders and clearly label materials; this small up-front investment saves hours during the texturing and look development stages.
Generate UVs for Sculpted Pieces (Rizom UV)
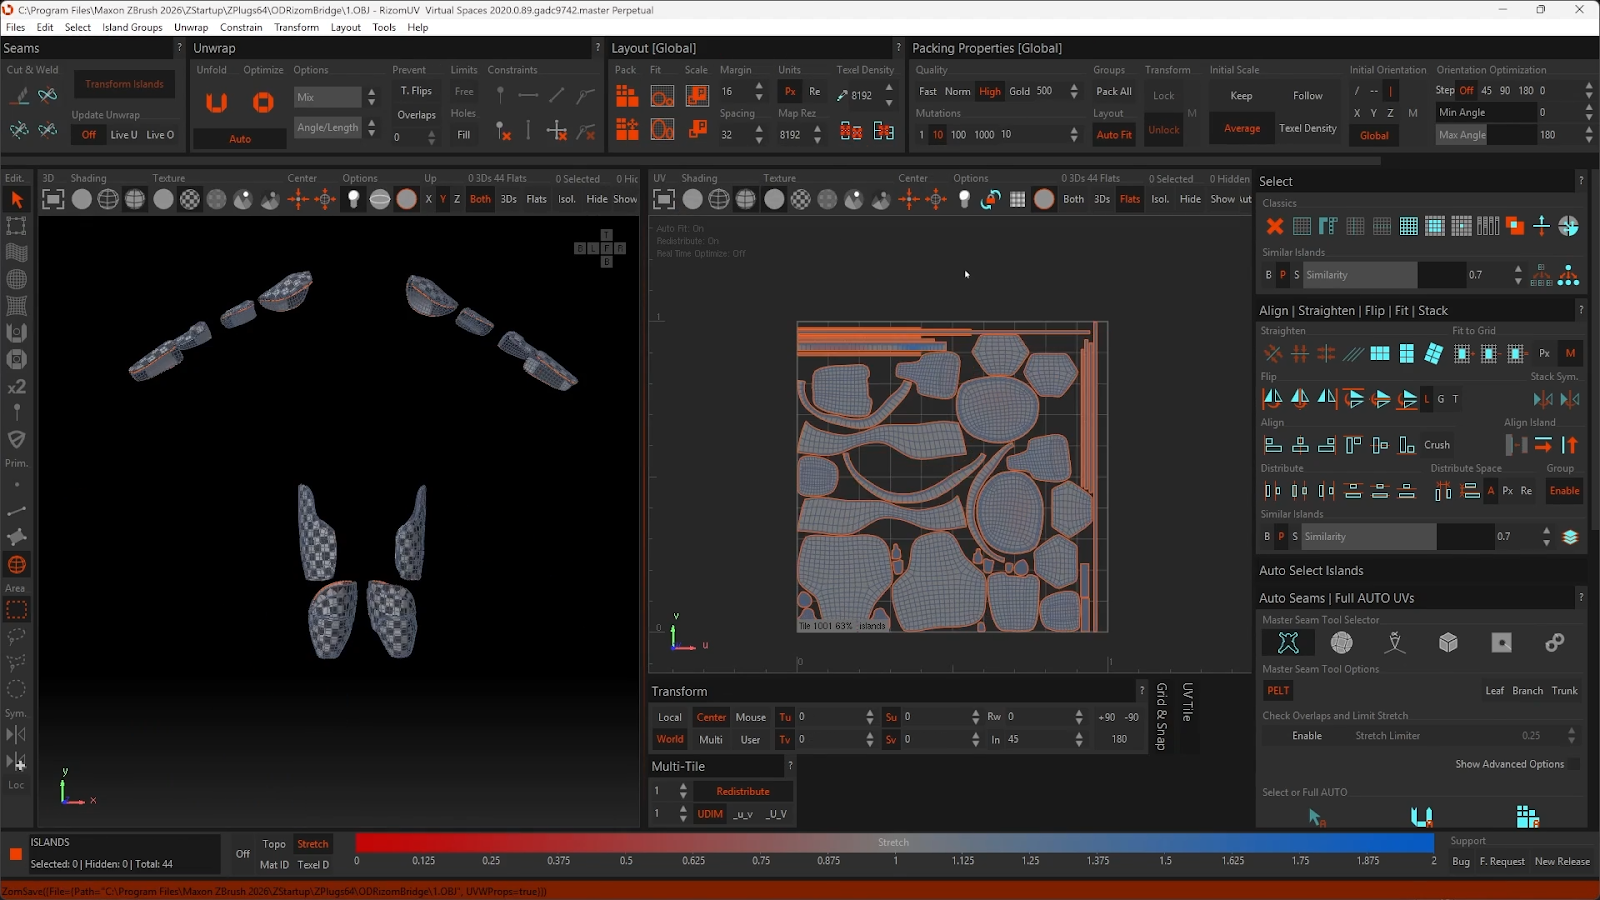
I use Rizom UV for unwrapping because it’s fast, robust, and integrates smoothly via a free plugin. From ZBrush, I select the mesh I want to unwrap (for example, a shoulder pad) and click the plugin button to send it straight into Rizom UV.
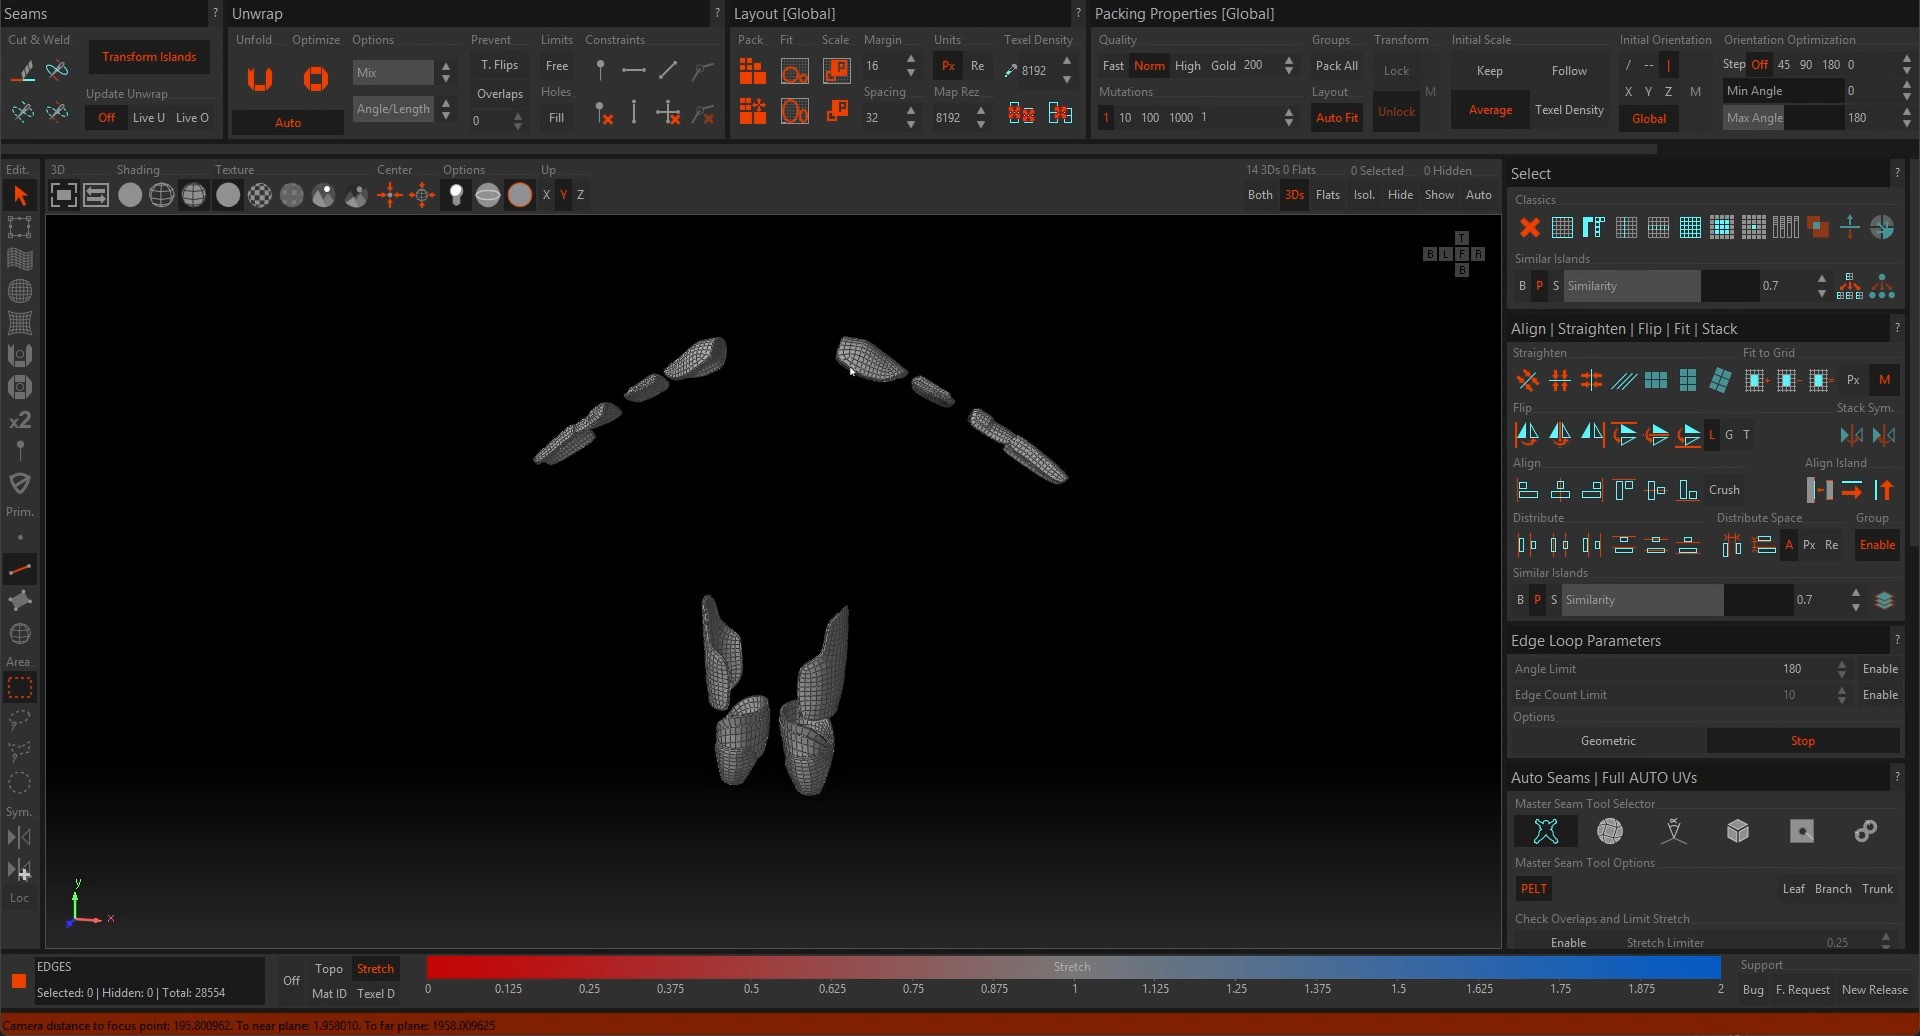
Meshes imported into Rizom UV, ready for seam marking and unwrapping.
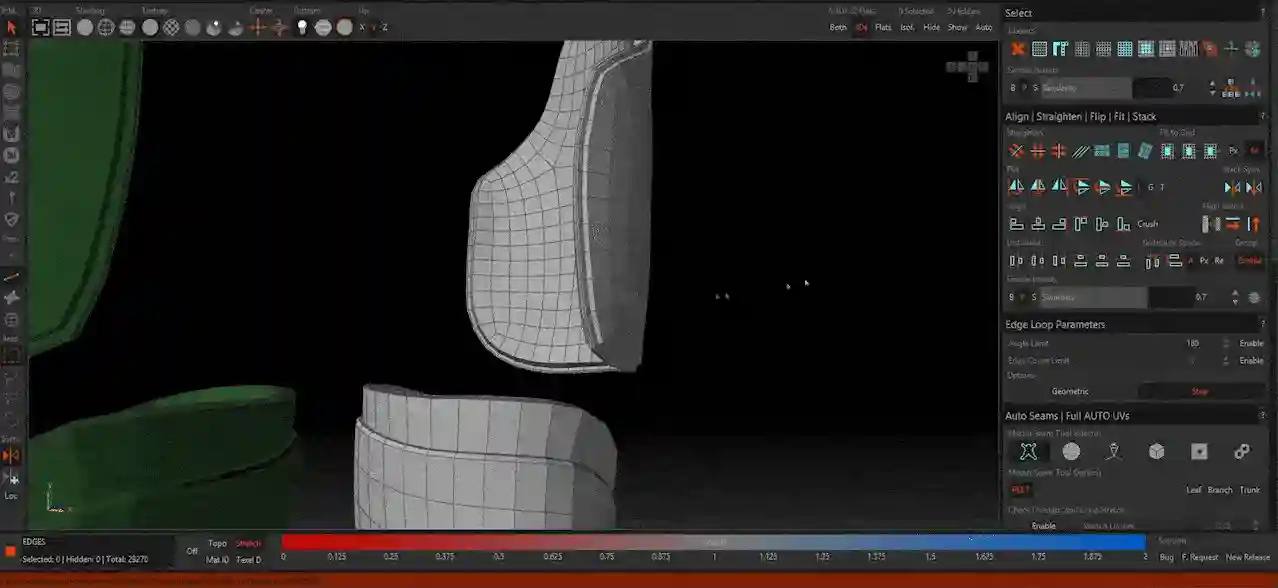
My workflow in Rizom UV follows three simple, reliable steps. First, I mark seams by selecting edge loops taking advantage of clean topology to double-click loops and press 'C' for instant cuts. Next, I adjust the UV islands, specifically utilising the single-click straightening feature; this is crucial for straps, belts, or any area where repeating textures require a clean, linear flow. Finally, I pack and optimize the UV space, making sure to preserve the orientation of the islands so that patterns read consistently across the entire model. When the islands look right and align logically , I save and send the UVs back to ZBrush via the plugin.
Sending Back to Character Creator 5
Before sending assets to CC5, I make sure every mesh is named clearly. If the meshes originally came from CC5, their names must match exactly; saving and exporting from other tools sometimes adds suffixes or changes names, and that breaks the automated update process.
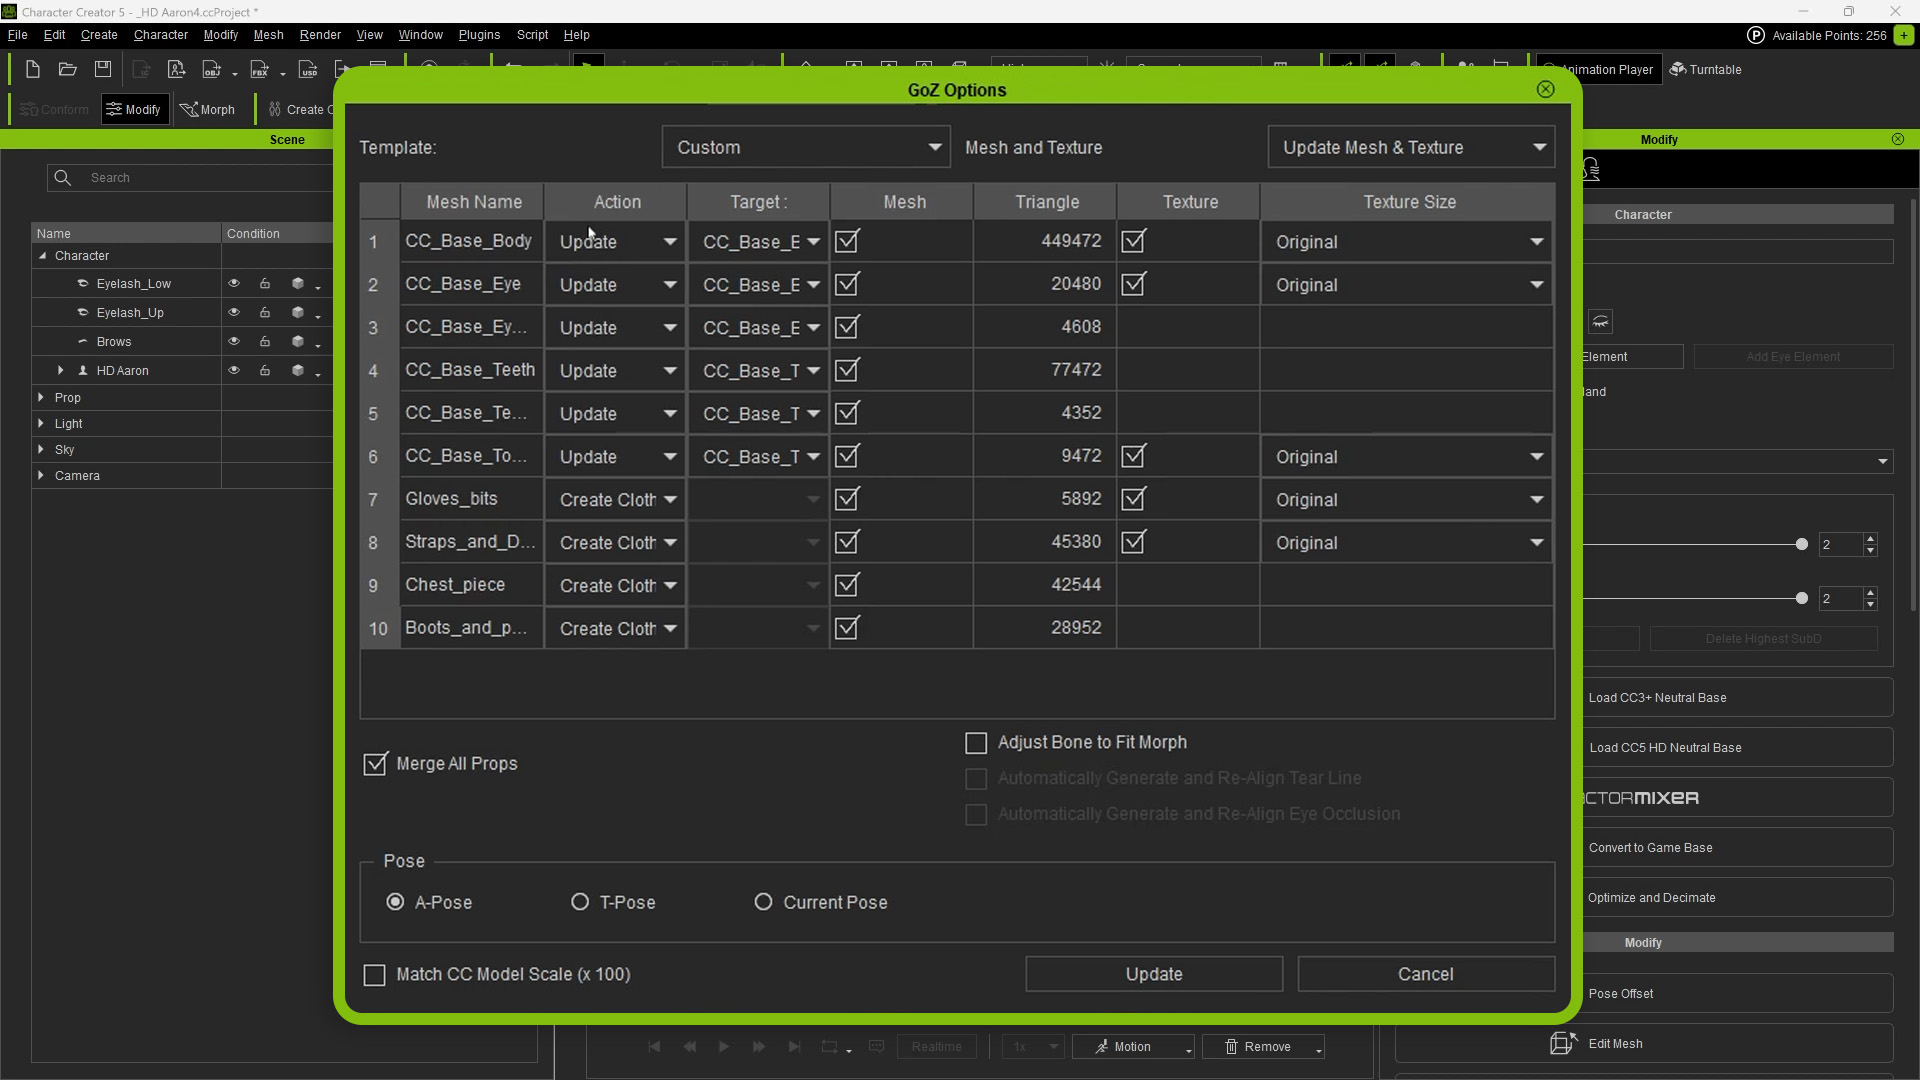
I use the GoZ Plus plugin from ZBrush to transfer geometry. Instead of sending objects one by one, I use the All option to send everything at once. This action not only transfers the subdivision levels but also bakes sculpted details into normal maps, so it can take a few minutes for complex projects.
When CC5 receives the files, the GoZ Options window tells me what will happen to each mesh. Any object with a name that starts with the CC prefix should show the action as update, these are original CC5 meshes being updated. New items I created in ZBrush will appear with the action set to create cloth. I keep default settings, ensure the A pose is selected (unless I sculpted in another pose), and click update. CC5 automatically skins the pieces to the base mesh.
Character Creator 5 offers a suite of tools that drastically streamline the setup phase, starting with automatic skinning that makes new pieces conform to the character immediately upon import saving hours of manual rigging. The GoZ Plus integration further enhances efficiency by handling subdivision details and normal map baking during transfer, ensuring high-frequency details are preserved without extra steps. For rigging, I rely on ready-made skin weight templates to quickly map items like gloves or boots, while the straightforward Skin Weights editor allows me to lock rigid props to specific bones using simple vertex selection. I can then validate these setups using built-in animation previews to test deformation in real-time, all while the software’s cloth creation pipeline automatically categorizes assets to keep the project organized for simulation and export.
Fix Deformations and Finalize Skinning
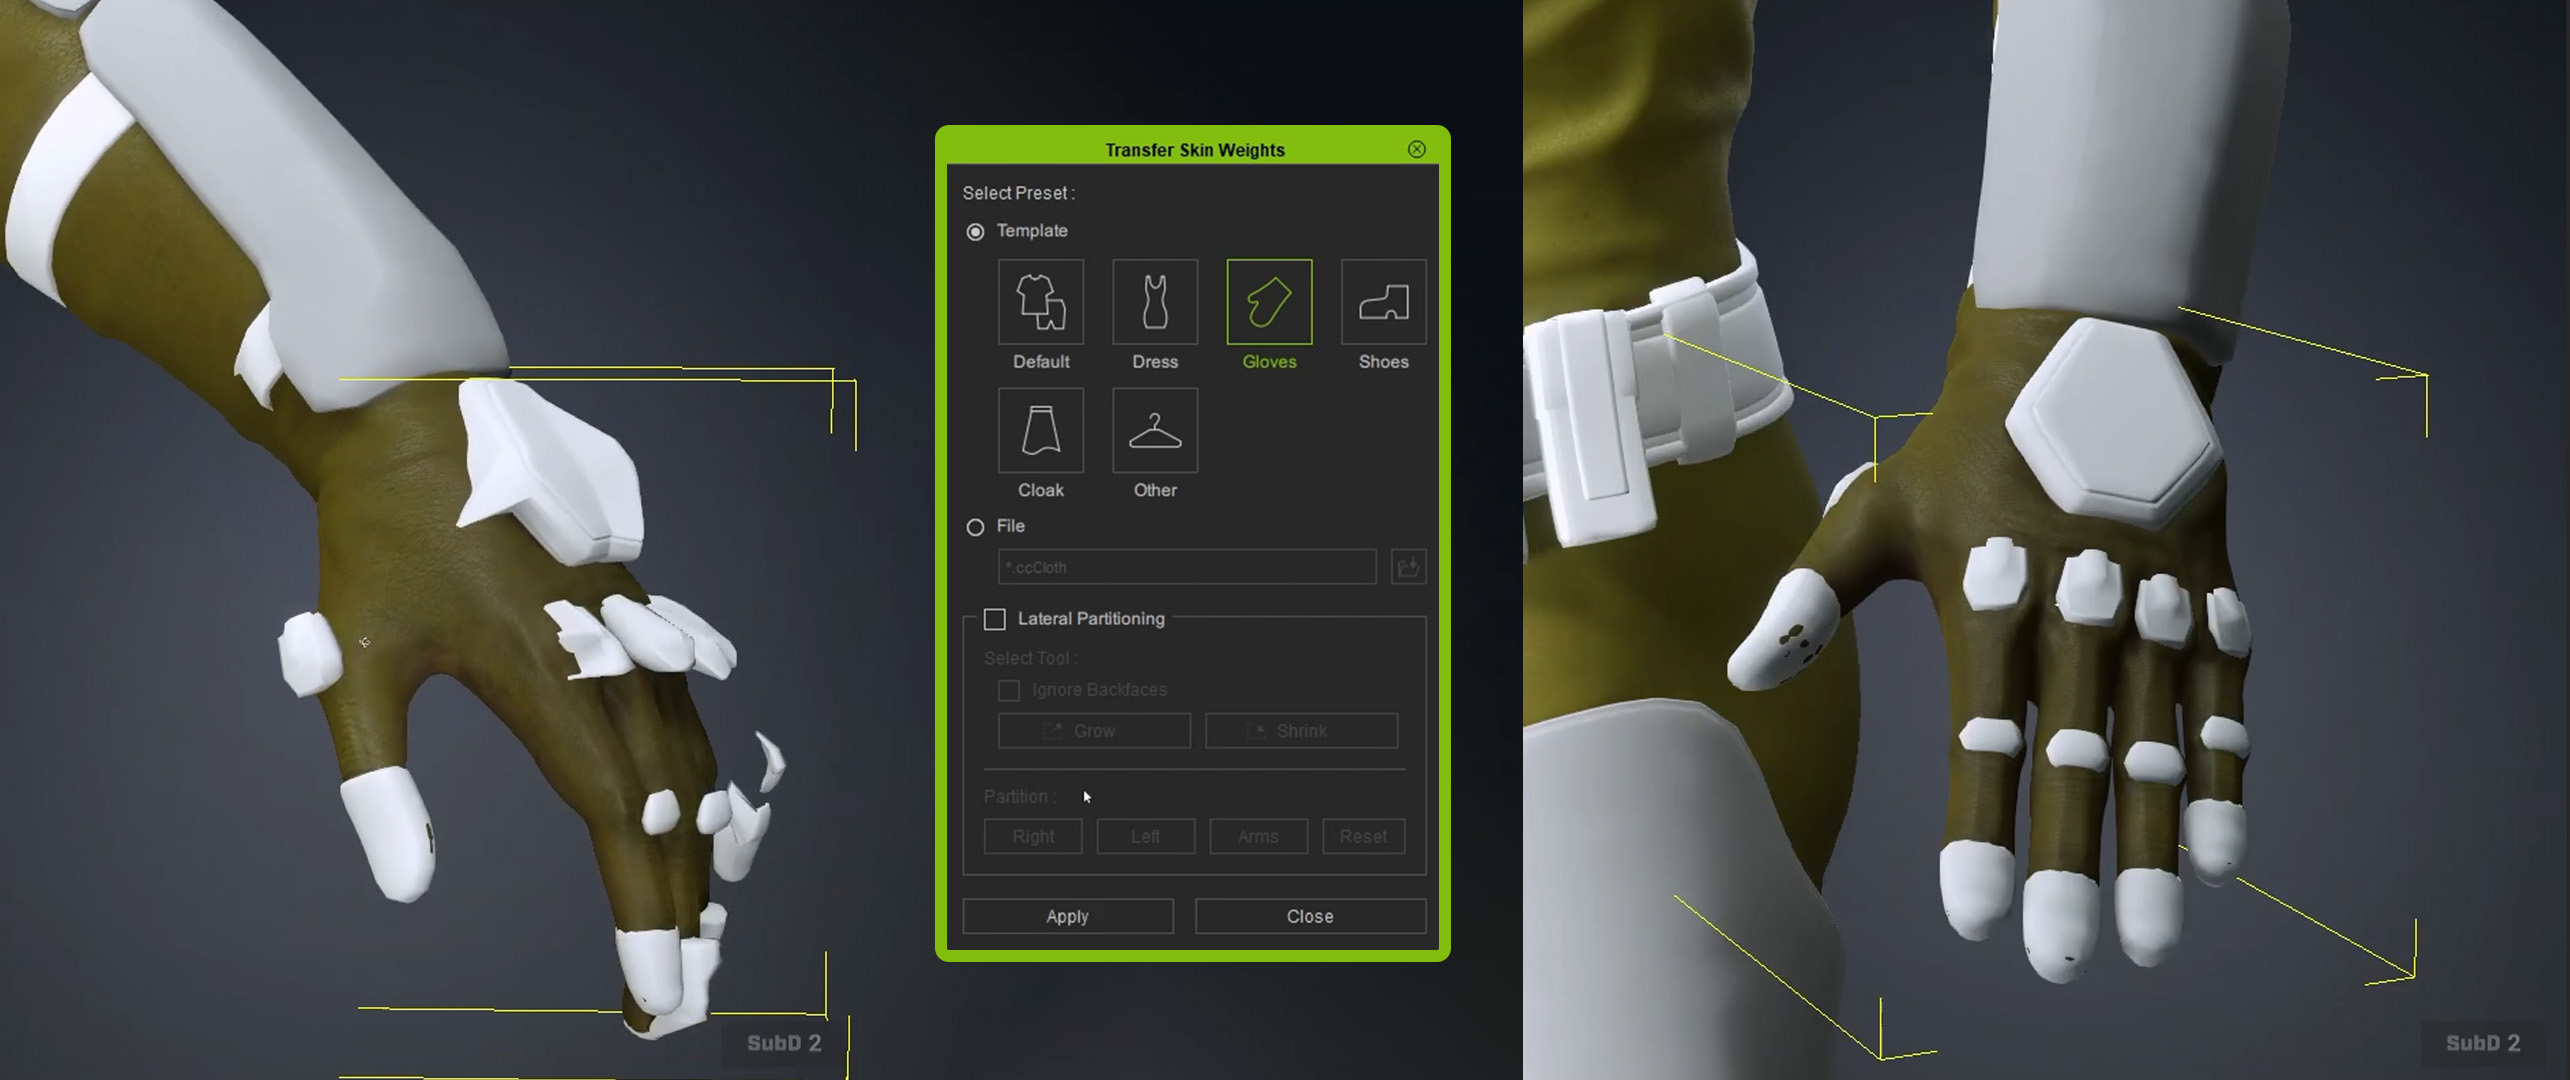
Automatic skinning is great, but CC5 doesn’t always know what a new piece is meant to be. Some elements require a quick correction. For example, glove extensions can appear crooked or misaligned after import. The fix is to tell CC5 what template to use.
I select the mesh, open Setting Panels, and use Transfer Skin Weights. From the pop-up, I choose the template that best matches the region. That reassignment maps the new mesh to the hands and fingers cleanly.
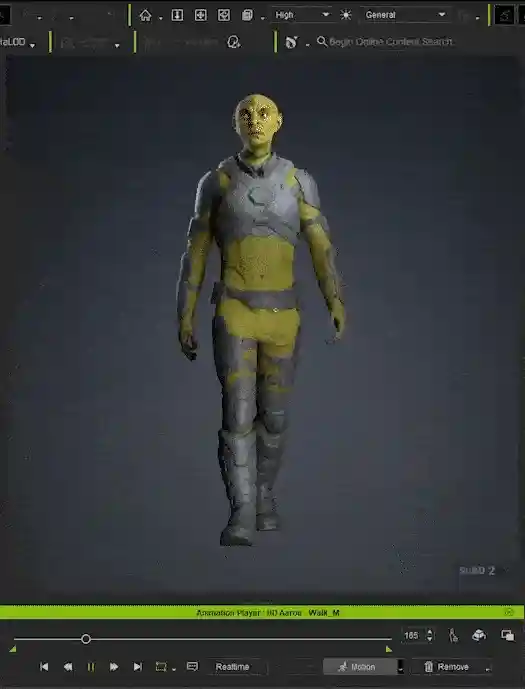
To validate skin weights across the character, I run a simple rig test: set the motion dropdown to Action, choose an animation like a walk cycle, and play. For visual clarity during testing, I temporarily change the diffuse color of new pieces to a mid or dark gray so details and deformations are easier to spot. These are placeholder colors; they get replaced when I send everything to Substance Painter.
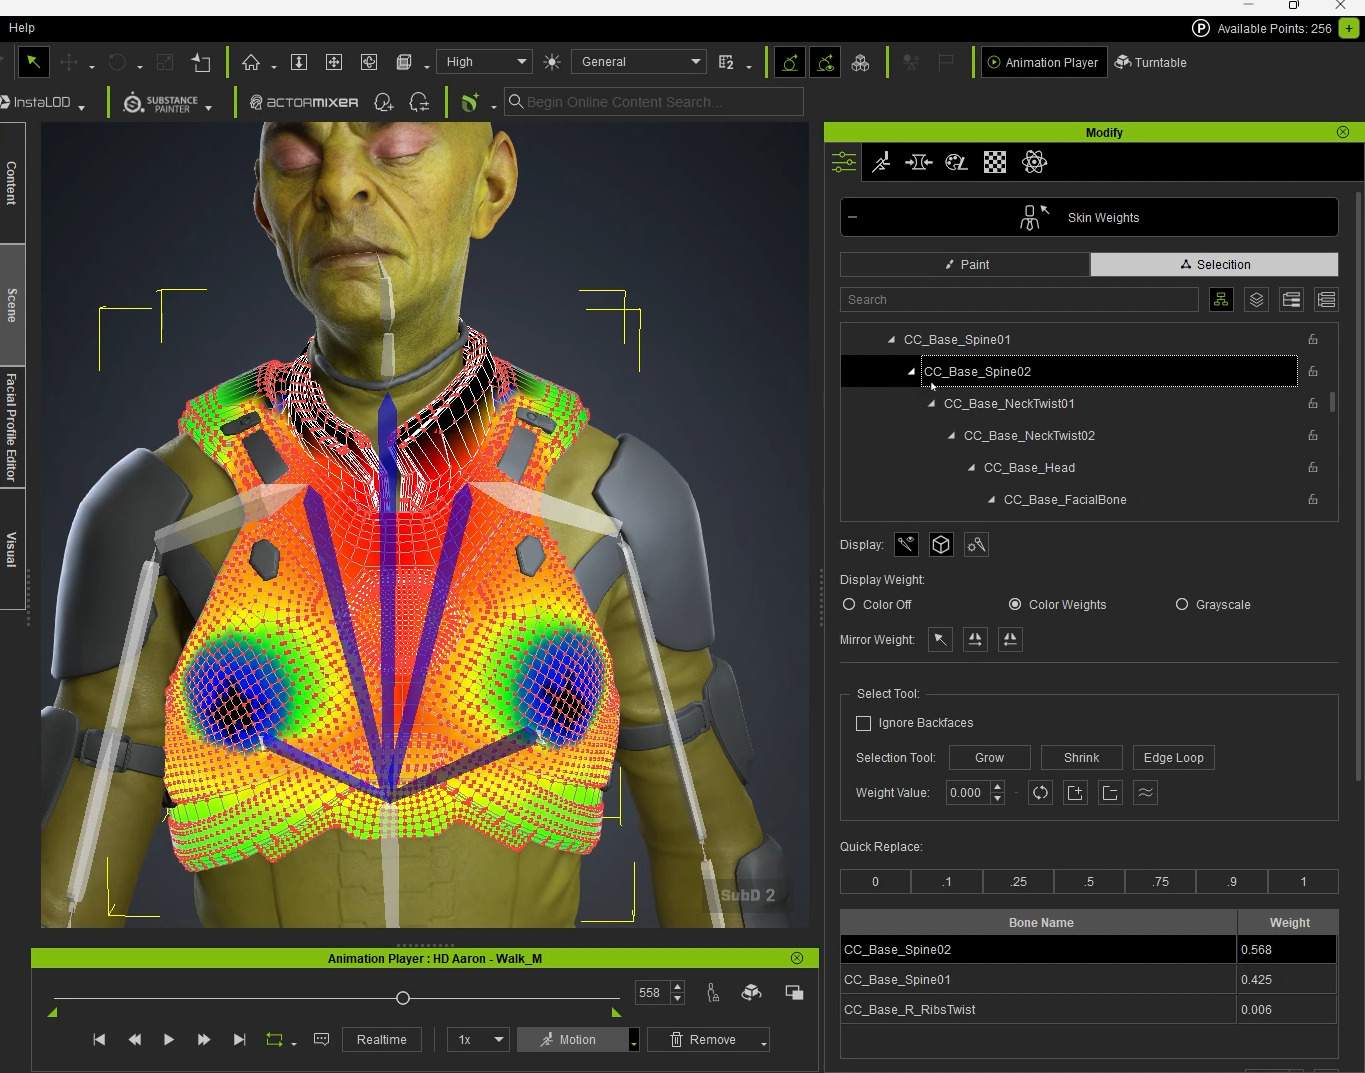
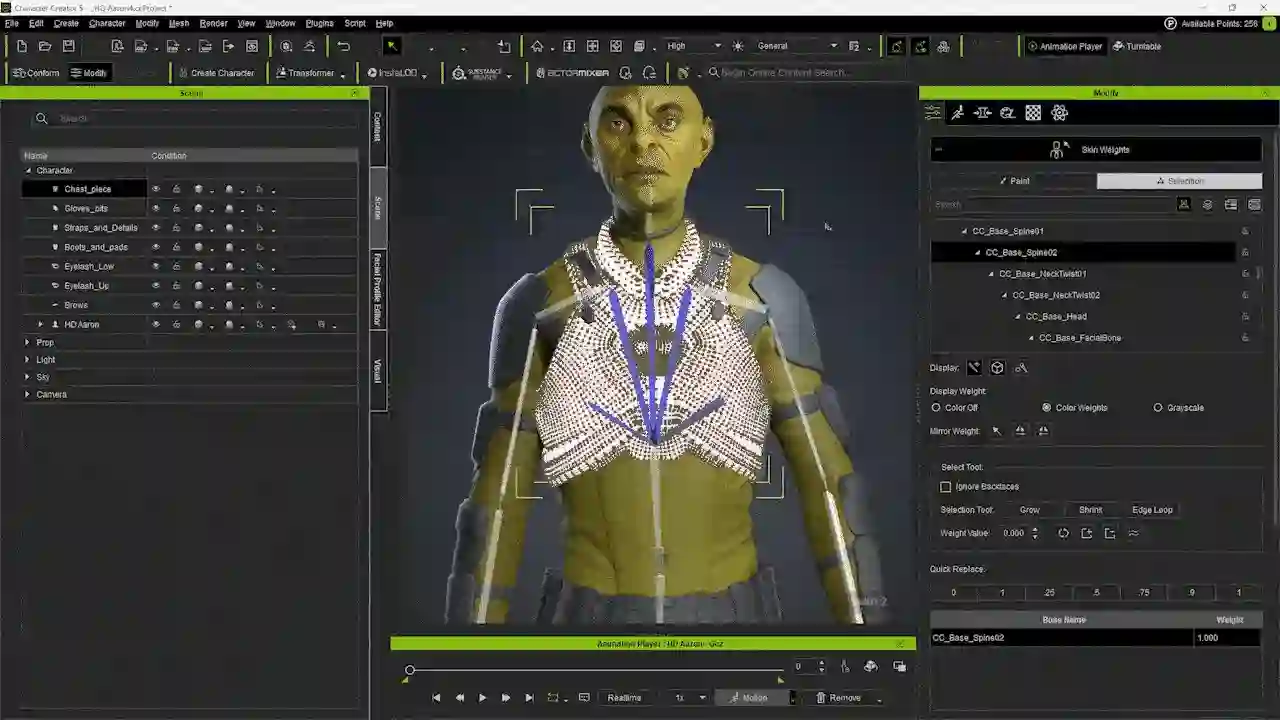
For rigid parts such as a metallic chest plate or a decorative neck collar that should absolutely not deform, I prefer to edit the skin weights directly. The process is straightforward: select the specific mesh and open the Skin Weights tool. From there, select every vertex of the mesh and assign 100 percent influence to the most appropriate single bone. Once applied, always re-run the animation to verify that the piece remains perfectly locked to the body without warping.

I repeat this process for belts, armor plates, and any other rigid items, assigning them to the appropriate base bone like CC_base_pelvis. After these adjustments, the walk cycle shows clean deformation and no unwanted stretching
Once skinning and weight edits are complete, I save the CC5 project and run a final confirmation pass before exporting to Painter. I ensure every mesh has UVs without exception and verify that normal maps were successfully baked during the transfer. It is also vital to check naming consistency, ensuring CC-prefixed objects update correctly while new items are properly categorized as cloth or props.
After confirming that UV orientation allows for predictable texturing, I perform a motion test to guarantee that deformations won't cause problematic stretching. With everything organized and verified, the project is ready for Substance 3D Painter; this combination of Rizom UV layouts and CC5’s rigorous validation tools creates a smooth pipeline that minimizes surprises. Simply save the scene, back up your assets, and proceed to the texturing stage with confidence.
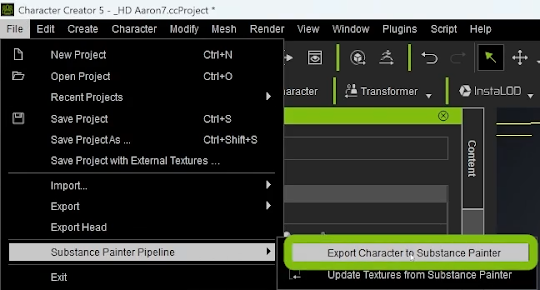
Export from Character Creator 5
From CC5, open the File menu and use the Substance Painter pipeline. Choose an export location and let CC5 generate the OBJ plus the texture and metadata required for Painter. The export includes the texture maps and the per-material setup that Painter will read, which saves a lot of time prepping files manually.
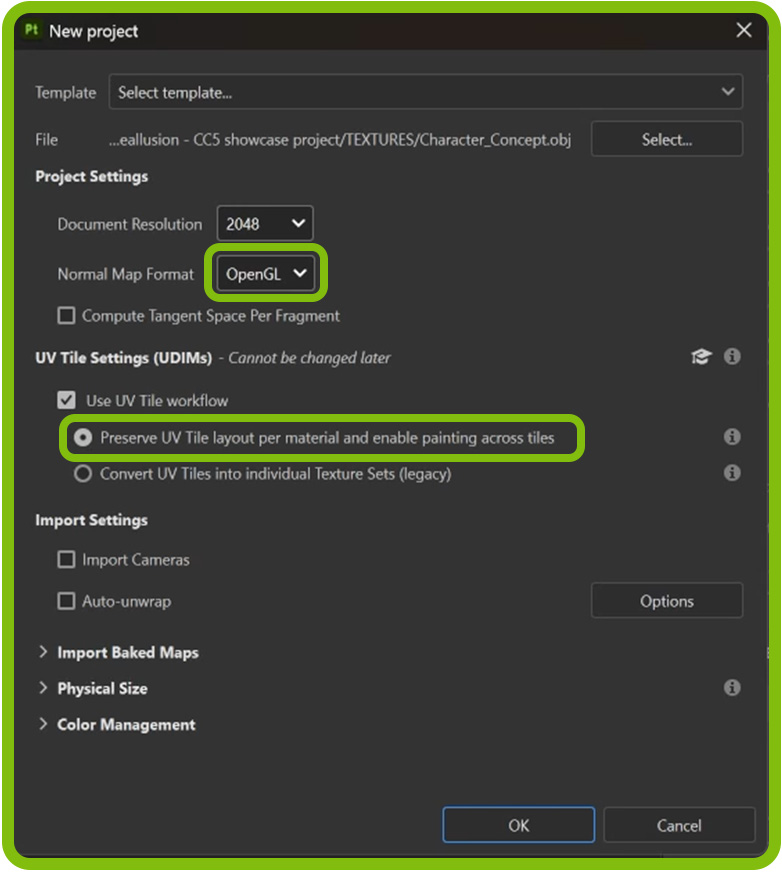
Import into Substance 3D Painter
When you drag the exported OBJ into Substance Painter, pay close attention to the New Project window, as these settings are crucial for a correct setup. First, ensure the Normal map format is set to OpenGL. To enable full UDIM support, check the box for Use UV Tile workflow and select Preserve UV Tile Layout per Material to maintain the specific layout for each shader. Finally, I highly recommend turning on Enable Painting Across Tiles; this allows your strokes to flow seamlessly across different UDIM boundaries without interruption.
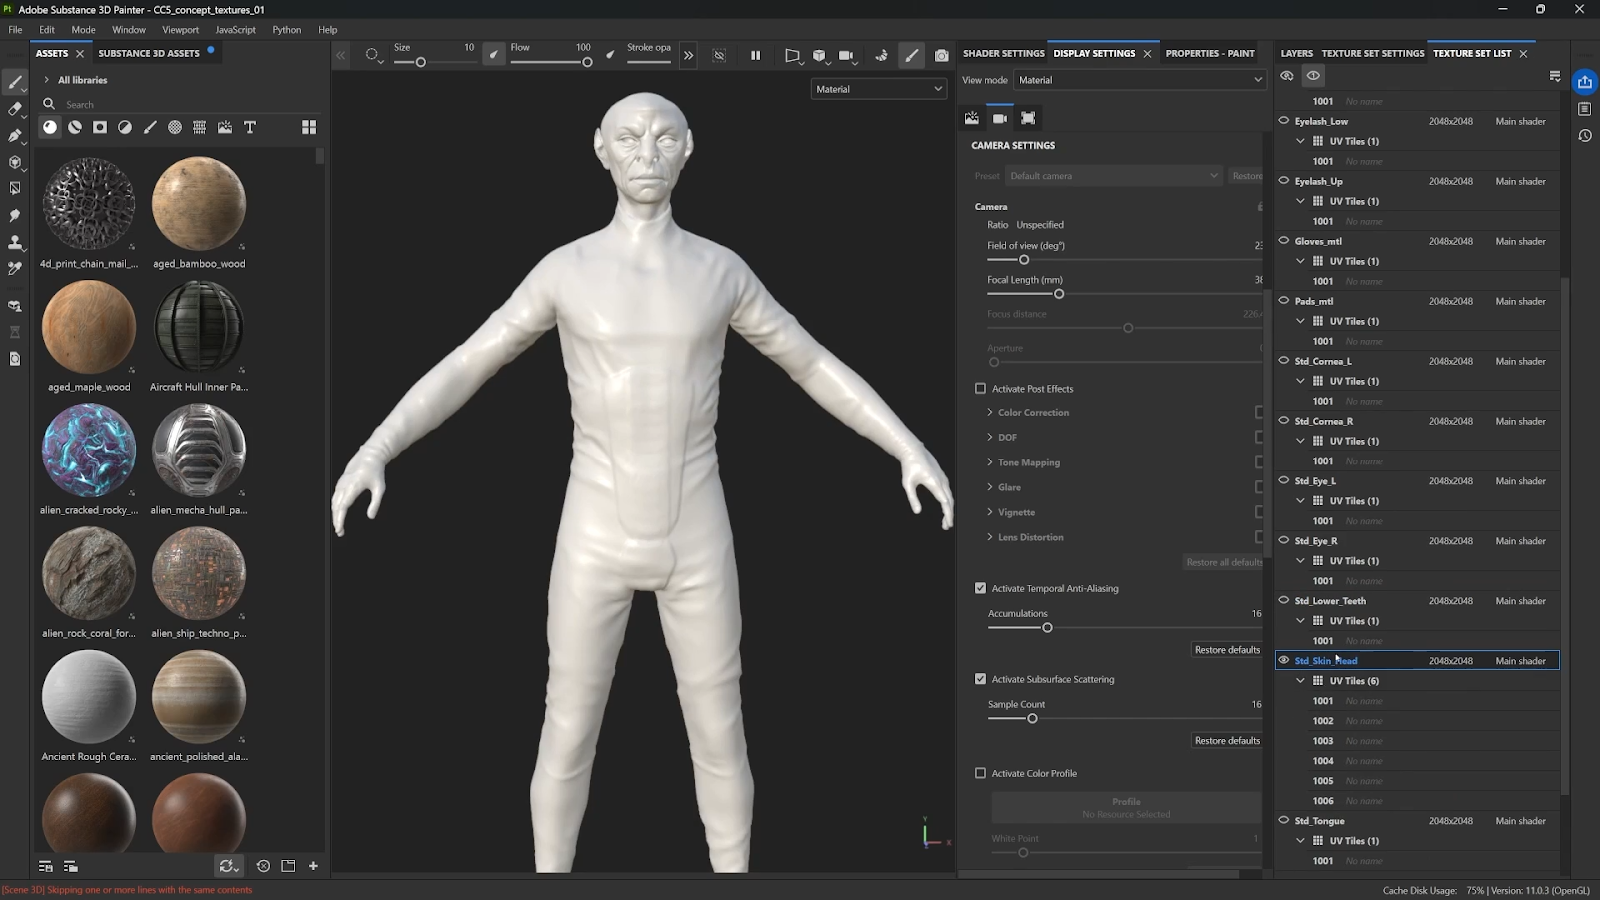
If everything is correct, you'll see the character in an A-pose and the Texture Set list will show a set for each material. This mapping is what allows per-material painting and targeted baking.
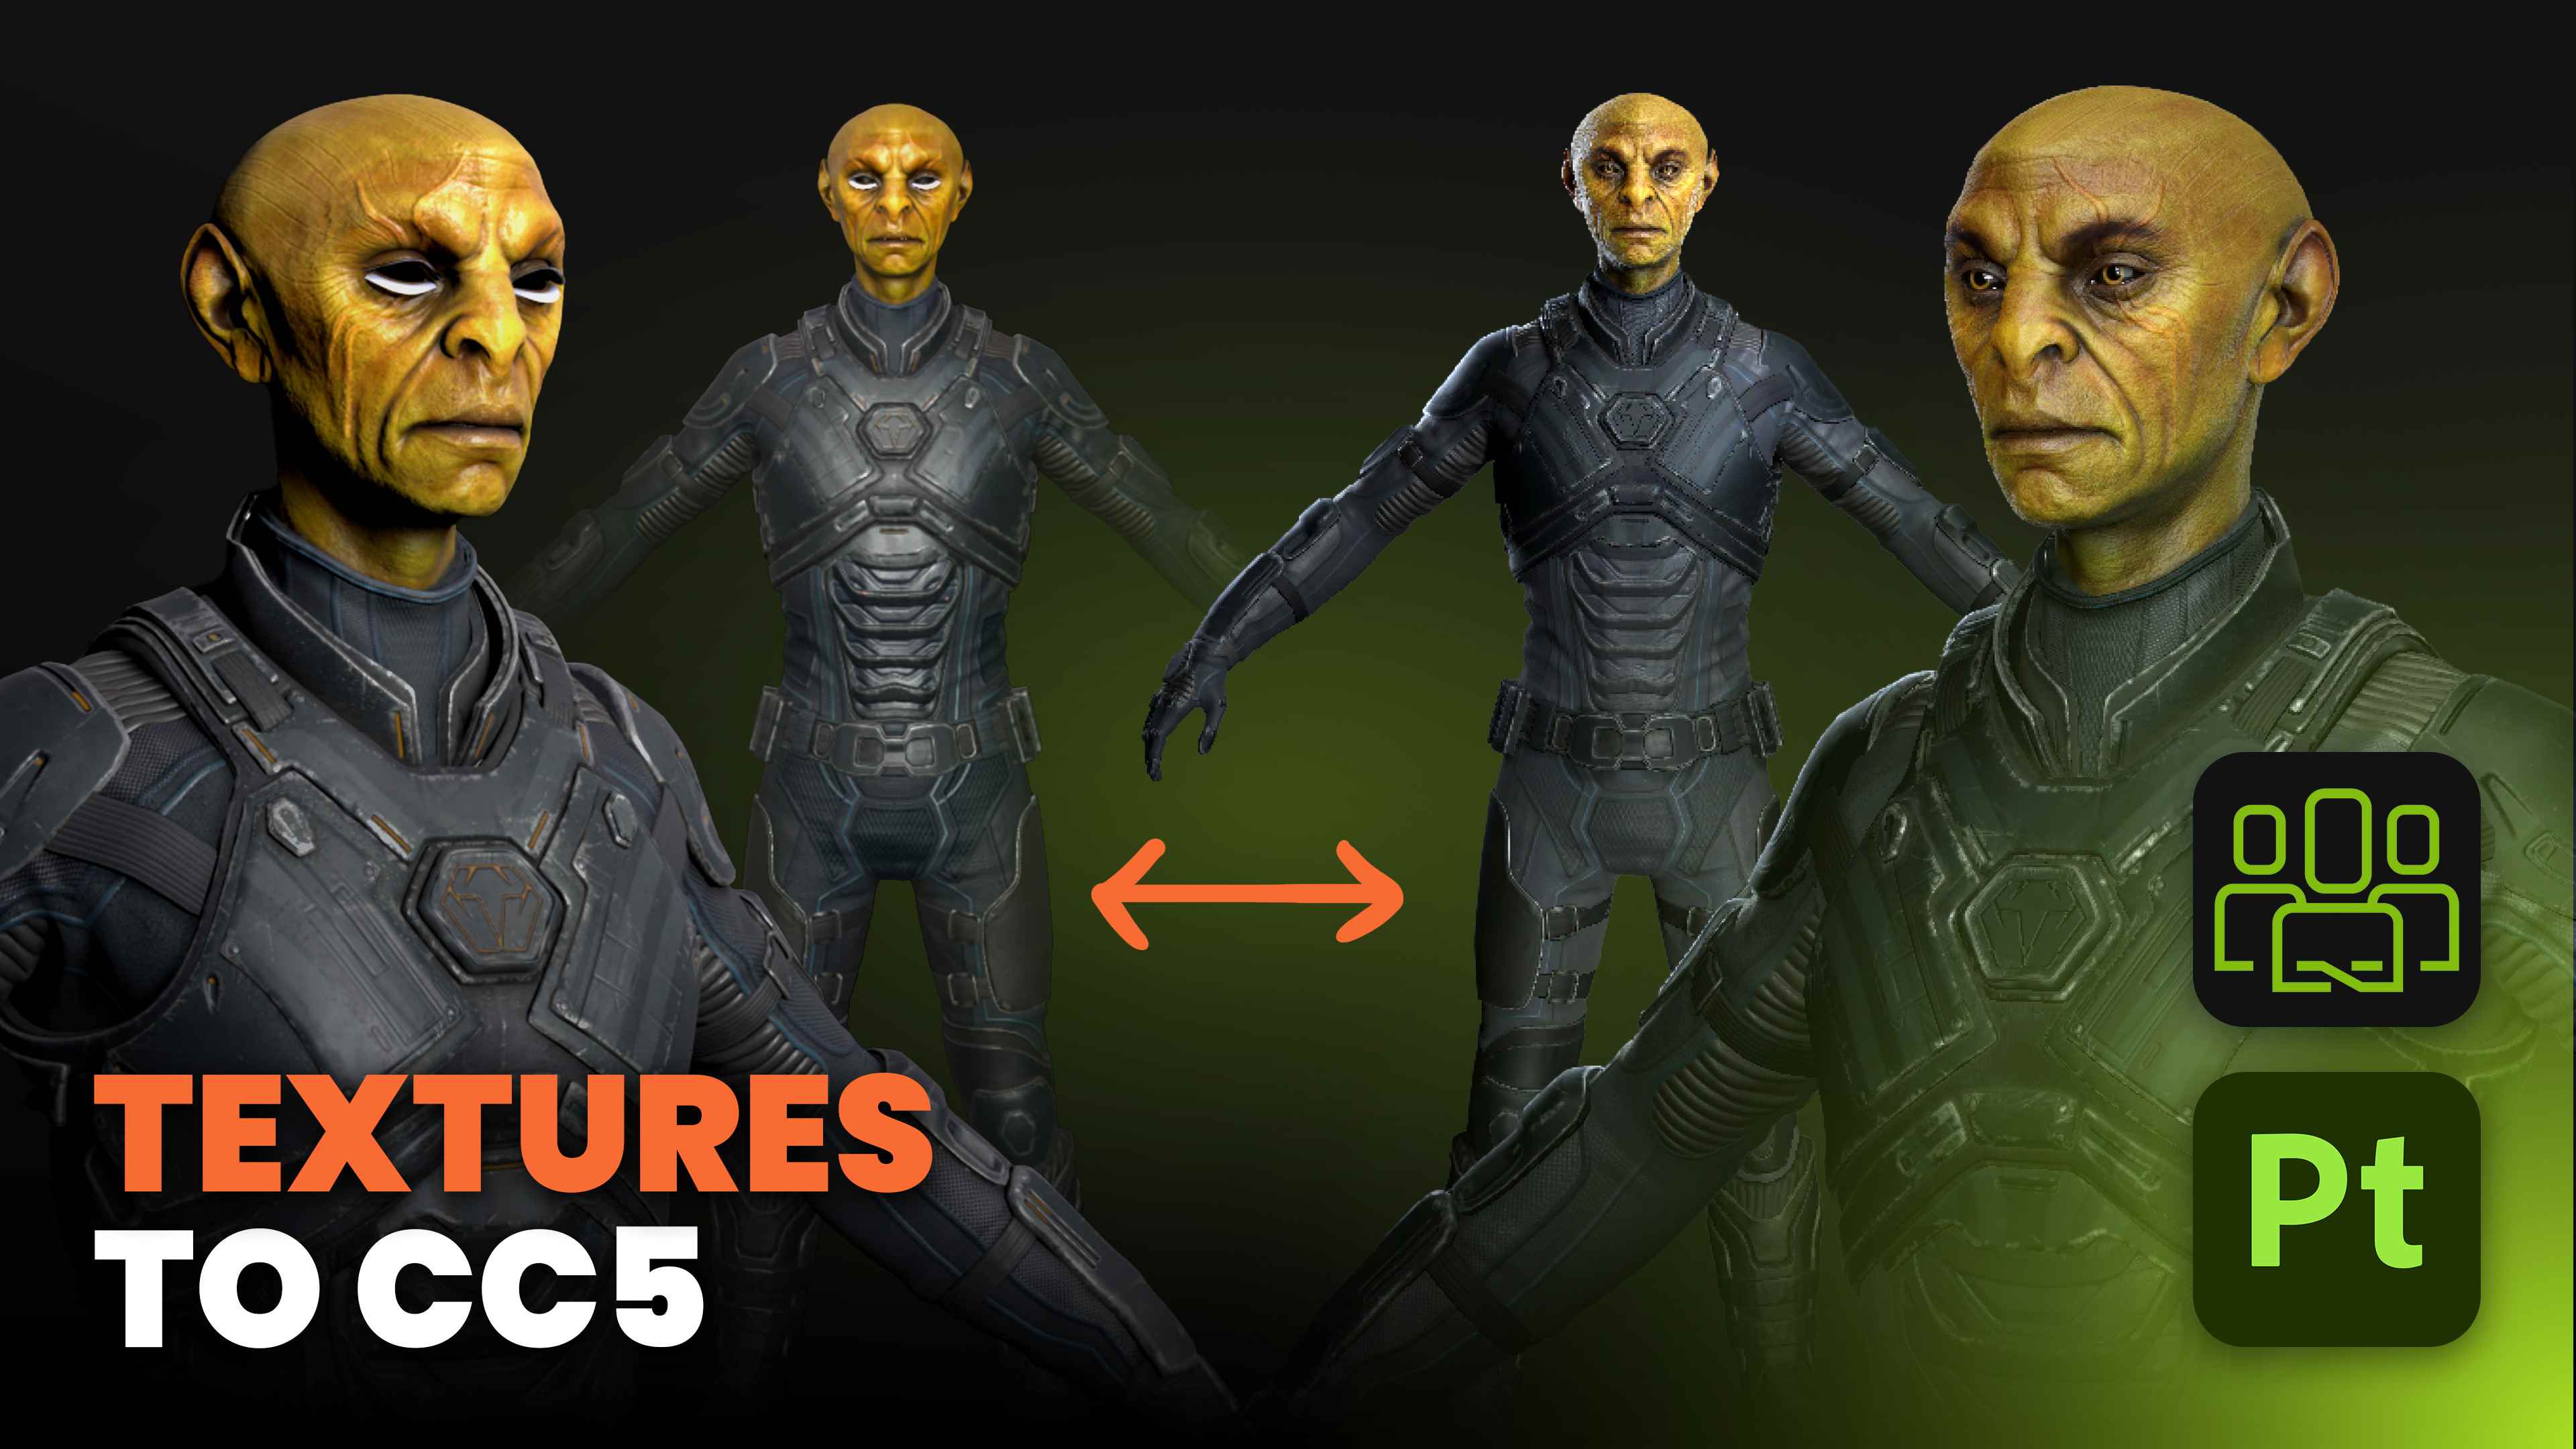
Reuse CC5 textures selectively
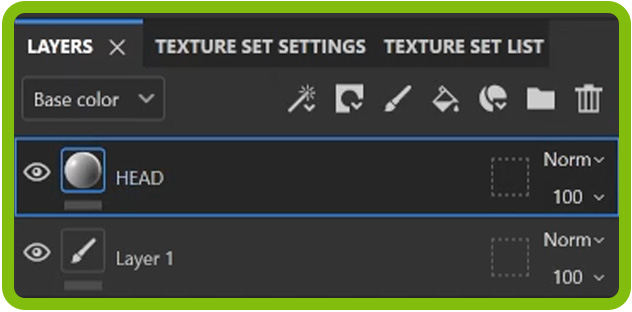
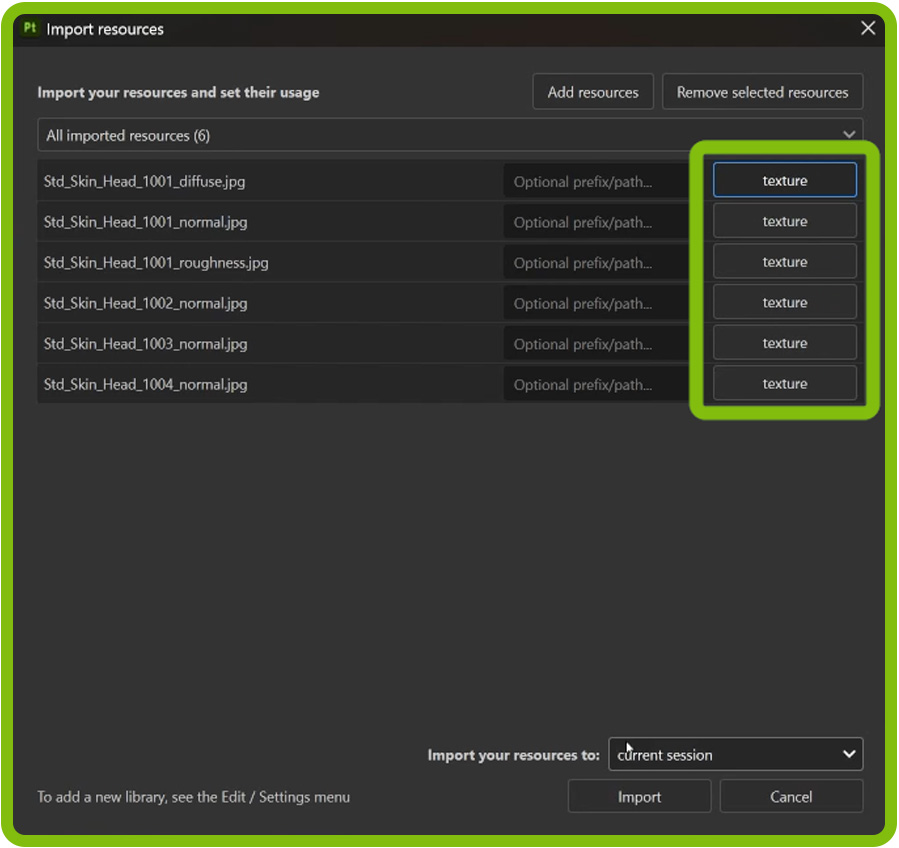
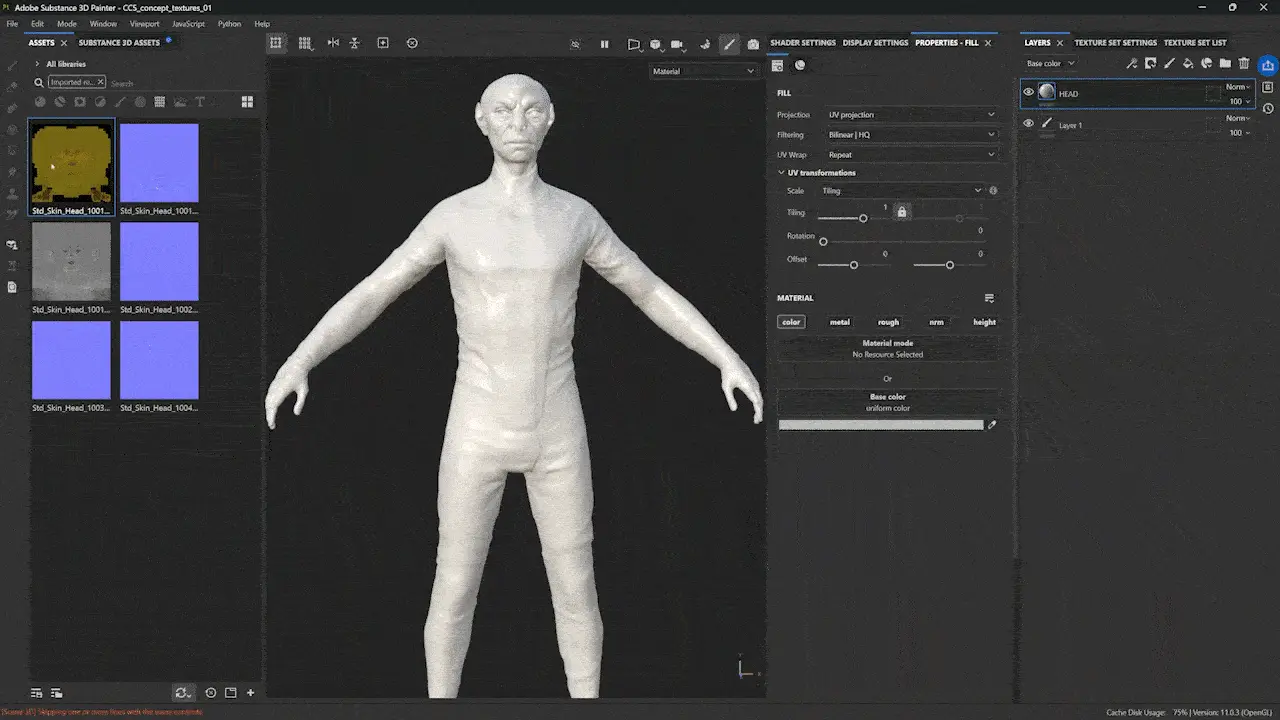
Occasionally, you may want to selectively reuse maps from CC5 while building the rest of the textures inside Painter; for instance, I often retain the high-quality head textures but recreate the suit and gear from scratch. To do this, select the head texture set in Painter and create a new Fill Layer named "head." Drag the exported CC5 head textures into the shelf, defining their import type as Texture, and then manually plug the diffuse map into the Color channel and the normal and roughness maps into their respective slots to restore the original look.
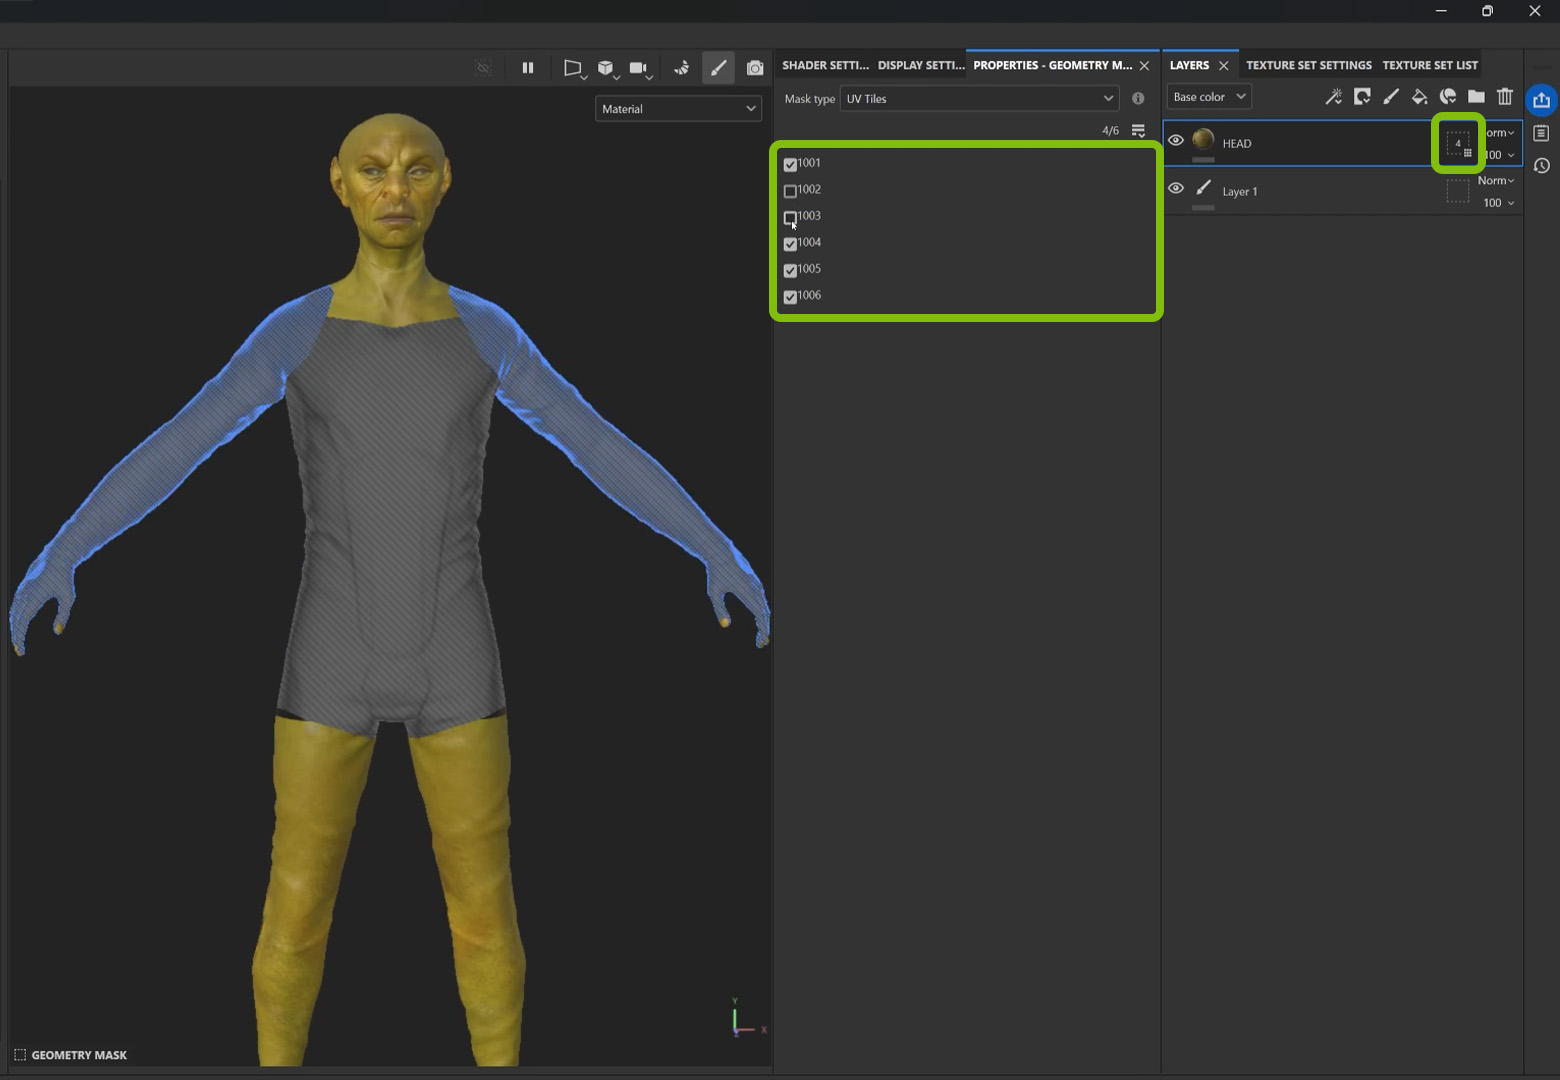
Because the mesh uses UDIMs, you may see the head texture repeated across tiles until you isolate the correct tile. Click the dotted square on the layer to open the tile list and untick every tile except the one that corresponds to the head.
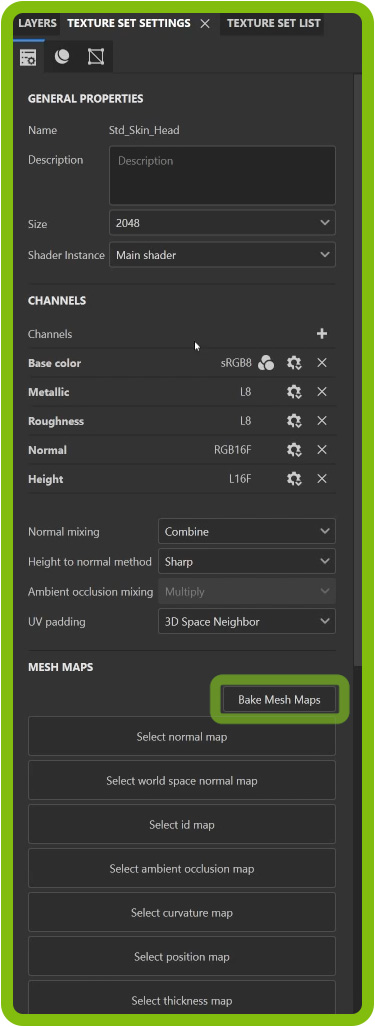
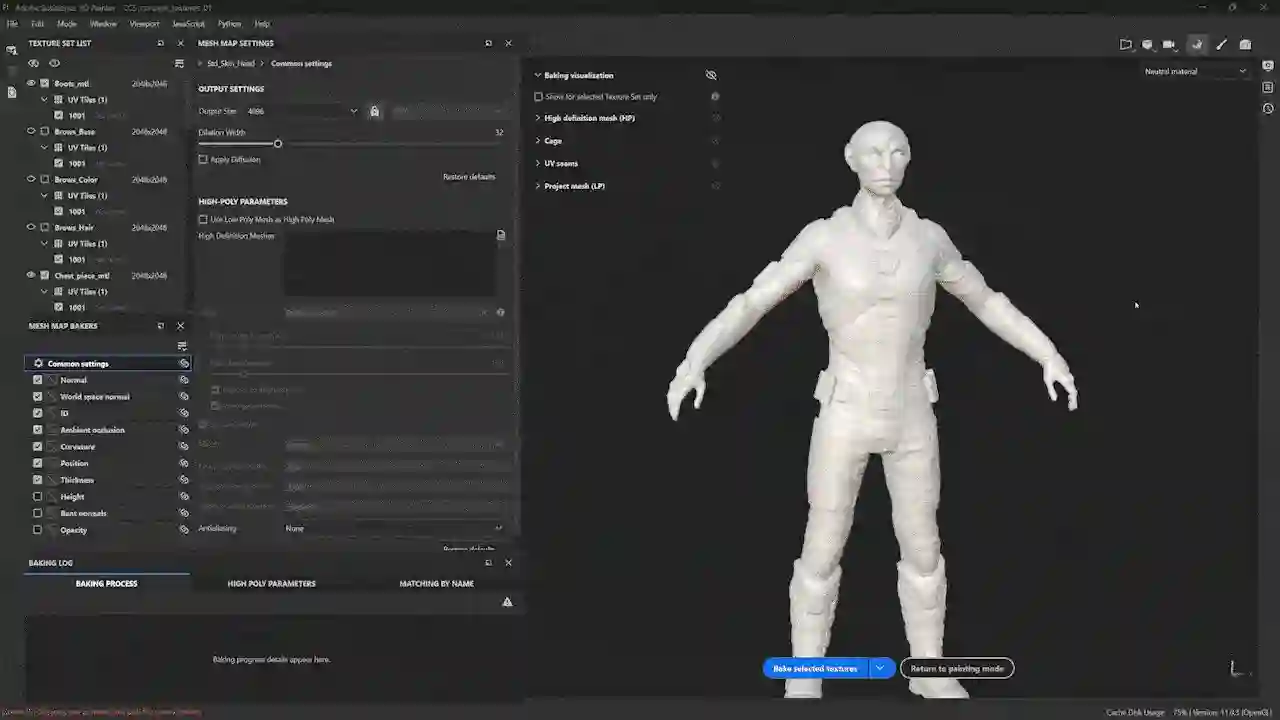
Bake the mesh maps
Baking is a critical step because generators like curvature and ambient occlusion rely entirely on these maps to drive masking, edge wear, and automated effects. To begin, click Bake Mesh Maps within the Texture Set Settings to open the baker window. A few practical tips ensure the best results: untick any texture sets you don't need to bake and set the output size to 4096 for crisp, high-fidelity details. Finally, click Bake Selected Textures and allow a few minutes for the process to complete, depending on the complexity of your mesh.
Watch for artifacts with thin or single-sided geometry, like eyebrow planes. Ambient occlusion can create heavy contact shadows for single-sided meshes and cause issues in animated scenes. If AO is too aggressive, re-bake AO only, then change the AO self-occlusion mode from Always to Only Same Mesh Name. This prevents cross-mesh occlusion and produces cleaner, animation-friendly AO.
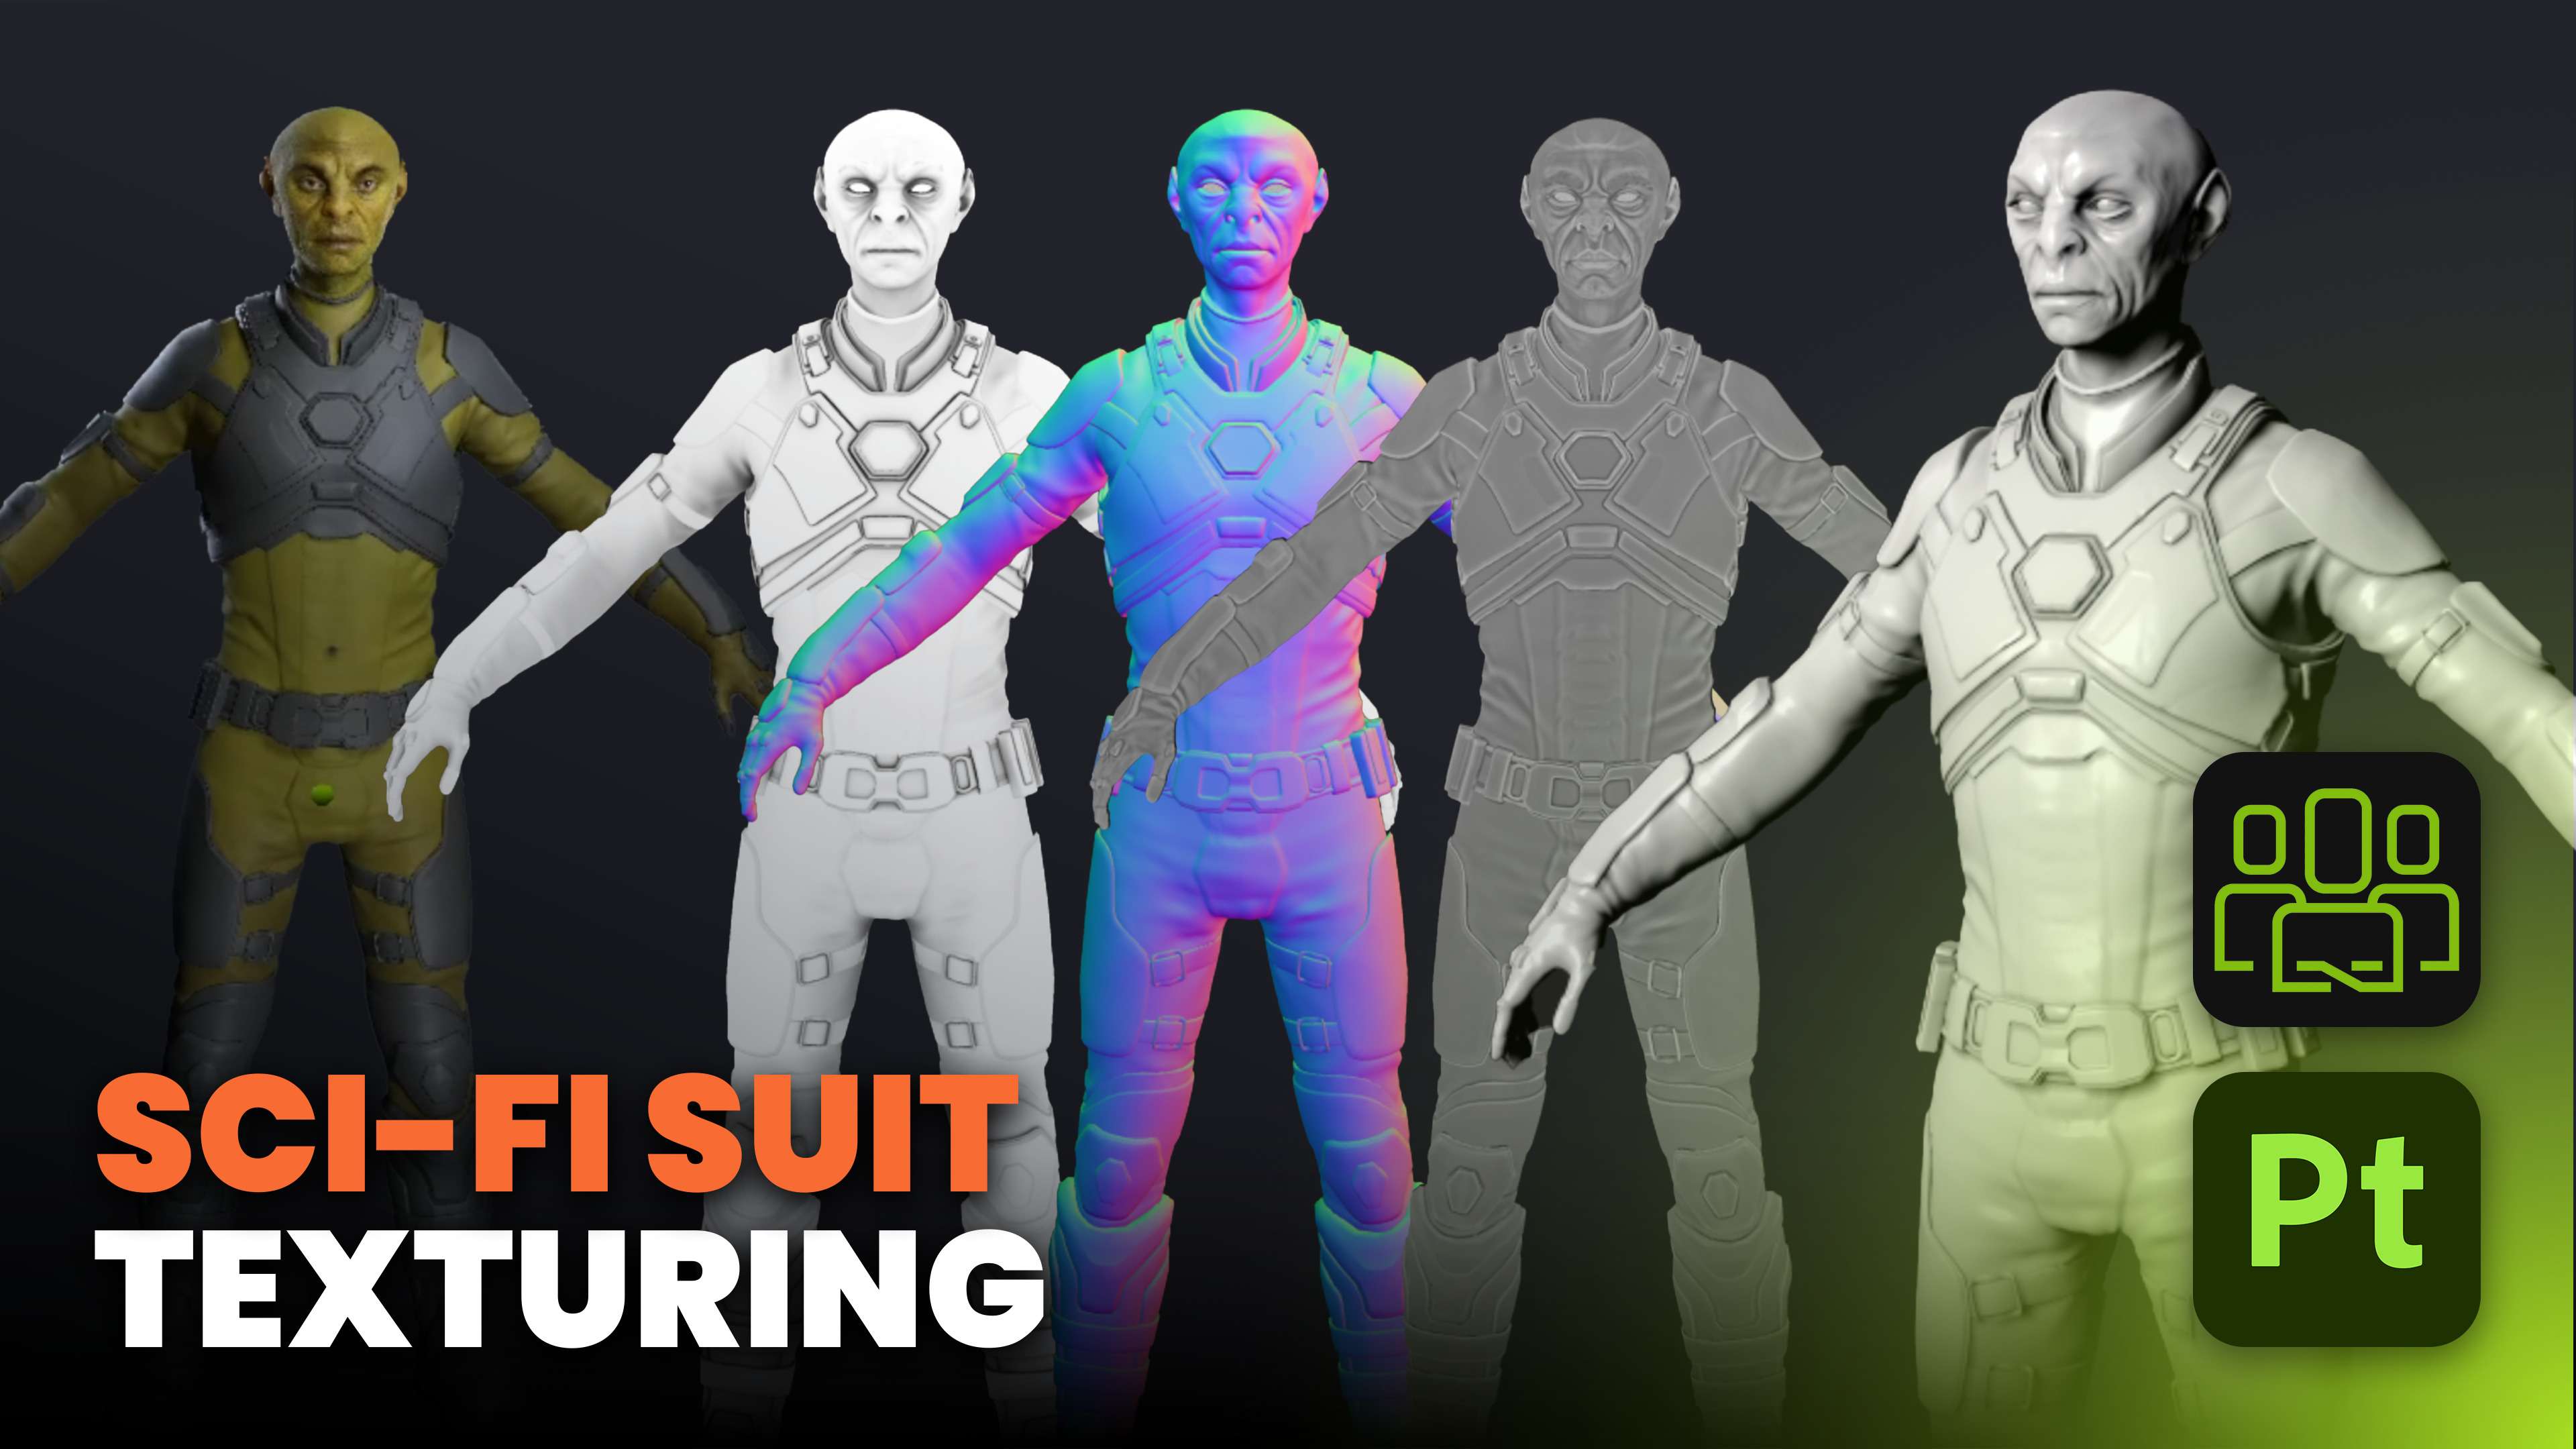
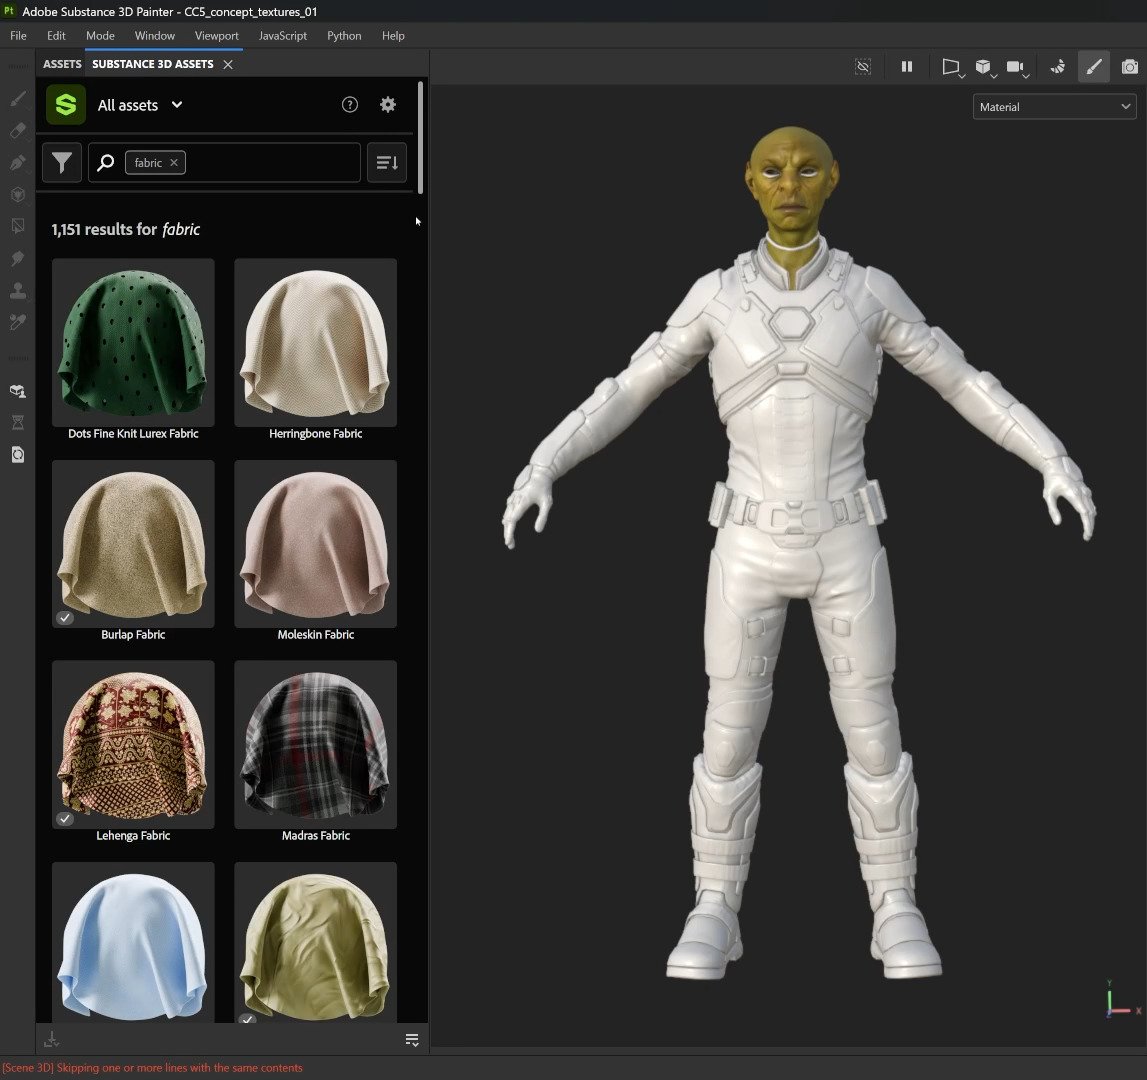
Establish a palette and experiment with materials
I usually start by focusing on material families and patterns rather than colors. For a clean, unified result, I tested built-in Painter materials and assets from the Substance 3D Asset Library. Drag candidate materials into the layer stack and preview combinations before committing.
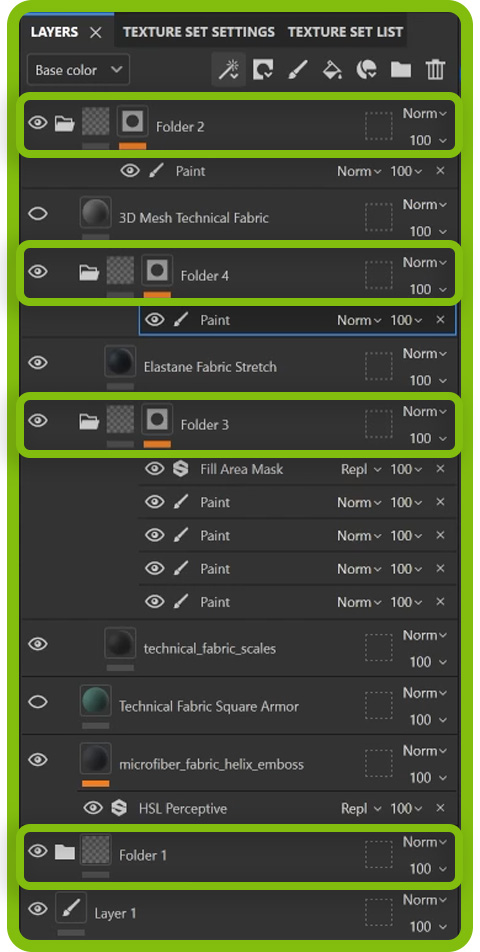
Group chosen materials into a single folder and use a folder mask to isolate areas. For example, paint black over the head area to exclude it from the “suit” folder. This way, anything added to the folder only affects the suit and keeps the workflow organized.
Non-destructive patterning: Path tool and Fill Area Mask
To create padded panels and fabric joins I use a black technical fabric material plus a mask and paint effect. Then I use the Path tool to define shapes. Click points to define a path and produce panels or seams. The big advantage is that this workflow is non-destructive: you can move points and change shapes at any time.
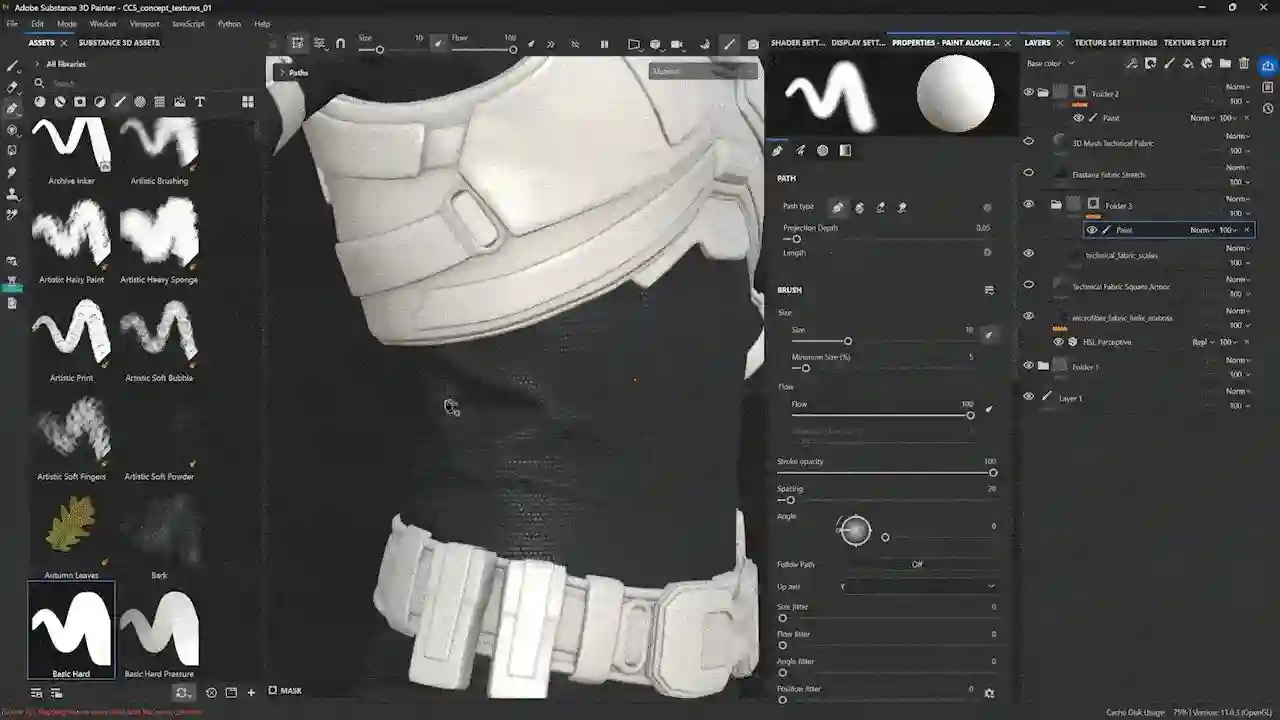
The Fill Area Mask is a game changer. It automatically fills any closed path created with the Path tool and updates dynamically when you move points. This makes iteration fast and low-risk.
Anchor points for consistent detailing
To add borders or tubing around patches, I use Anchor Points. Drop anchors on the paths you created, then reference those anchors inside the mask for another material (for example, a green edge or piping). Place anchors below the fill area mask so they reference only the pad, not the filled area. If you later alter the pad by moving path points, both the pad and the edge update automatically since they reference the same anchor.
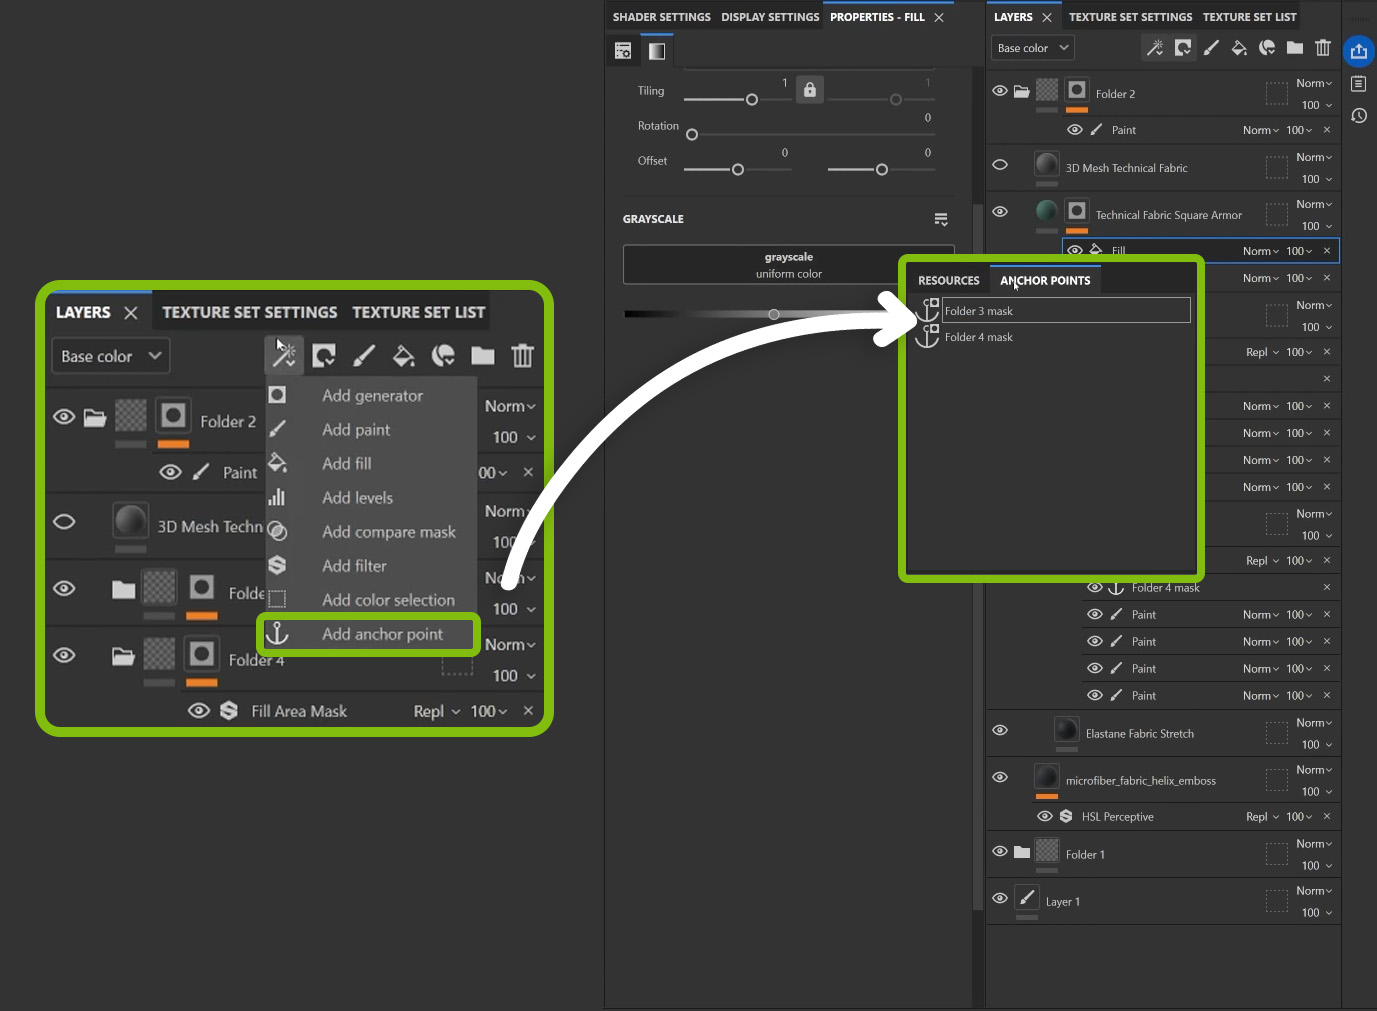
This setup keeps everything flexible: I can tweak placement, scale, or color later. Right now I focus on composition and flow rather than final colors.
The CC5 Substance Painter pipeline is a major asset, automating the export of OBJs and textures to significantly reduce manual errors and save time. When handling complex assets, I rely on the pipeline's robust UDIM support to keep UV sets manageable and seamless. Even extra meshes created in ZBrush integrate perfectly, arriving with clean UVs ready for painting. This workflow supports selective texture reuse, allowing me to keep high-quality CC5 maps for the head while rebuilding the rest of the suit in Painter for maximum creative control.
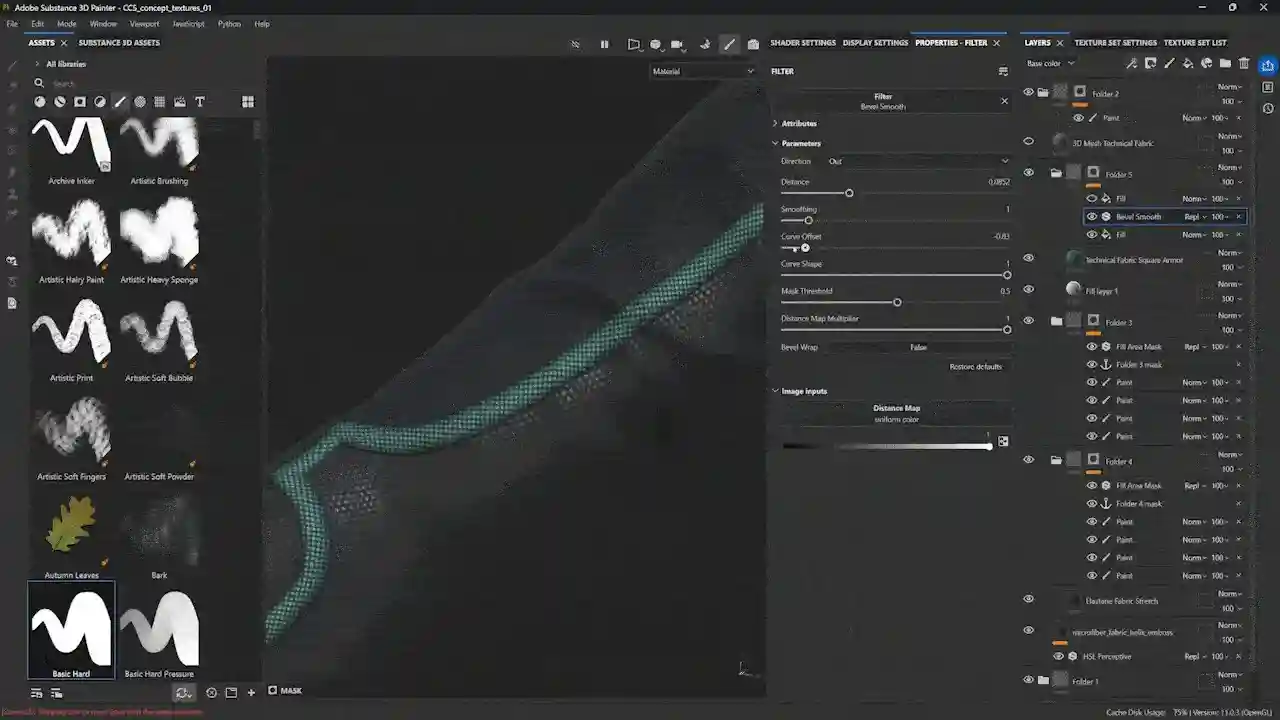
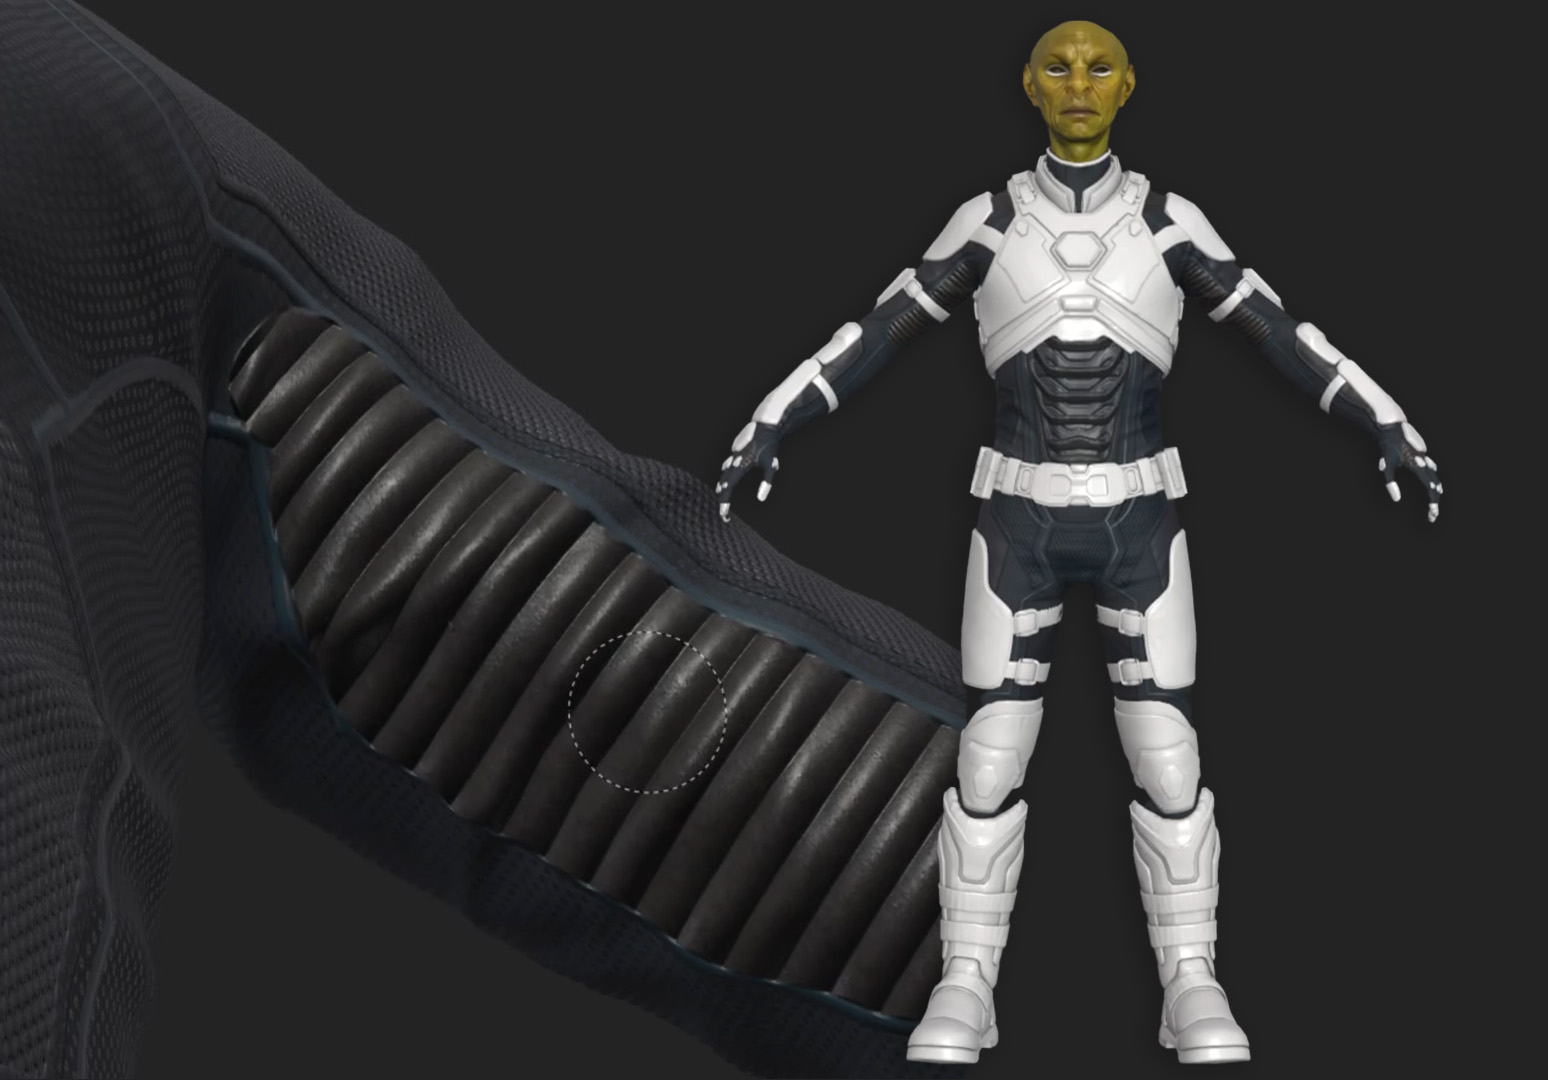
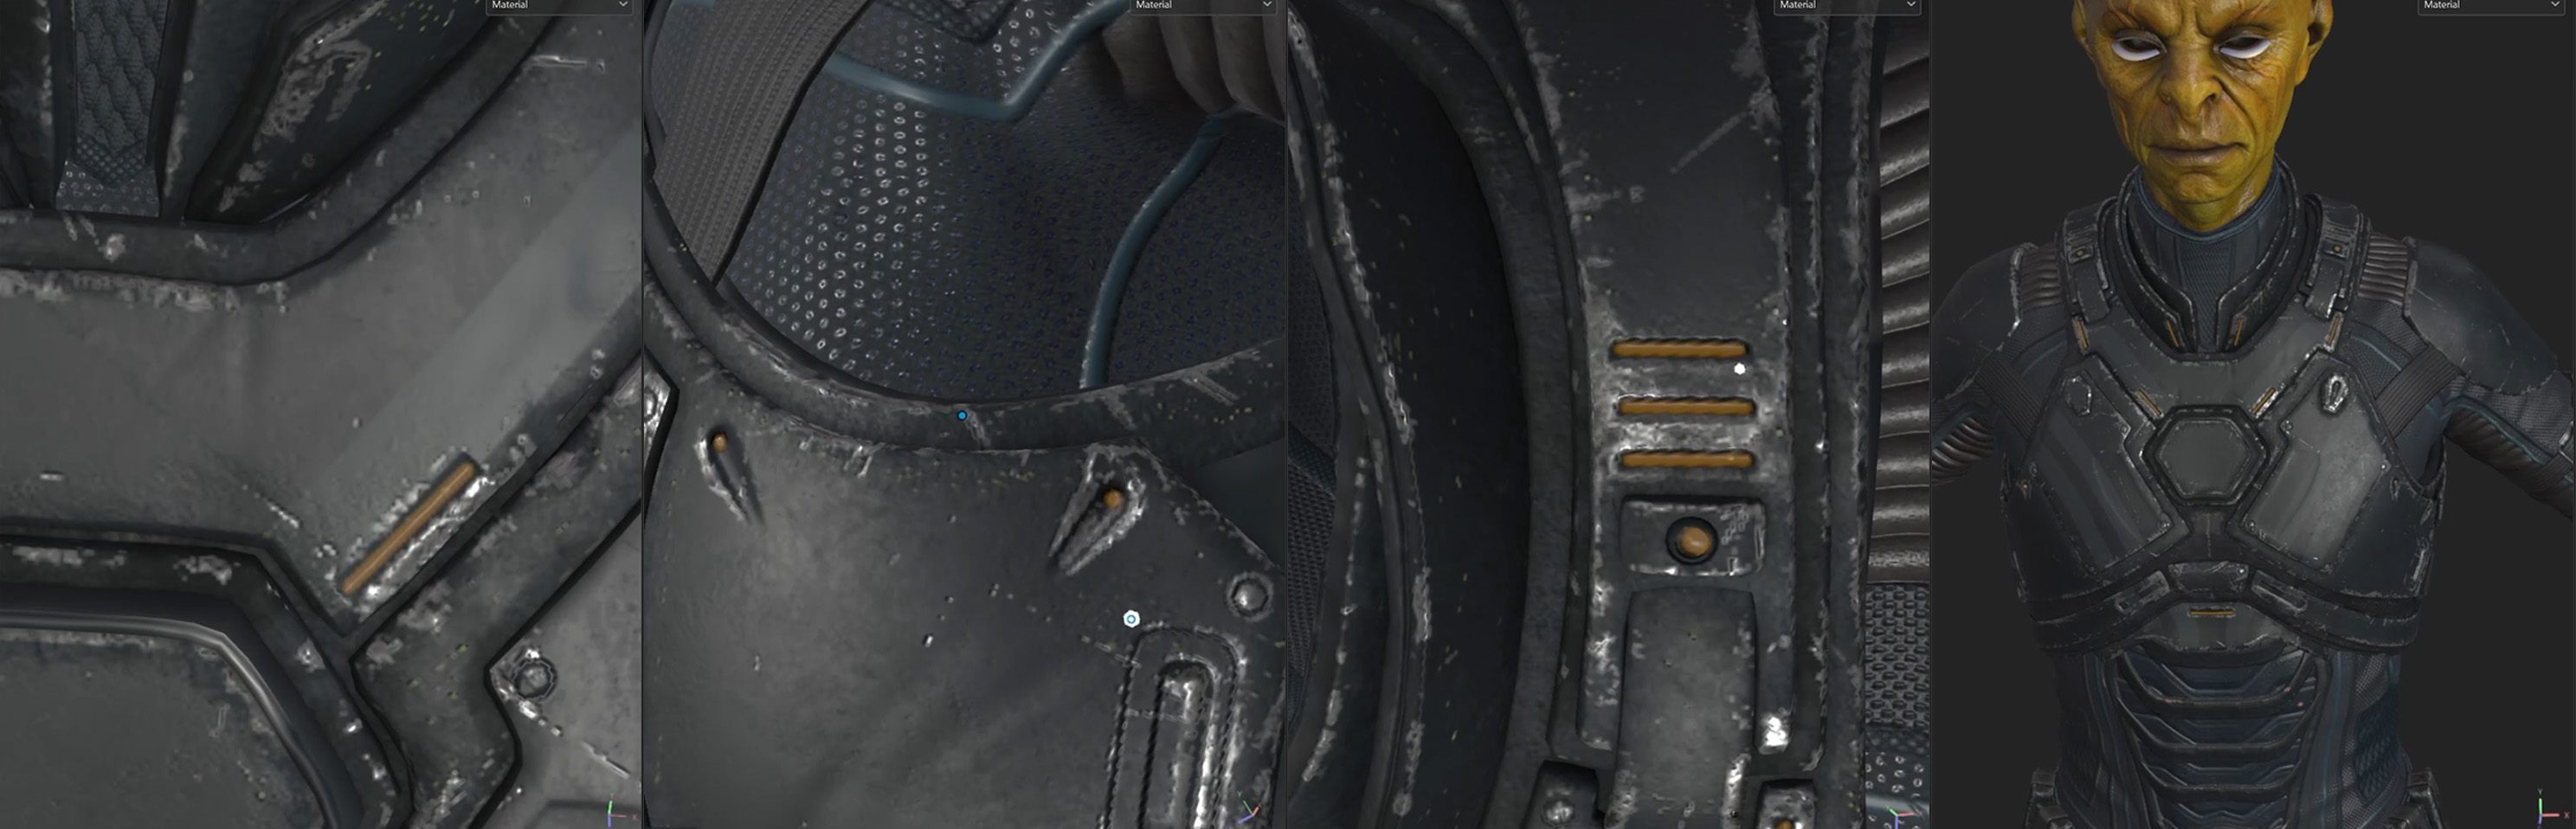
Purposefully adding surface details
Small surface additions sell a suit’s functionality. I like a cable or ribbed pattern from the asset library to create padded reinforcement around the shoulders, between the chest and shoulder pads. It reads as practical padding when the character lifts their arm, and it helps bridge hard armor to fabric elements.
Use these details sparingly: gloves, biceps, strap edges, or the inside of a boot can all get subtle padding. The goal is to communicate how the suit behaves, not to cover every square centimeter with noise.
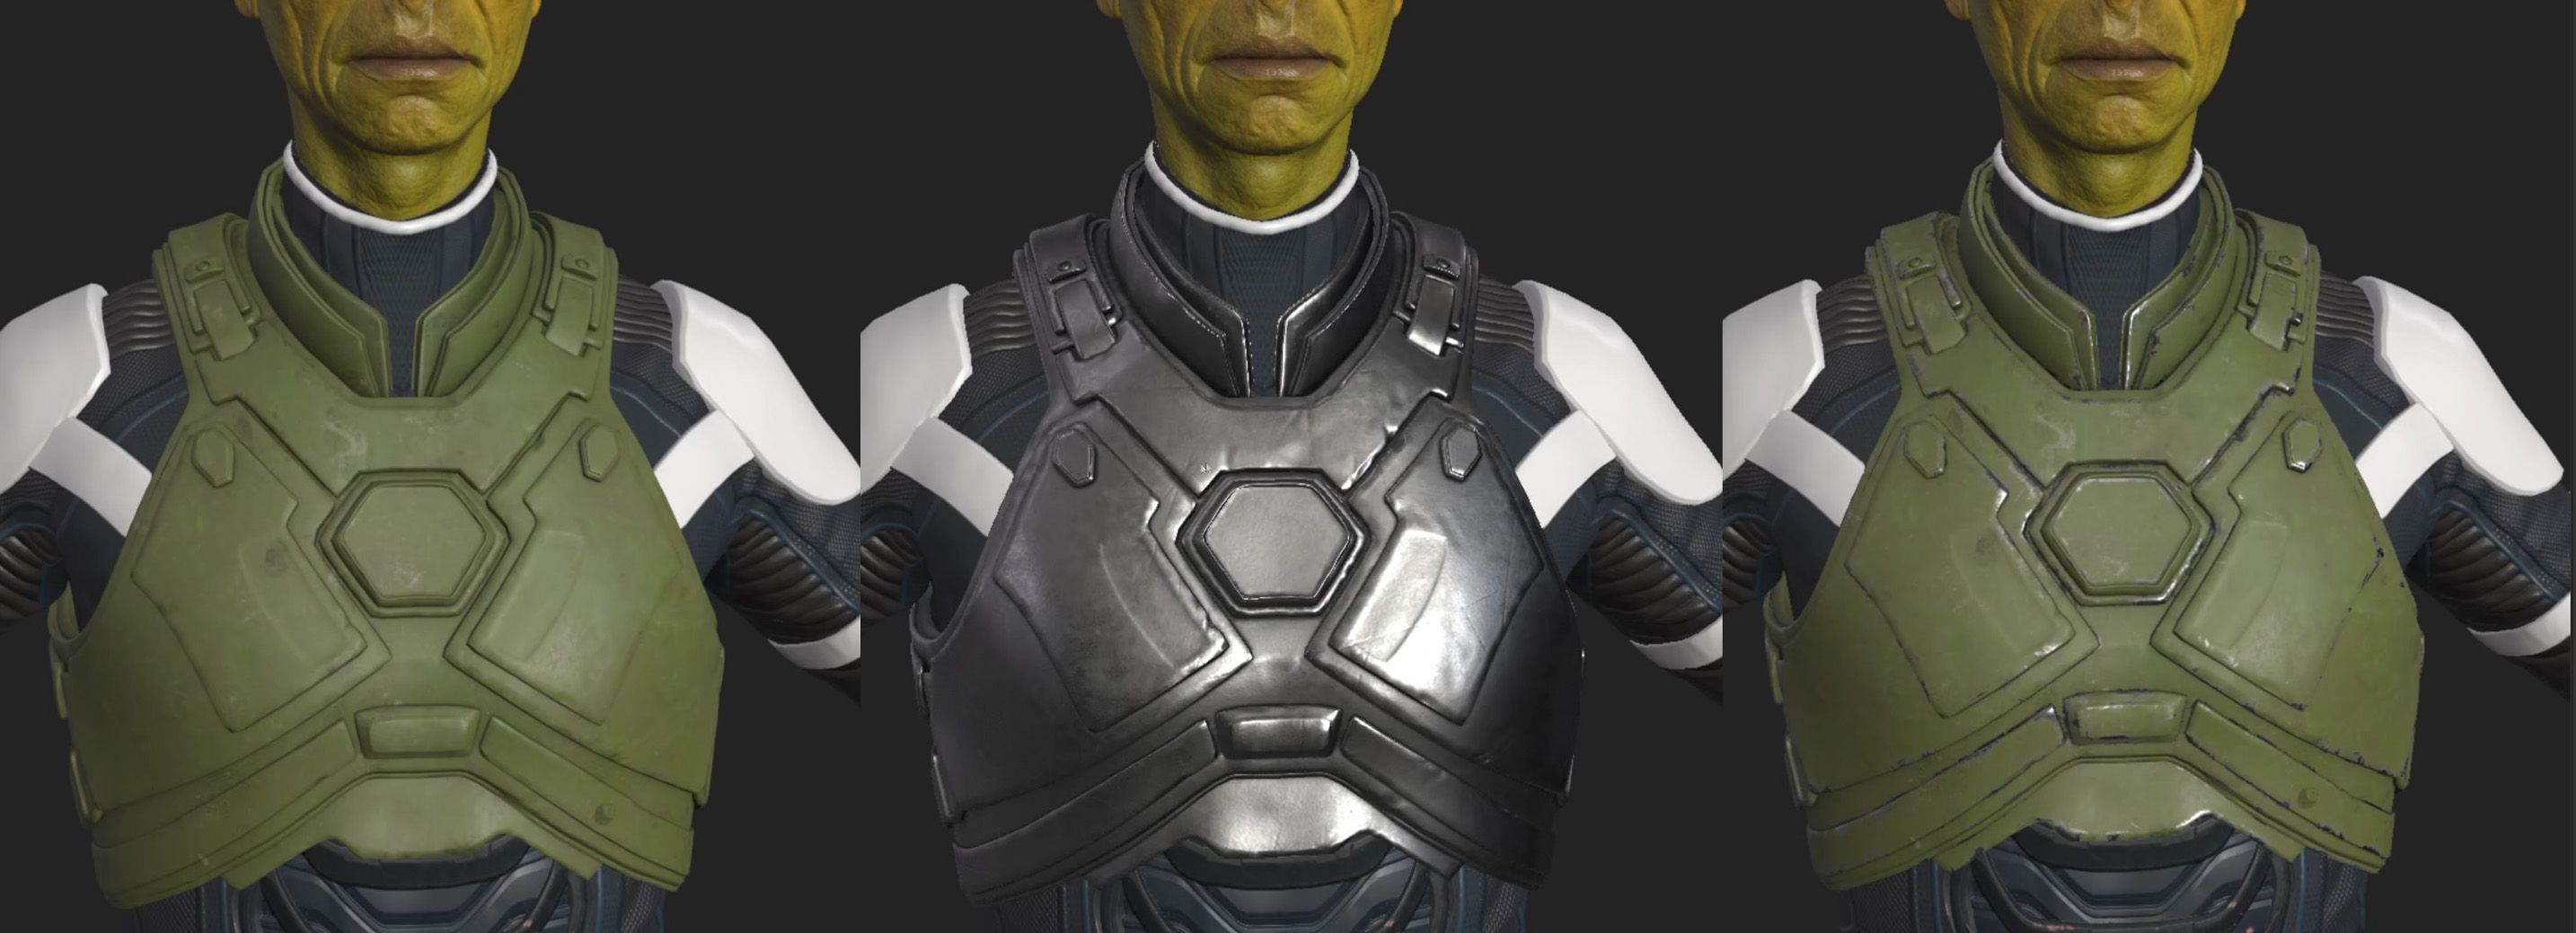
Build and reuse smart materials
I keep a library of custom smart materials. Whenever a layered setup works, I save it as a smart material. Dropping a custom green smart material onto the chest plate gives me an immediate base finish. Additionally, I layer a simple metal smart material and reveal edge wear with a mask.
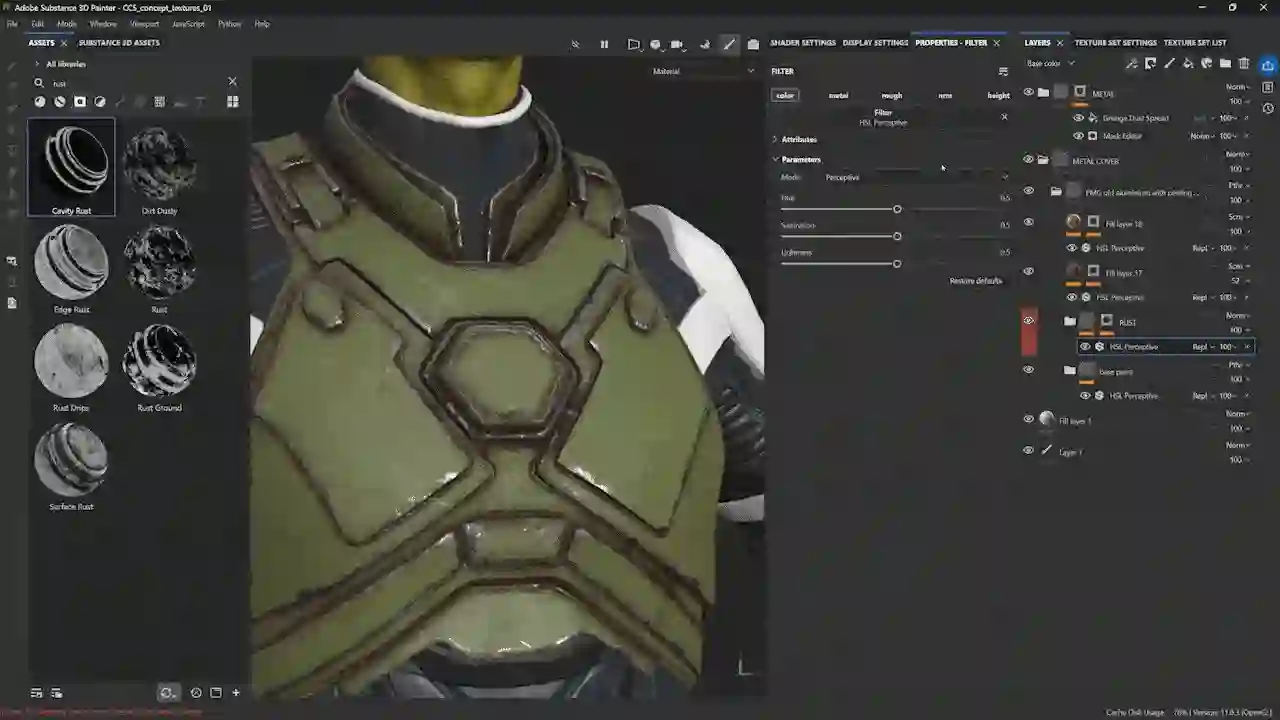
Substance Painter’s built-in smart masks are massive time-savers for establishing base details. A favorite technique of mine is filtering for "gun" and applying the "gun edges" preset, which provides an excellent foundation for scratches and edge wear. To prevent the result from looking generic, I refine the mask by adding grunge maps set to subtract; this reduces the intensity of the preset and makes the damage feel far more organic. Finally, I rely on the HSL Perceptive filter as my go-to tool for tuning hue, saturation, and brightness, ensuring the material aligns perfectly with the overall color palette.
Group, instantiate, and maintain single-source edits
Once I have a metal coating and its supporting metal folder dialed in, I group them into a single folder called armor. Then I use Painter’s Instantiate across texture set feature to push that exact setup to every piece that should share the same finish: chest, pads, boots, belt.
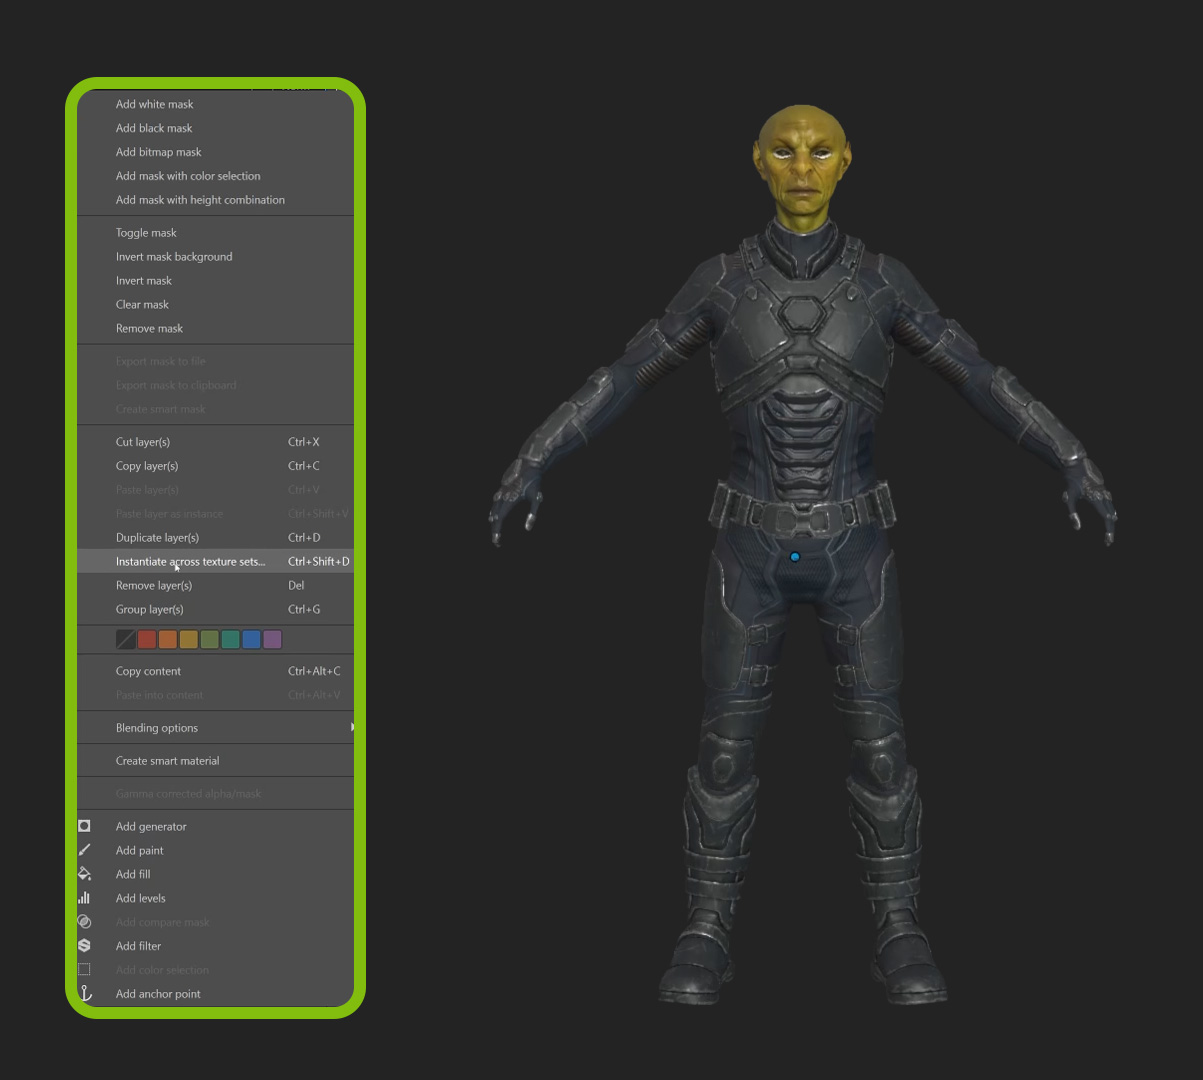
Because it's an instance, editing the original immediately updates all other texture sets. Change the hue, adjust the mask, or tweak the roughness. This is ideal for keeping consistency across armor without repetitive work.
Add pattern, normals, and emissive accents
Straps and fabrics get a repeated pattern. If the UVs were unwrapped with straight islands, vertical or horizontal patterns tile cleanly across wraps and loops, which means consistent texture direction on straps that wrap a limb.
For high-frequency hard surface detail I avoid adding geometry. Instead I paint normal detail directly in Painter: load hard-surface normal detail maps into a hard brush and paint them onto a single painting layer. This keeps topology clean and conveys the look of panel seams, bolted plates, and tiny bevels with texture maps alone.
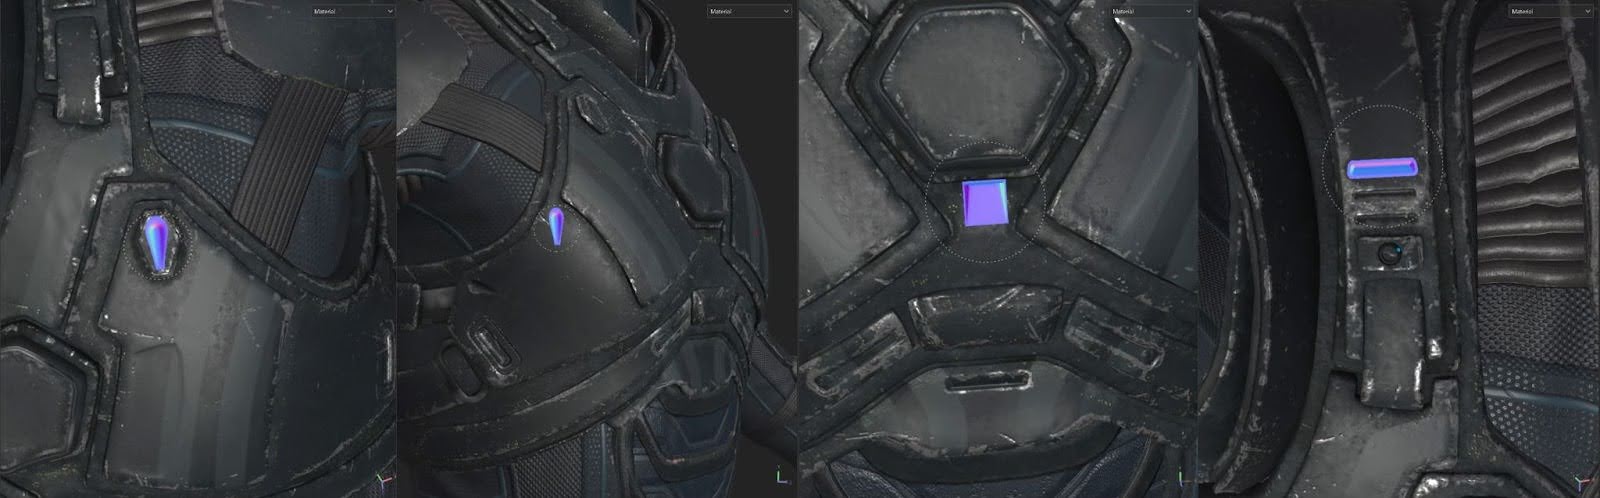
Emissive stripes are a quick way to add personality and a sci-fi vibe. I create a fill layer, enable the emissive channel, mask it black, then paint the mask to reveal glowing accents. Fine-tune brightness, color, and add grunge for variation.
Exporting textures for Character Creator 5
Prevent import errors in CC5 by utilizing the correct export configuration. Begin by installing the Character Creator export preset to guarantee proper channel mapping between the applications. Open File → Export Textures and disable any unmodified texture sets to keep the file structure clean. In the Global Settings, apply the Character Creator template, select PNG format, and define the resolution as 4K for optimal visual fidelity. Choose the destination directory and execute the Export command to finalize the assets.
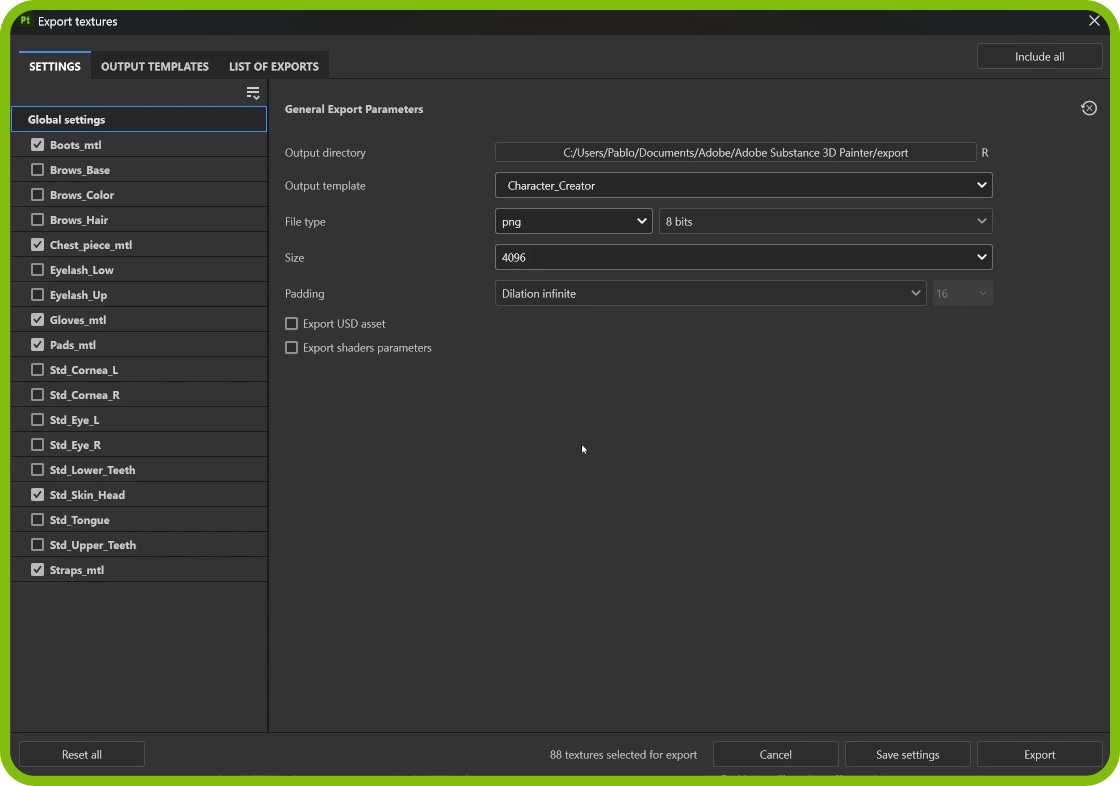
Once finished, you’ll have organized folders with the maps ready for CC5.
Importing into Character Creator 5
Character Creator 5 includes a Substance Painter pipeline that automates import and assignment. In CC5 go to the File menu and open the Substance Painter pipeline, then use the Update textures from Substance Painter option. Point CC5 at the exported folder and it will assign every map to the correct material slot automatically.
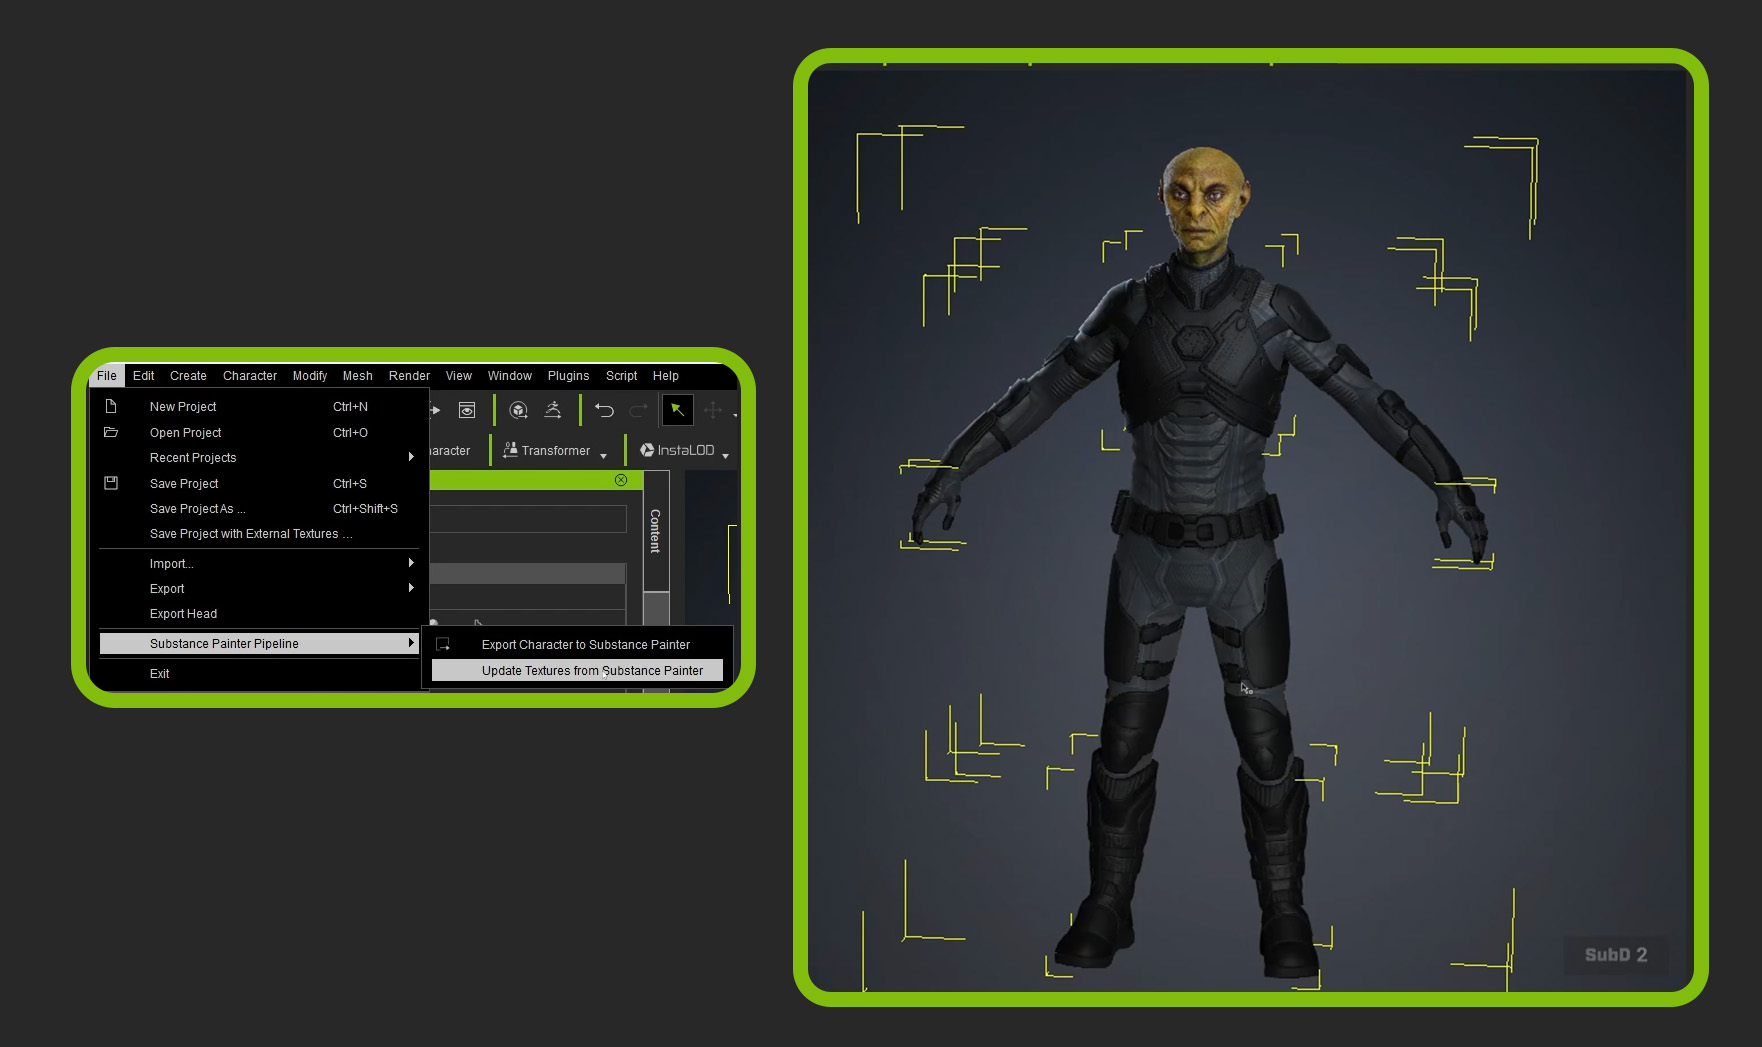
If your textures look unexpectedly dark after import, don’t panic. That usually means a temporary dark diffusion color was blended in earlier to visualize deformations. Set the diffuse color back to white in the material settings and everything will render as intended.
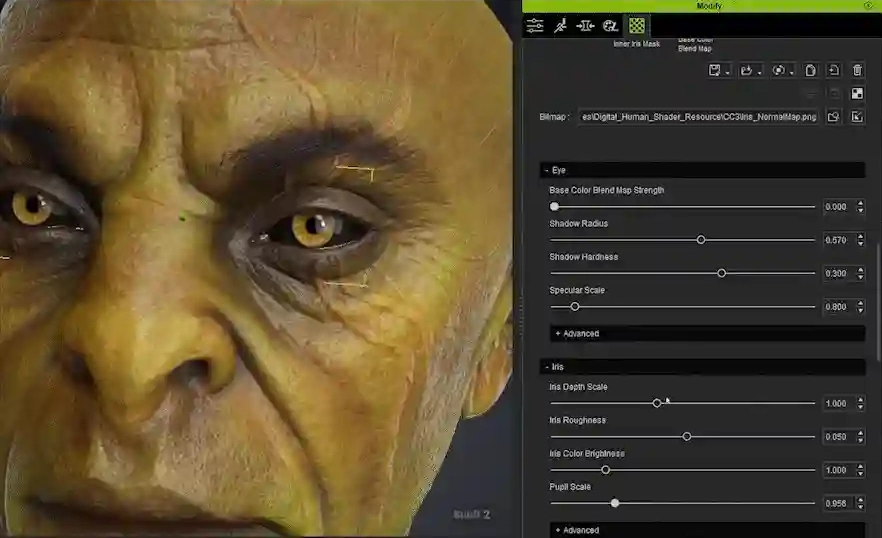
Features that speed iteration
Character Creator 5 stands out for look development and iteration, largely due to features that automate tedious tasks. The Substance Painter pipeline handles texture assignment automatically, eliminating manual slot mapping and maintaining a non-destructive workflow, while the "Update Textures" command allows for one-click reimports during iterative tweaks. For facial details, the Modify tab lets you adjust iris brightness, pupil scale, and sclera images directly. While the Dynamic Wrinkle system is phenomenal for animation, I recommend replacing its default expression-specific textures with your own Painter-generated maps to ensure visual consistency during deformation. Finally, CC5’s robust integration options serve as the perfect launchpad for the next step: a single-click setup for Marmoset Toolbag 5.
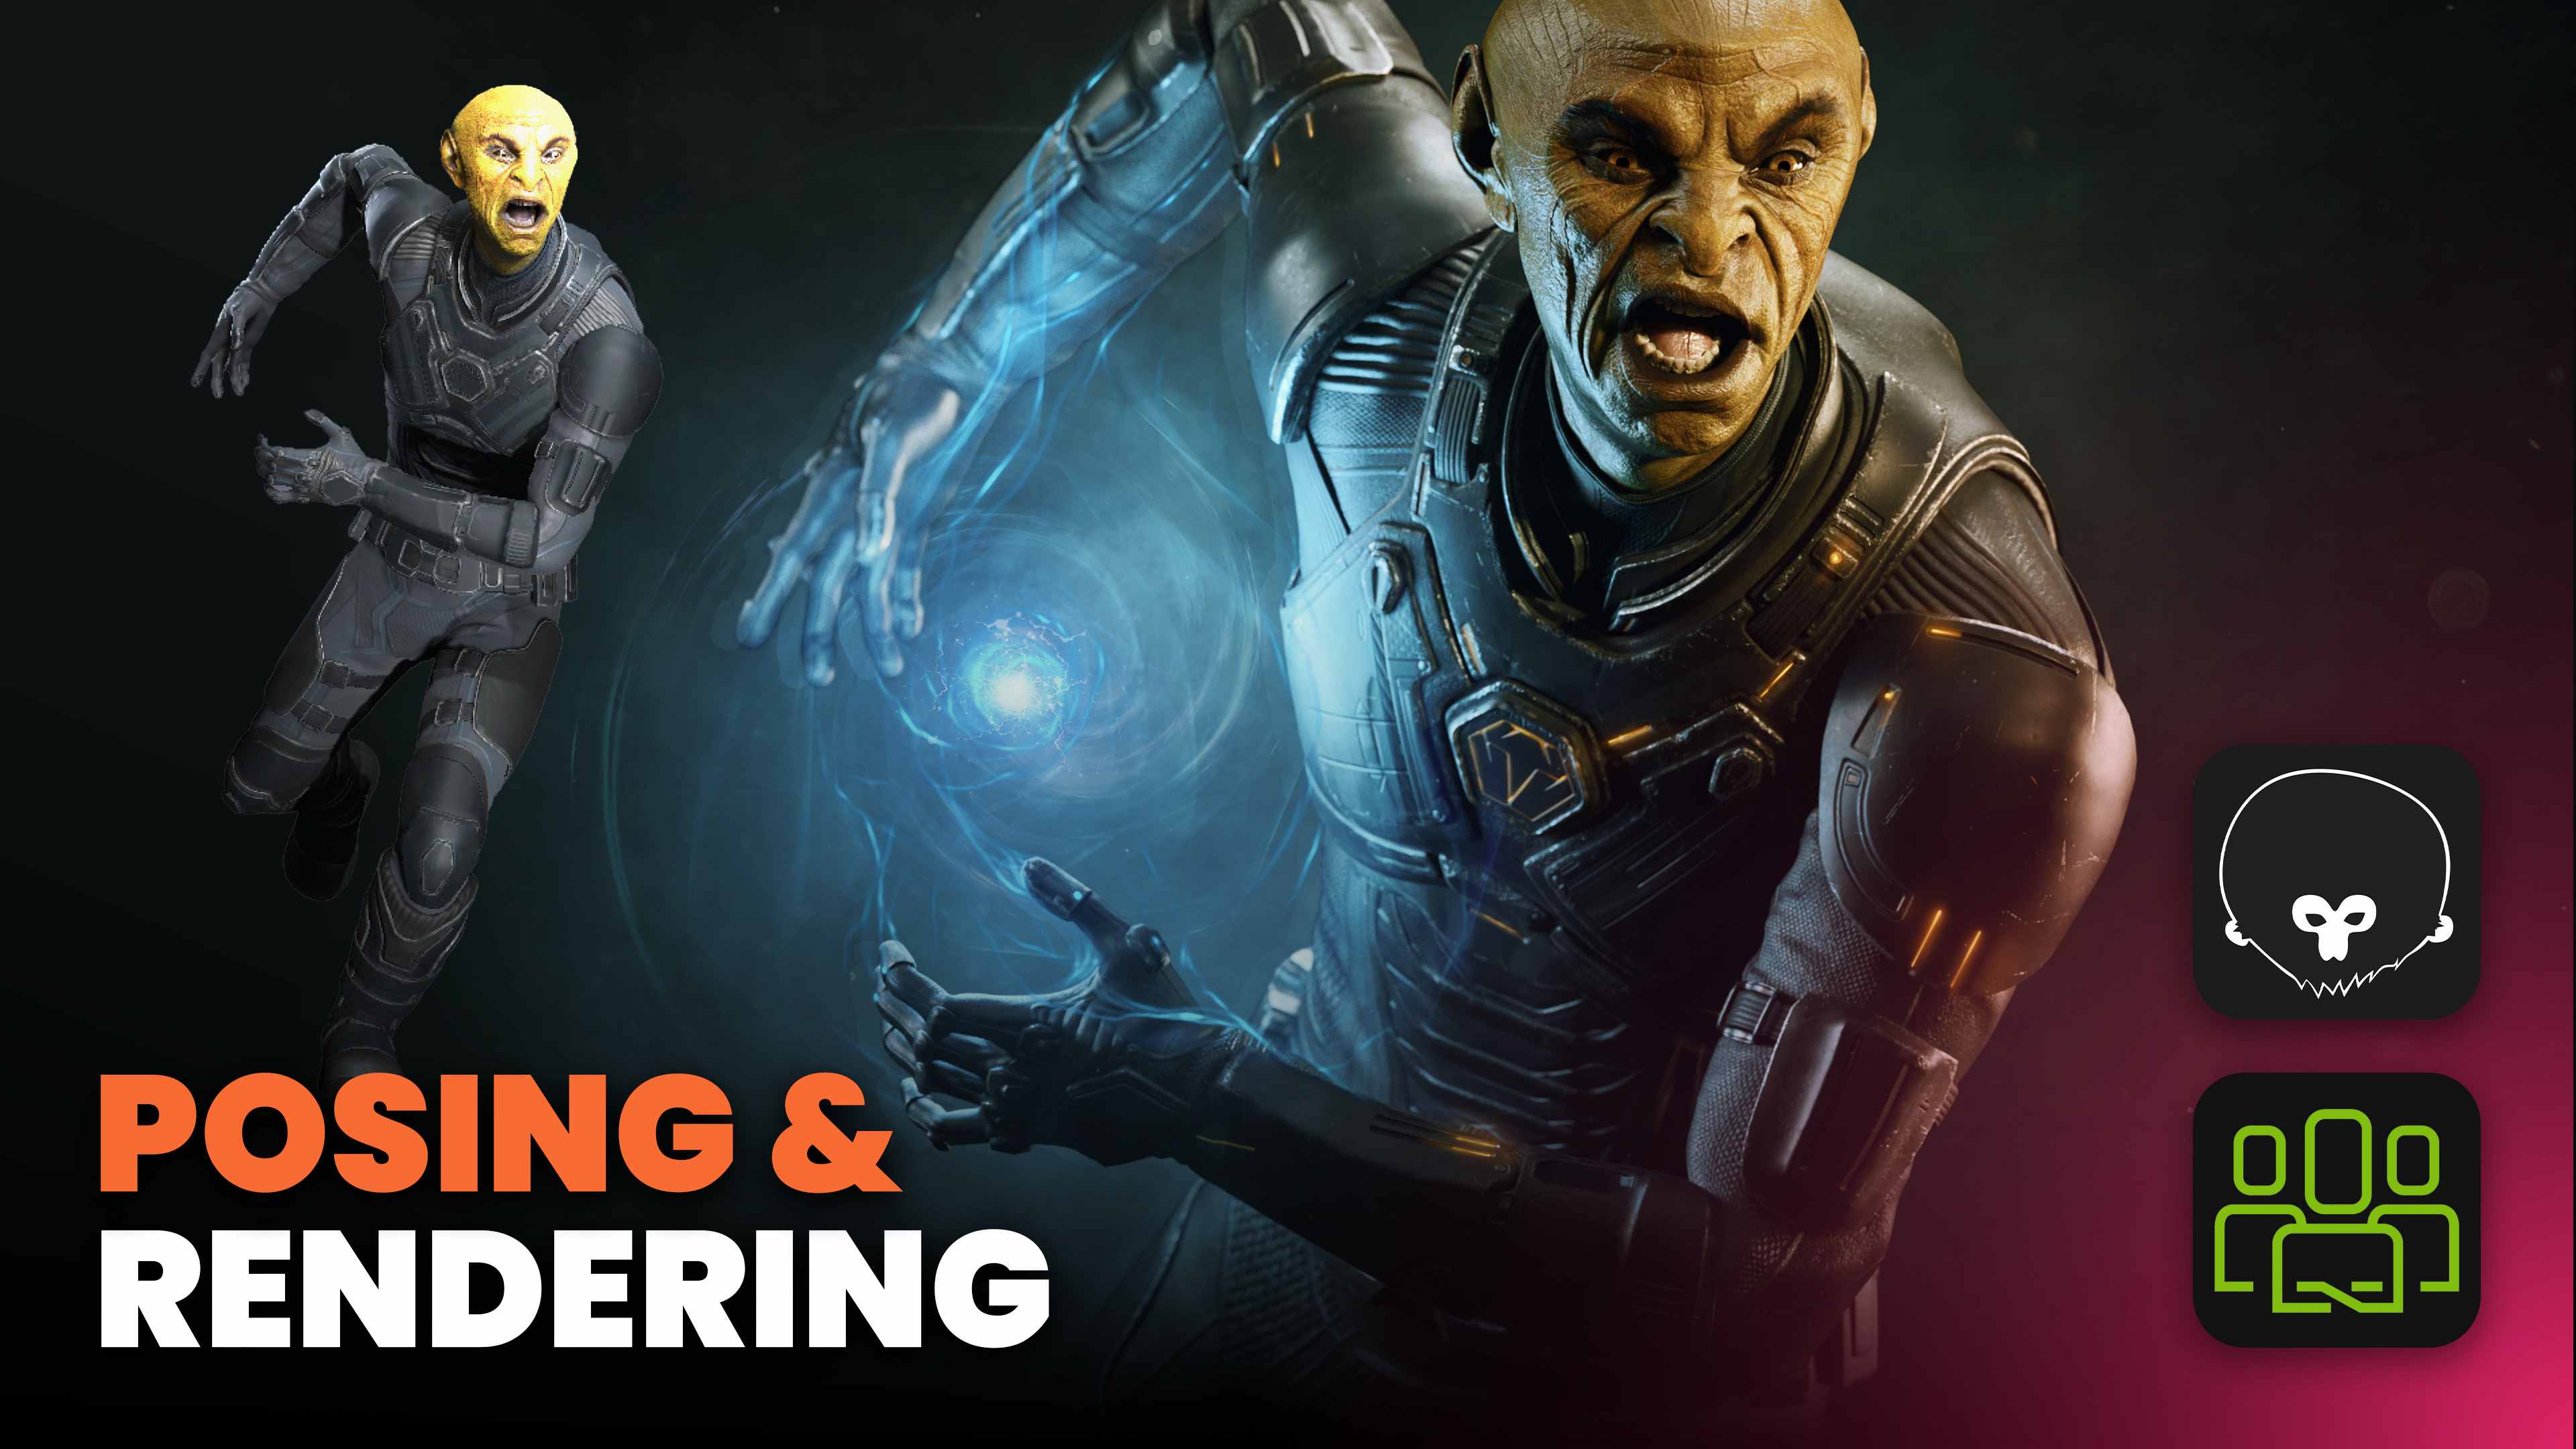
Finishing with a dynamic pose
I begin by choosing a motion from the Content Pack tab. CC5’s Pack section in the Content window includes motion and animation packs you can download or buy. For this project, I used a Parkour pack as a starting point. Drag and drop the animation onto the character and scrub through the timeline until you find a frame with potential.
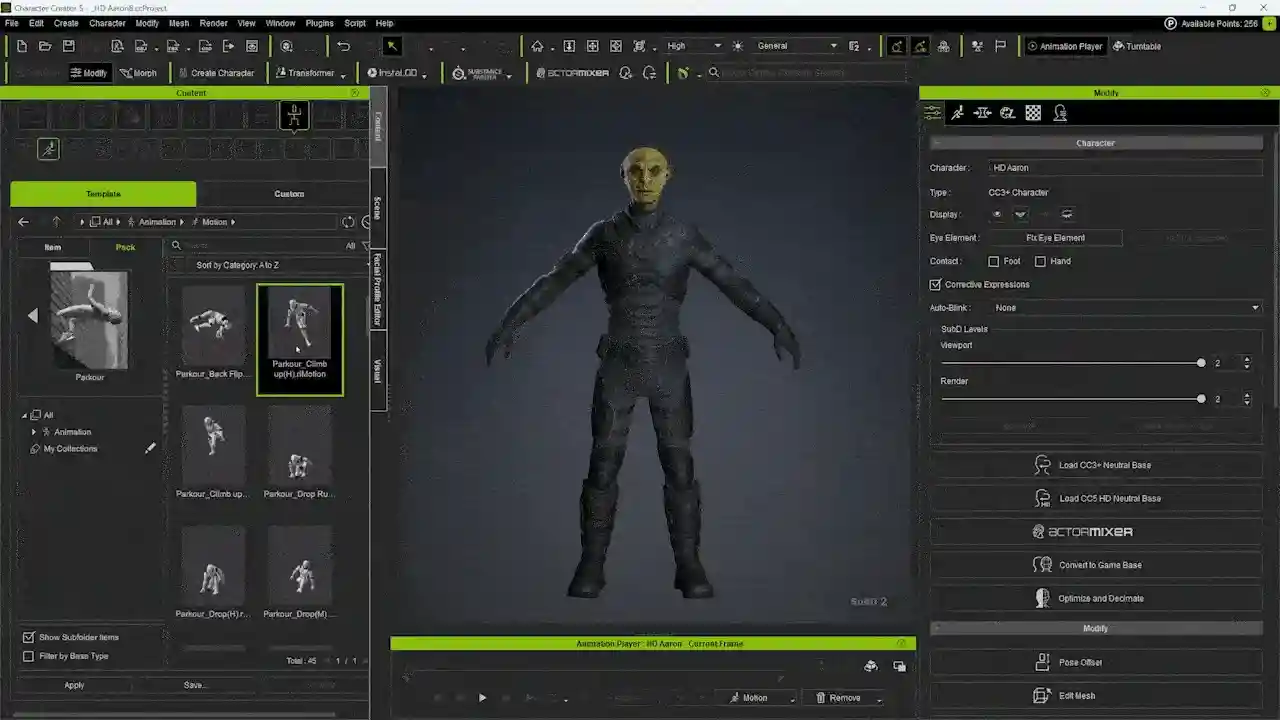
Open the Parkour motion pack to browse starting animations.
Once I find a frame that reads well, I switch to the Modify tab and use Edit Pose under the Motion section. This opens a pose editor where I can select joints and rotate them to refine balance and weight. I usually toggle off the joint dots to reduce visual clutter while I tweak the silhouette and center of gravity.
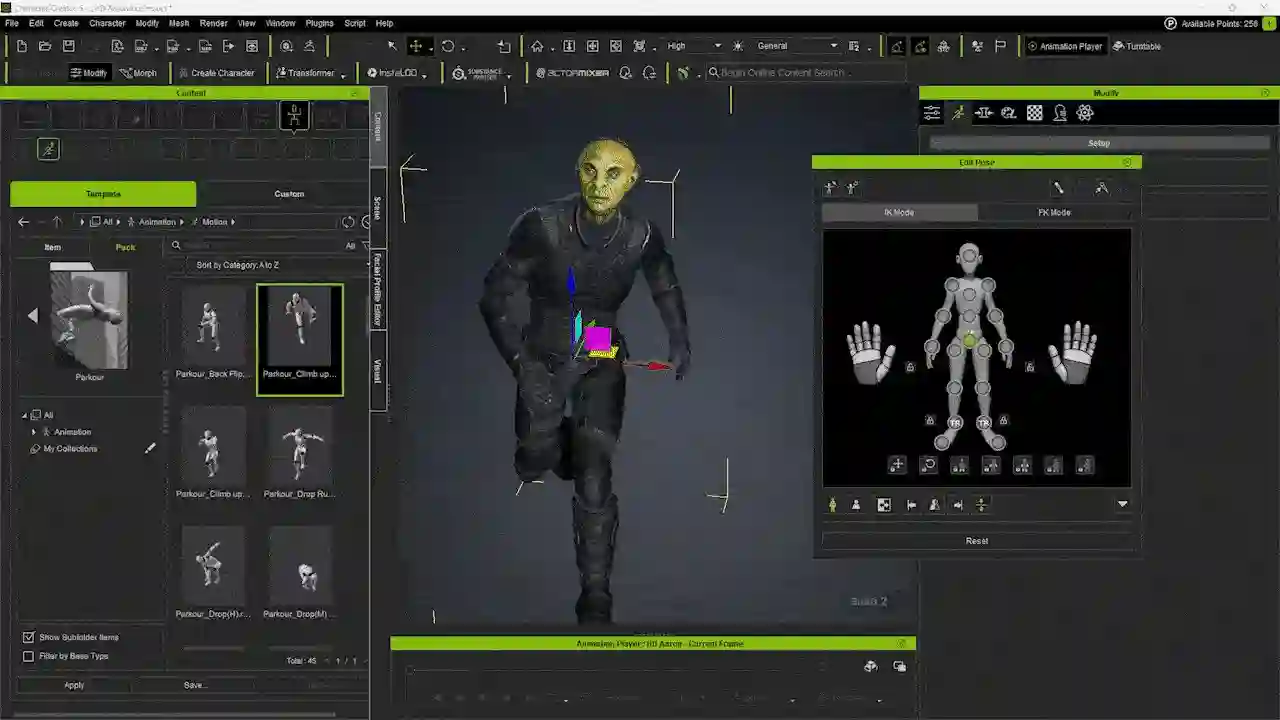
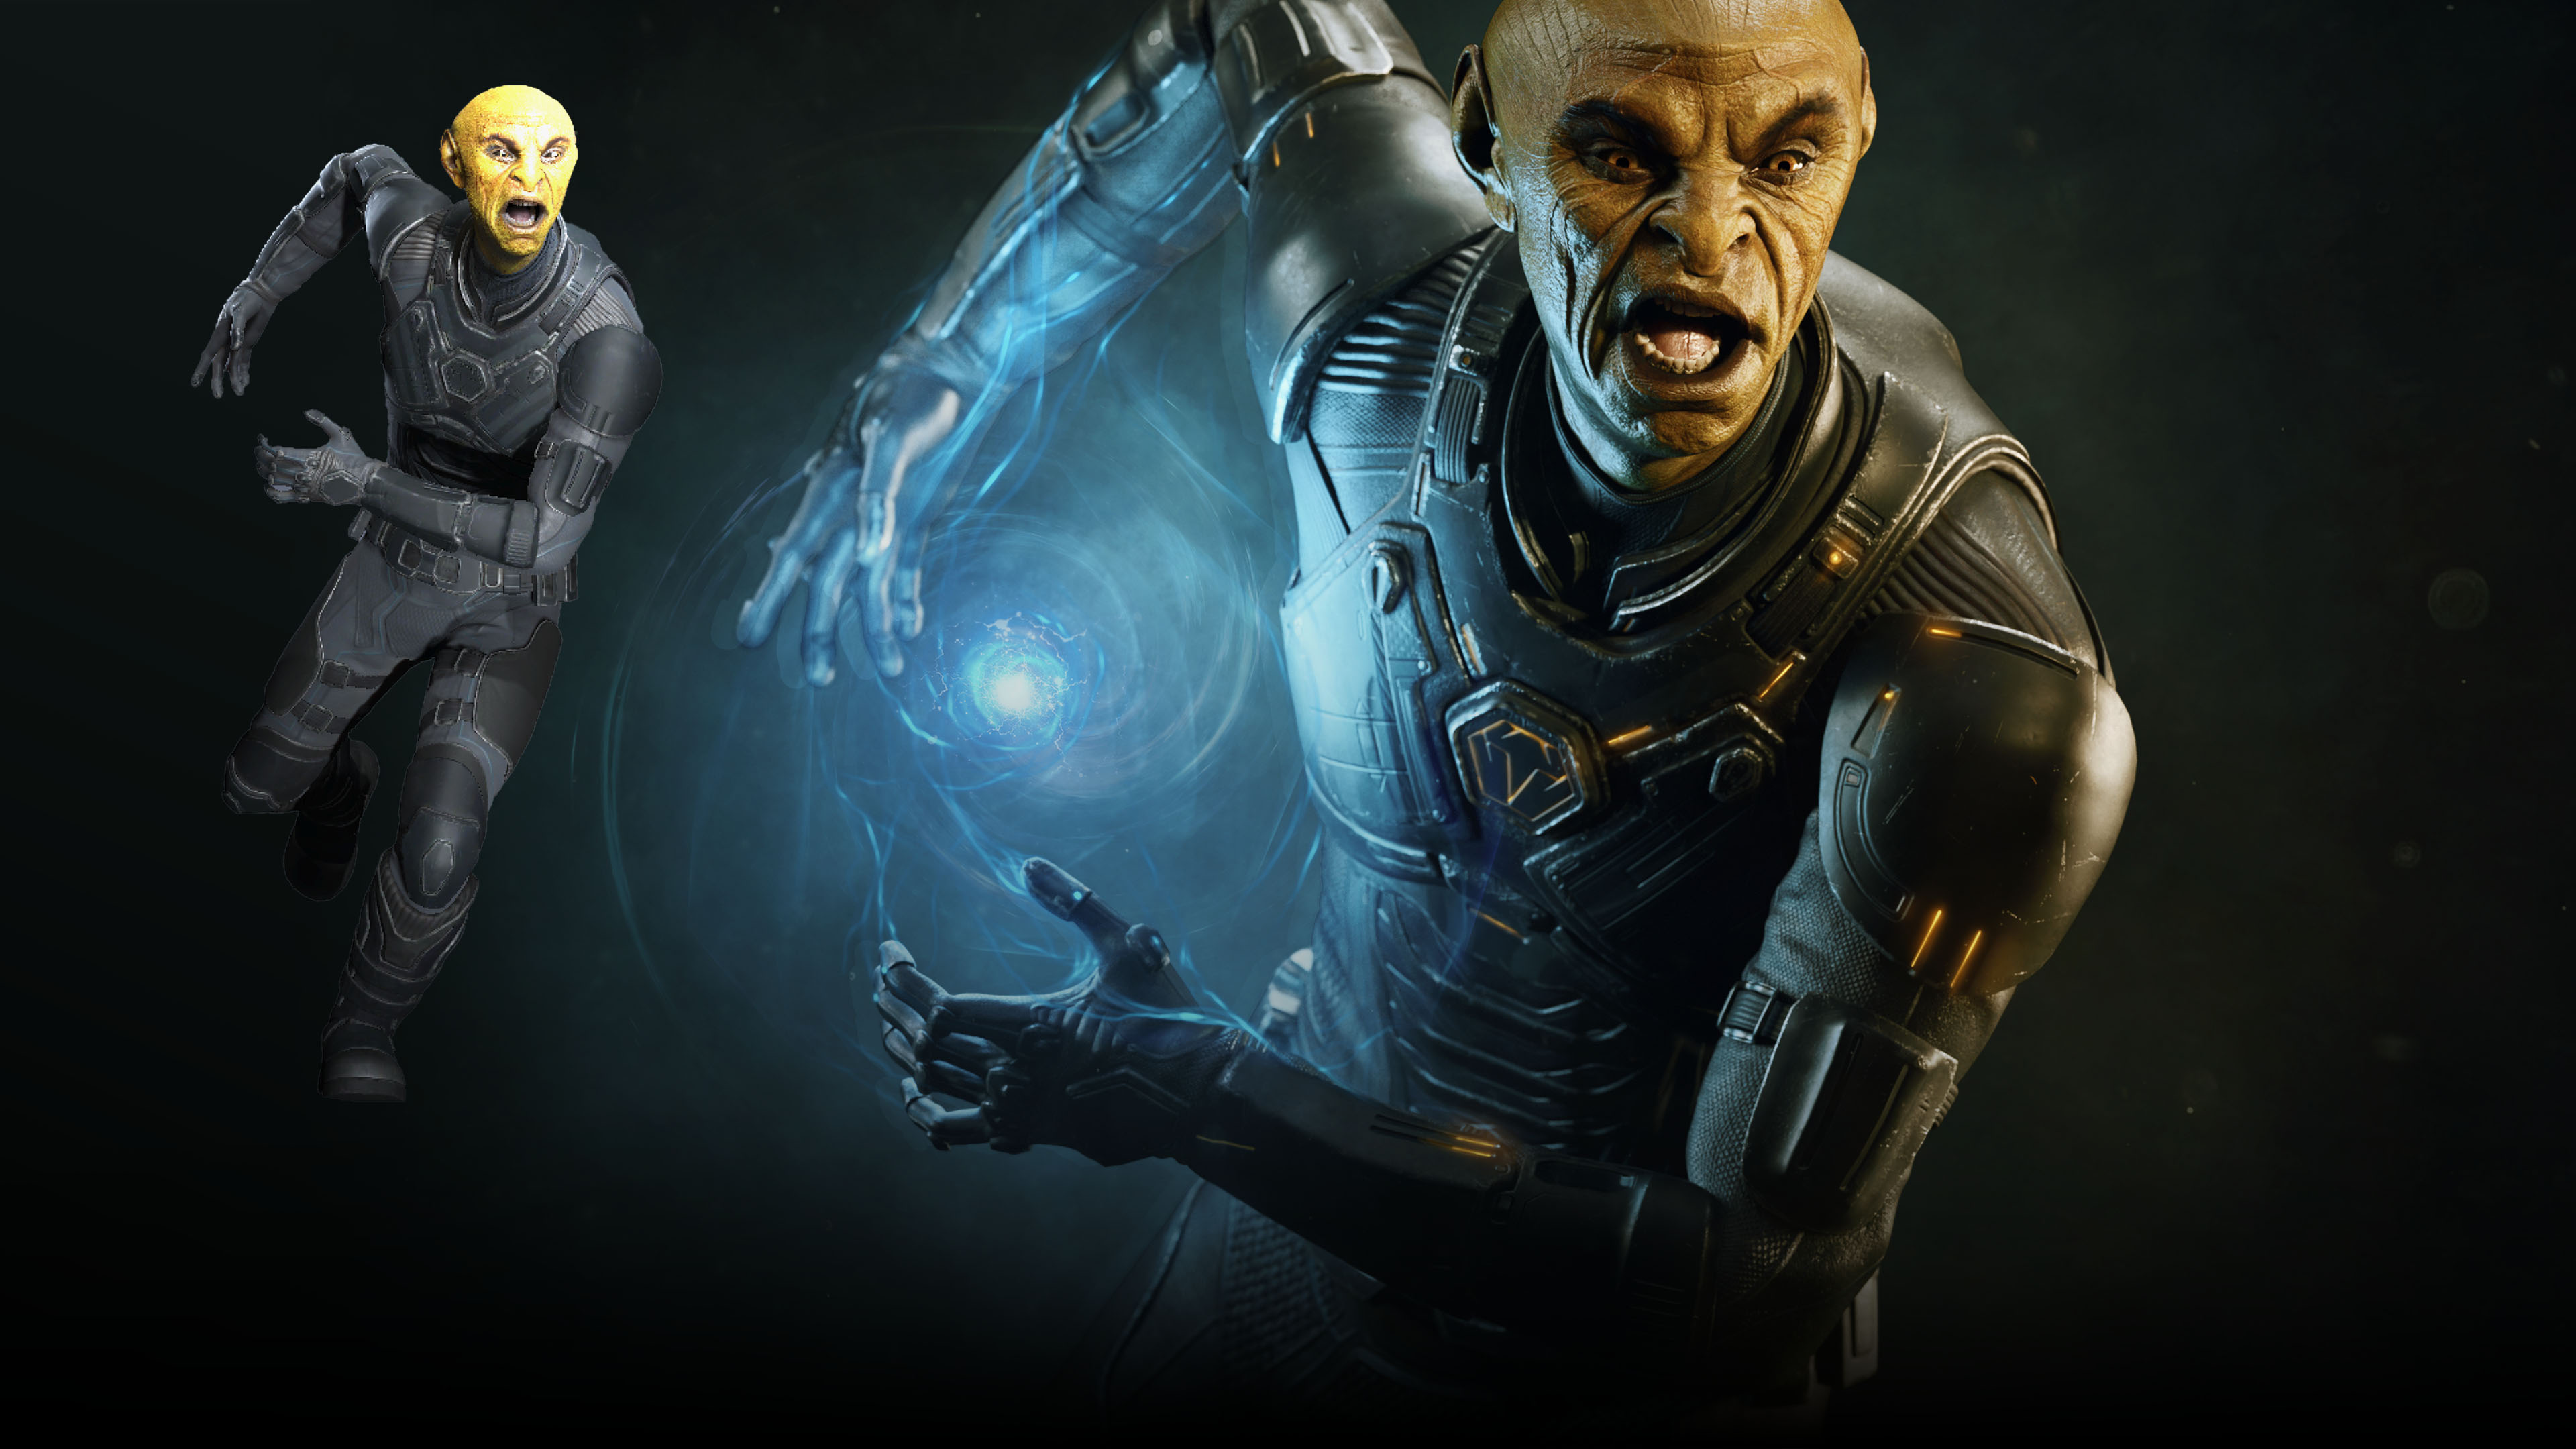
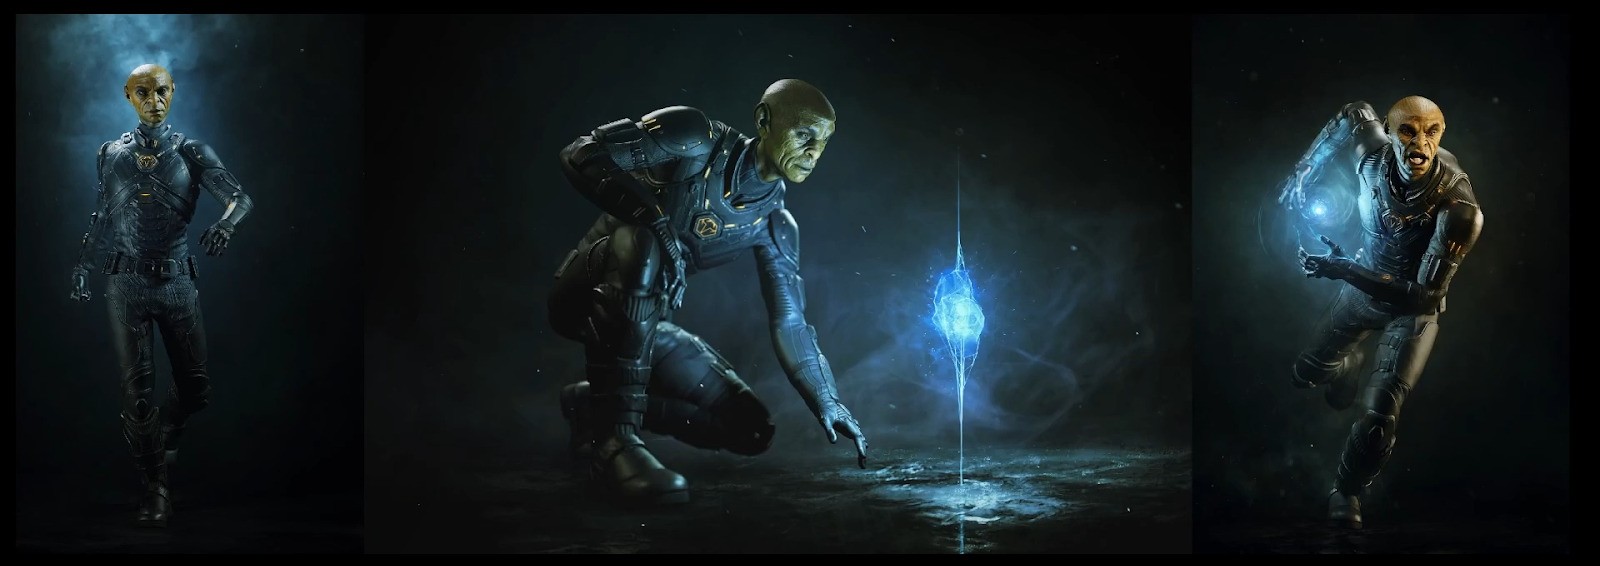
Working with a purpose matters. I give each pose a bit of backstory so the silhouette and limb placement make sense. For example, I imagined this character running while charging an energy orb between their hands. That story explained why the hands are cupped and the chest is pitched forward. Having that intent prevents aimless adjustments and keeps the pose coherent.
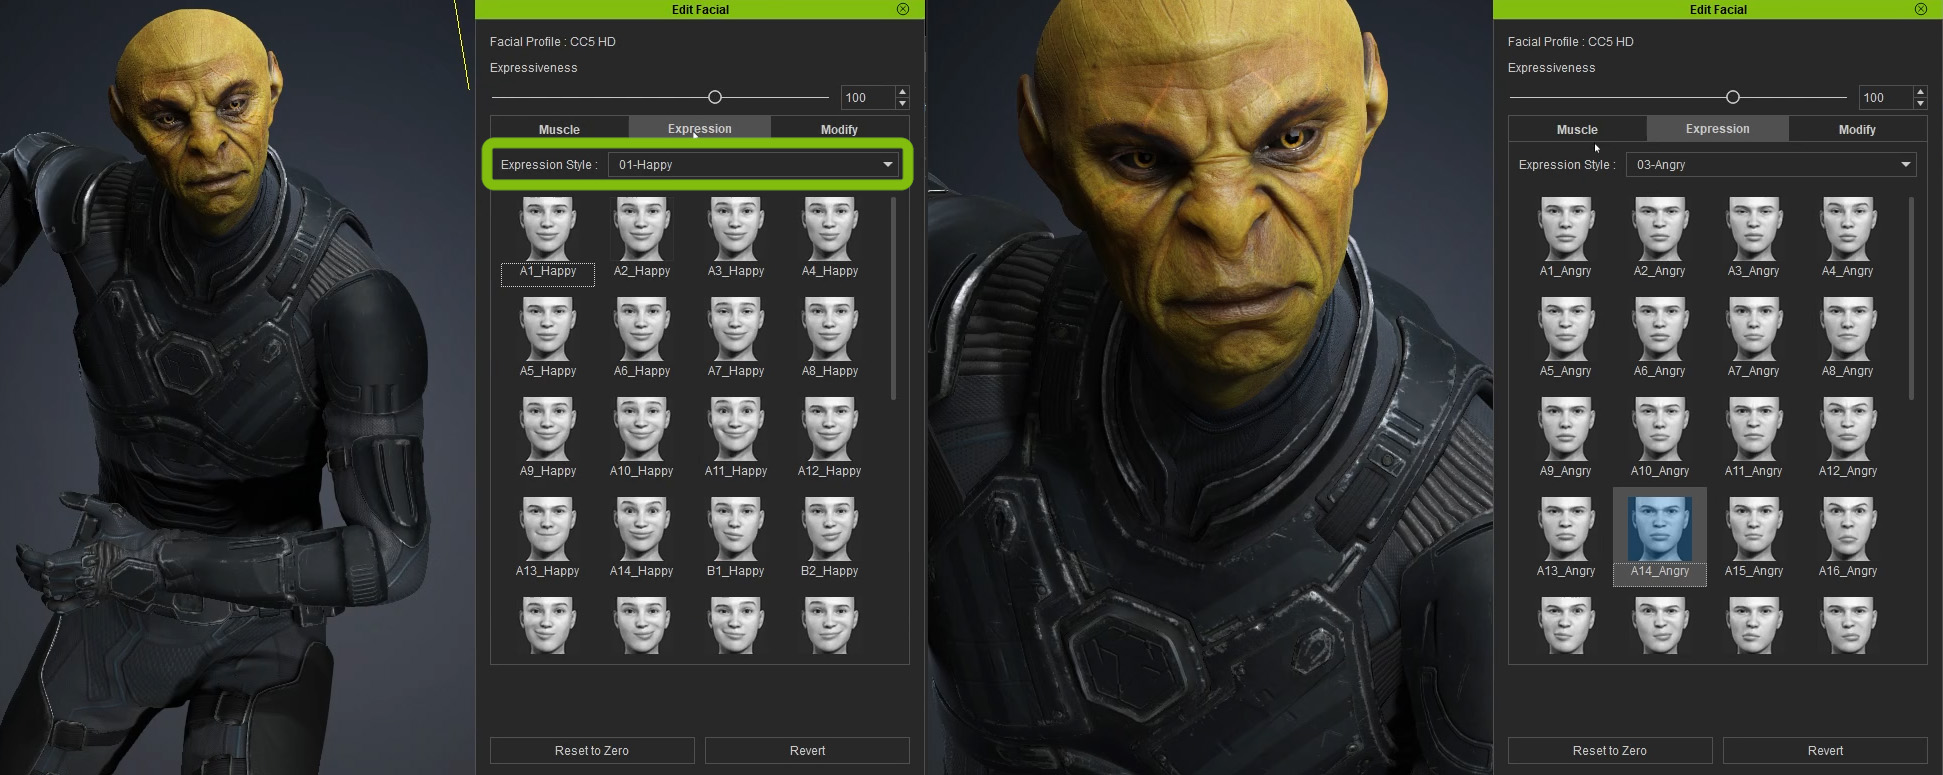
Match the facial expression
Posing alone is not enough. The facial expression must sell the emotion that the body promises. In CC5 I ,use Edit Facial from the Motion section. CC5 includes a range of expression presets under the Expression tab and a dropdown to choose a base emotion.
After selecting a base expression, I switch to the Muscles tab and tune specific areas of the face. The interface behaves like the morph controls used for body shaping: select the facial region, then click and drag with the middle mouse button to sculpt the expression. Small micro-adjustments here make a huge difference in believability.
I always save custom poses to my personal pose library so they can be reused on other characters or future projects. Building a library of strong poses pays off quickly in productivity and consistency.
Exporting the posed character to Marmoset
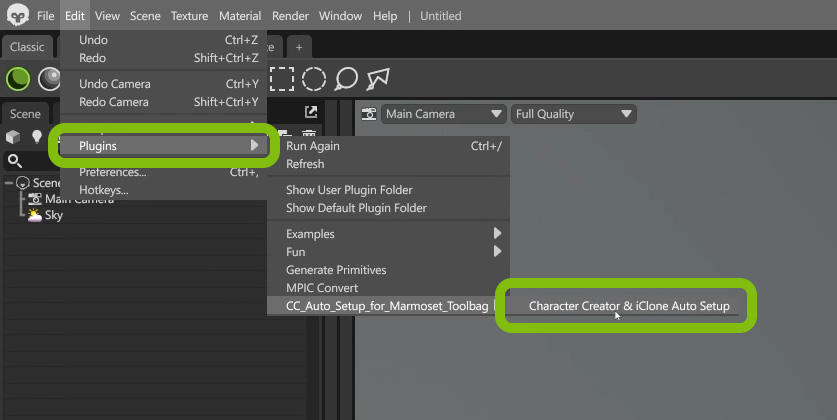
To get the posed character into Marmoset Toolbag 5, I use the CC Auto Setup plugin for Marmoset. Installation is simple: drop the plugin folder into Marmoset’s plugin directory and restart. Once the plugin is enabled, the workflow is straightforward.
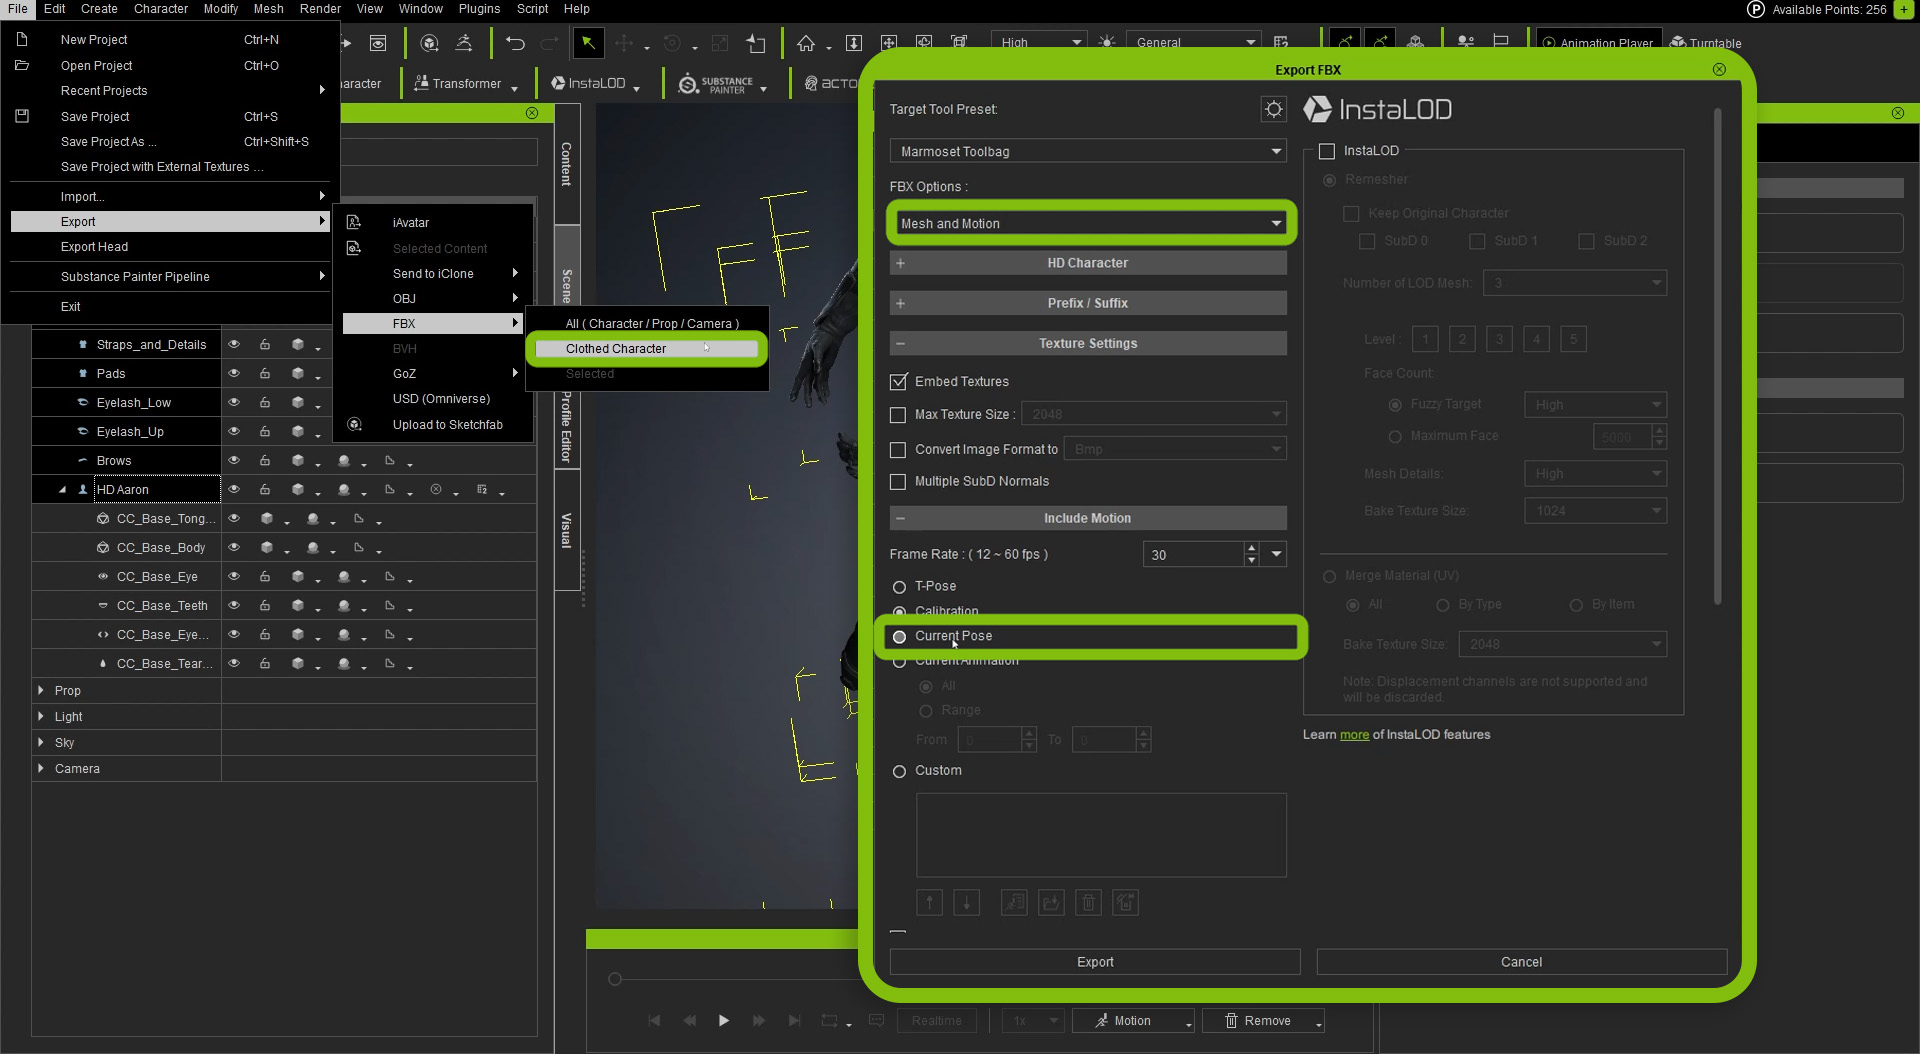
In CC5, select the necessary and go to File > Export > FBX. Choose the Clothed Character option so that accessories, armor, and external props export alongside the base mesh. In the FBX export settings, select the Marmoset Toolbag preset, set Export Type to Mesh and Motion, and ensure Current Pose is selected so you export the single posed frame instead of an animation.
The exporter writes an FBX, a JSON that maps materials, and a folder with all textures. This setup lets the plugin auto-detect assets during import.
Auto import and material setup in Marmoset
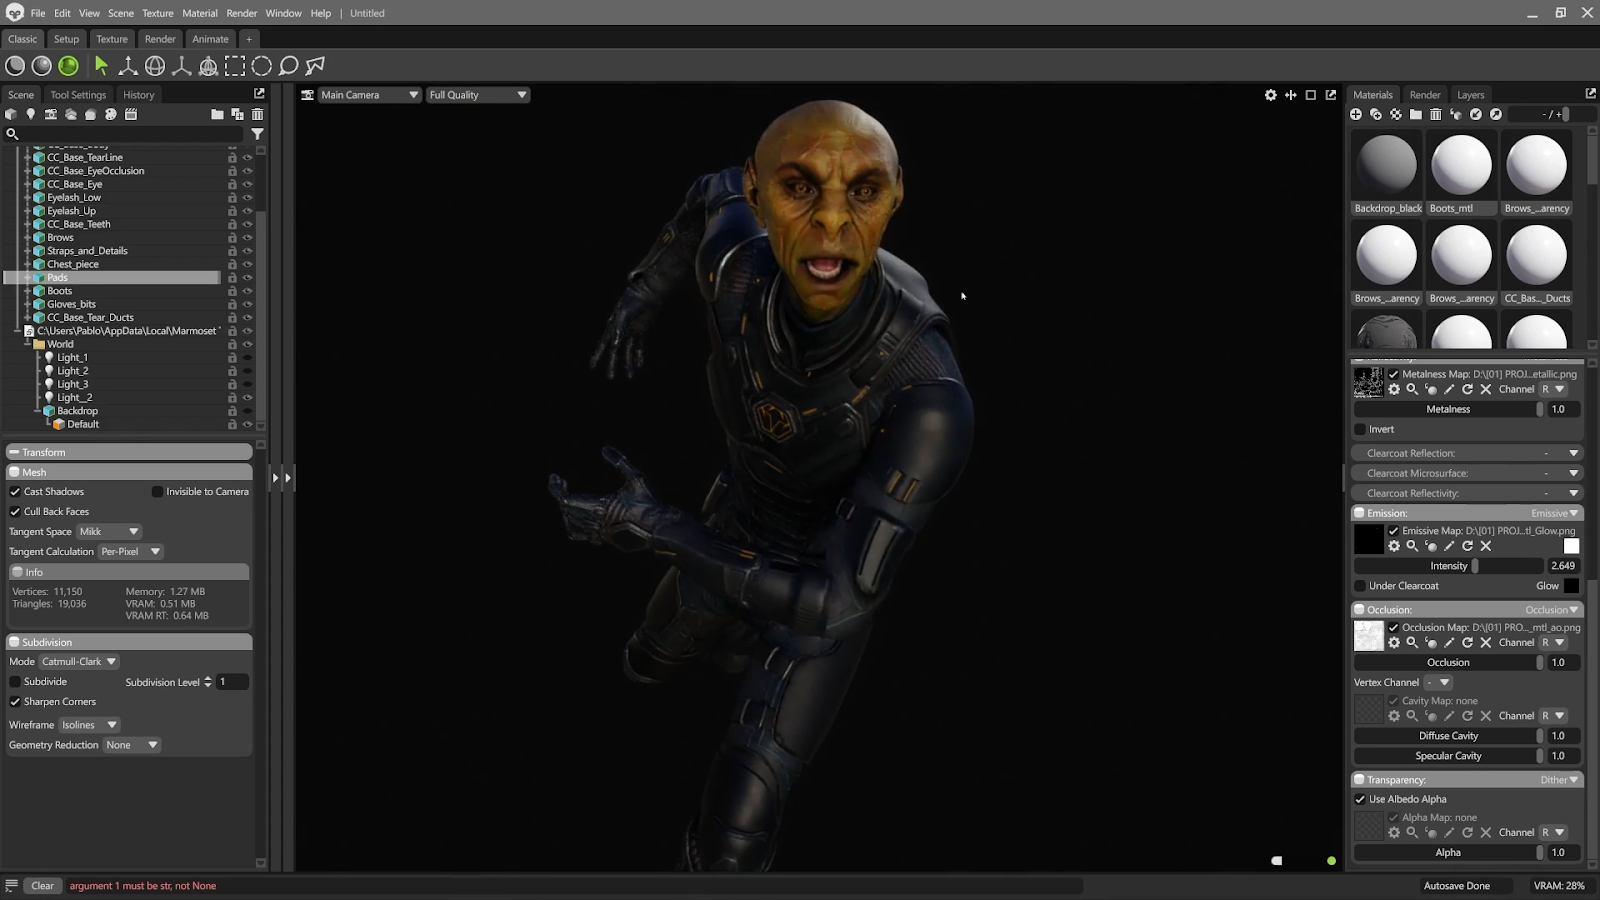
Back in Marmoset, open the CC Auto Setup plugin window, point it at the exported FBX, and click Import. The plugin automatically rebuilds the scene with the materials and basic lighting. It is a huge time-saver and a great starting point, but I prefer to customize lighting and materials to match the story and mood.
Emissive and displacement quick wins
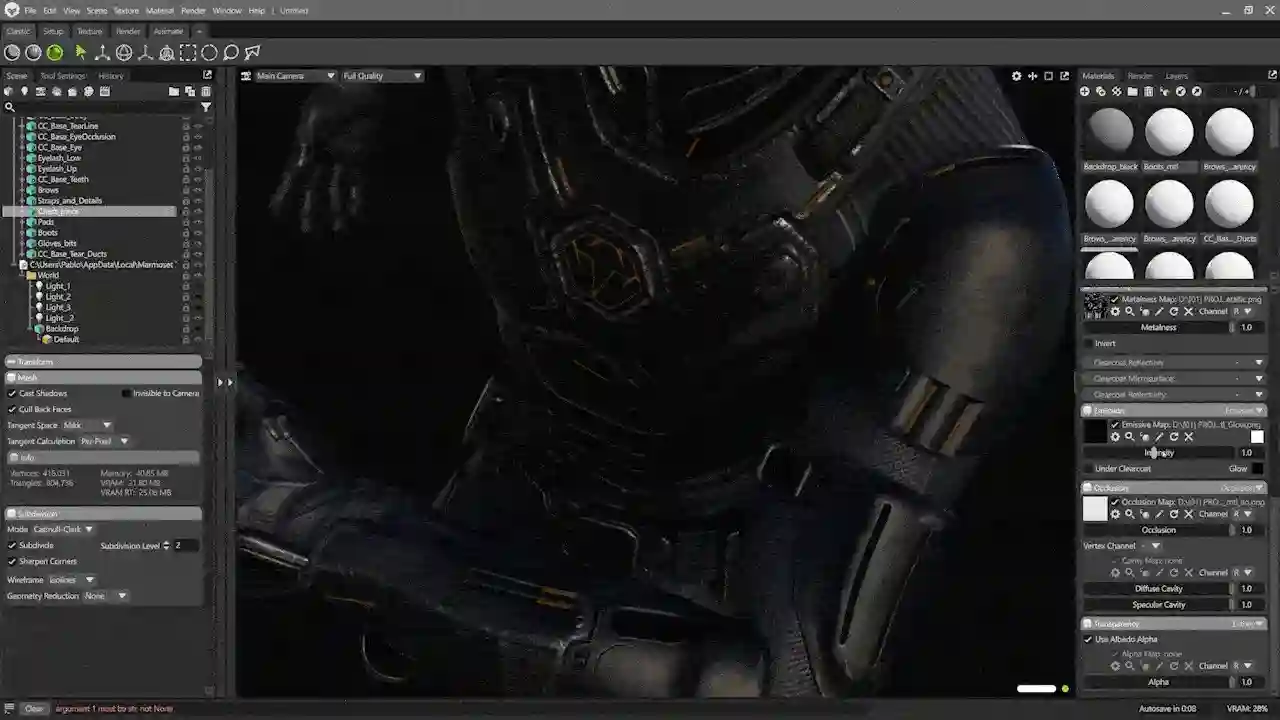
Some imported materials include emissive channels that can be subtle by default. Double-click any mesh in Marmoset to open material properties and boost Emissive Intensity to make UI accents or suit LEDs pop. Also check if the import contains displacement maps. A small displacement scale tweak can enhance details like iris curvature or subtle surface relief, adding realism.
Build custom lighting
I usually turn off the default world lighting the plugin creates and pick a low contrast HDR for ambient light. That way, I get a neutral base and can sculpt the look with explicit lights. I split my workspace into two views: one in draft quality for performance and one high-quality render view to preview results.
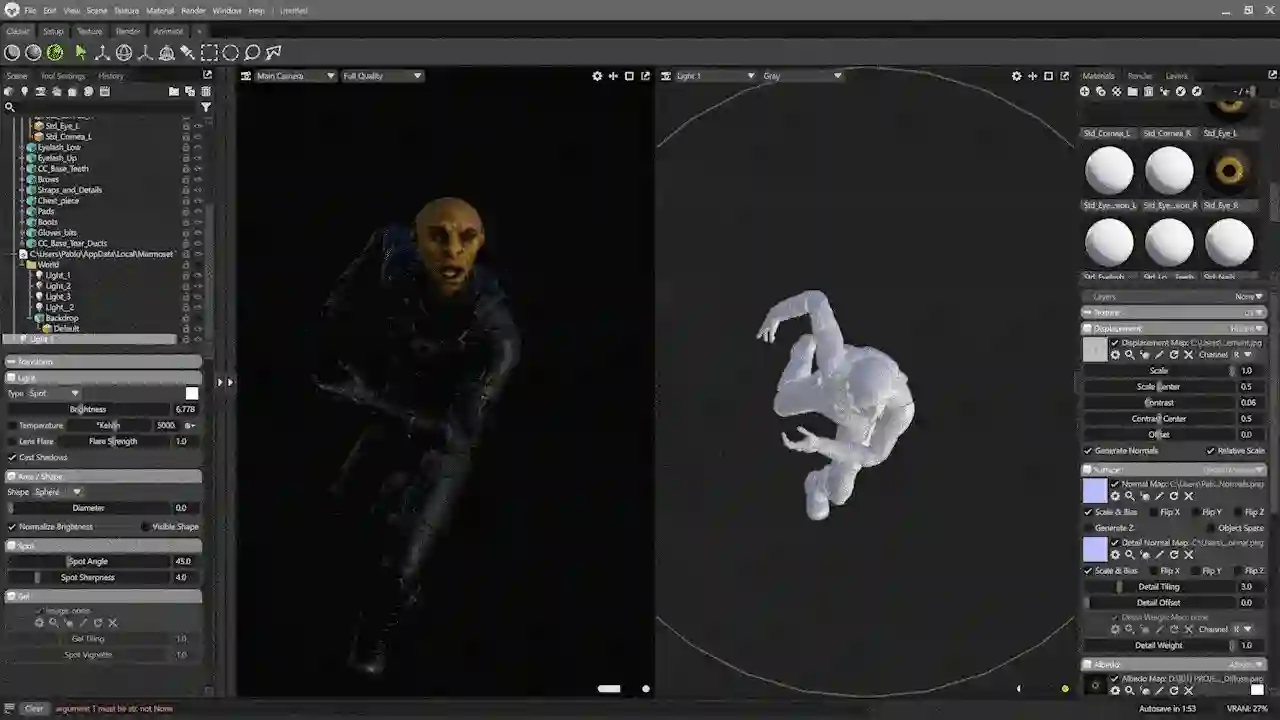
To position lights intuitively, I create a spotlight and switch the viewport camera to look through the light. That lets me move the light while observing the rendering view in real time. This method is one of the most intuitive ways I know to place key and rim lights.
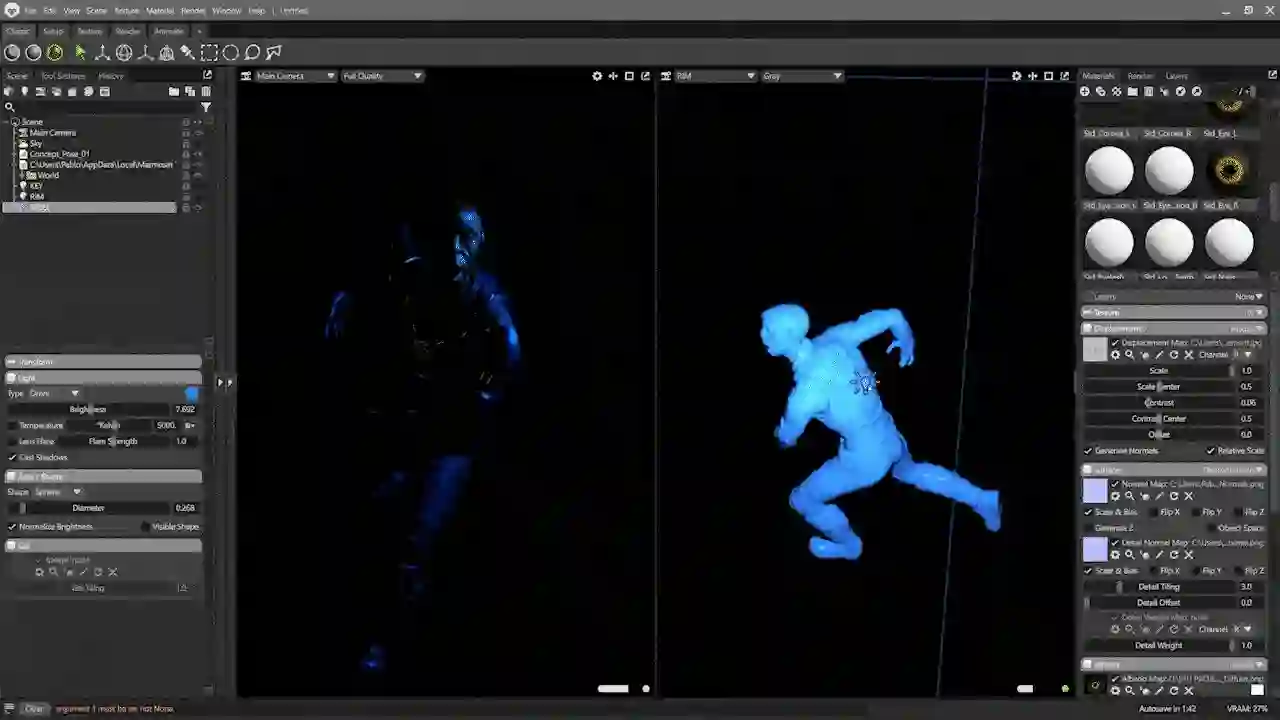
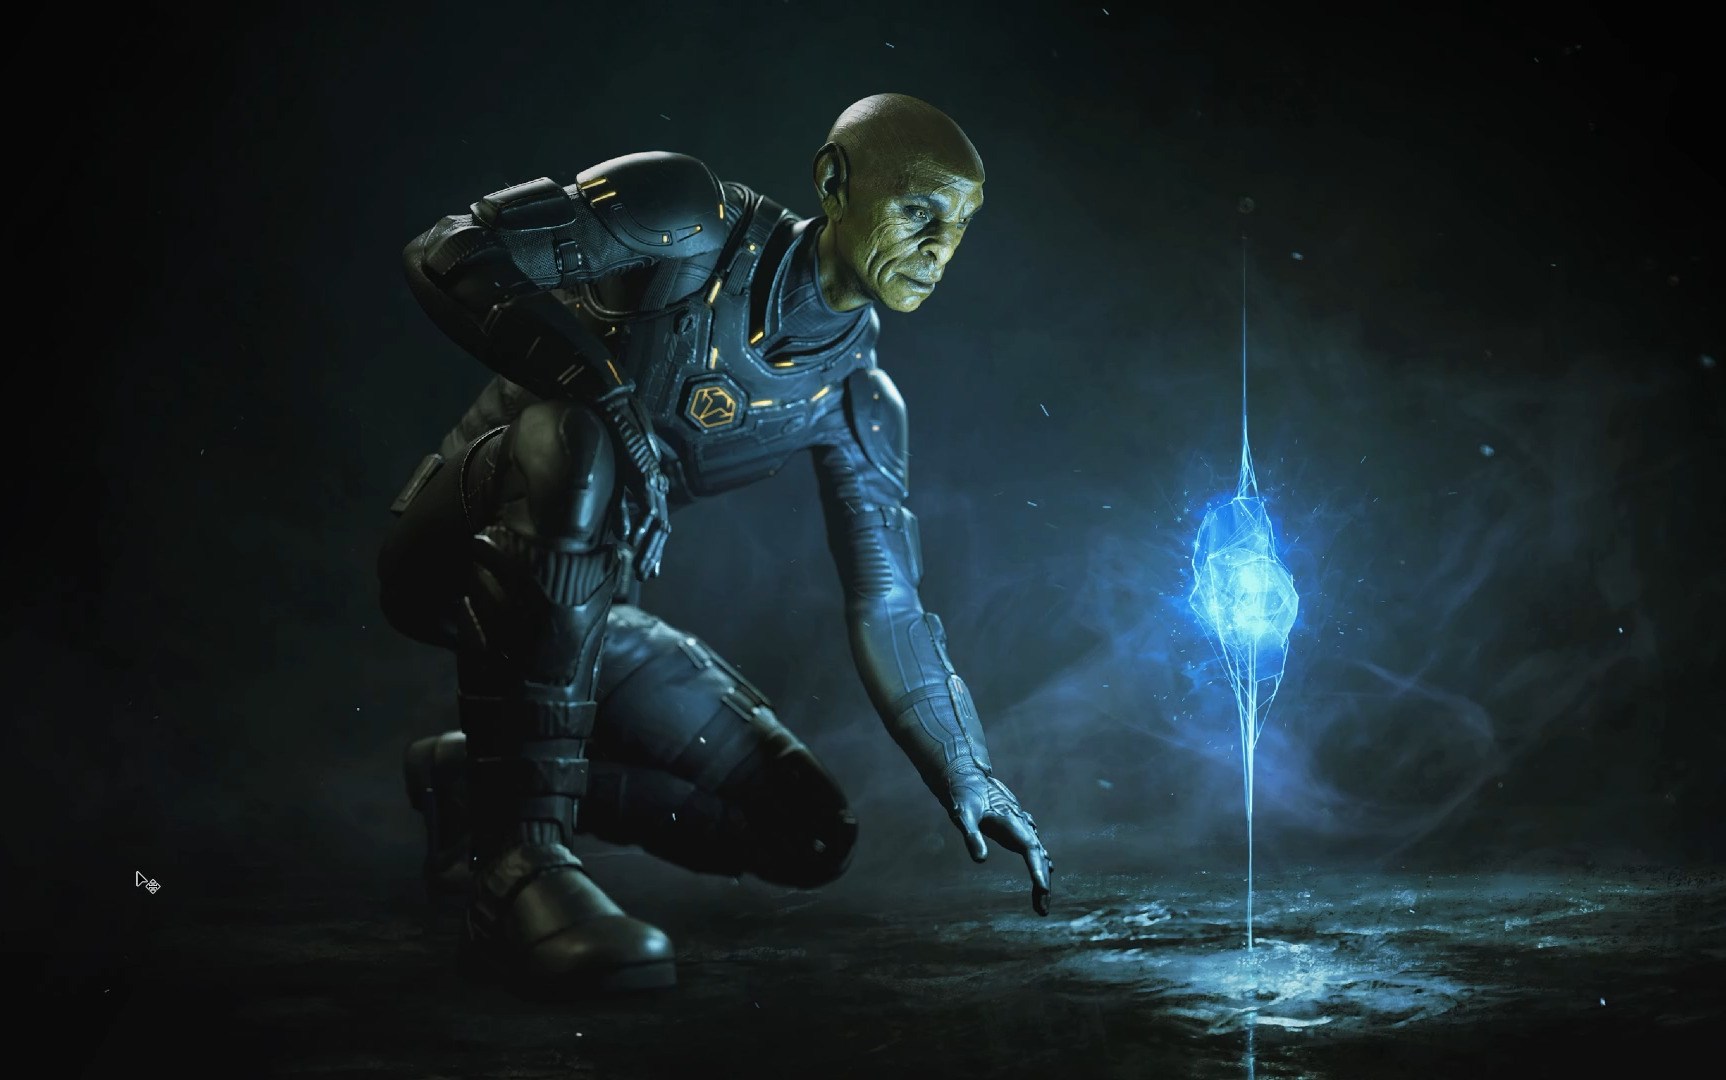
For the glowing energy orb between the hands, I add an Omni light, tint it blue, and increase intensity. Omni lights are perfect for spherical light sources because they radiate in all directions and interact naturally with nearby materials.
Always tweak light color, angle, and intensity to bring out the materials and silhouette you want. Presets are fine as a base, but custom adjustments make the scene read correctly for each pose and character costume.
Camera, tone mapping, and depth of field
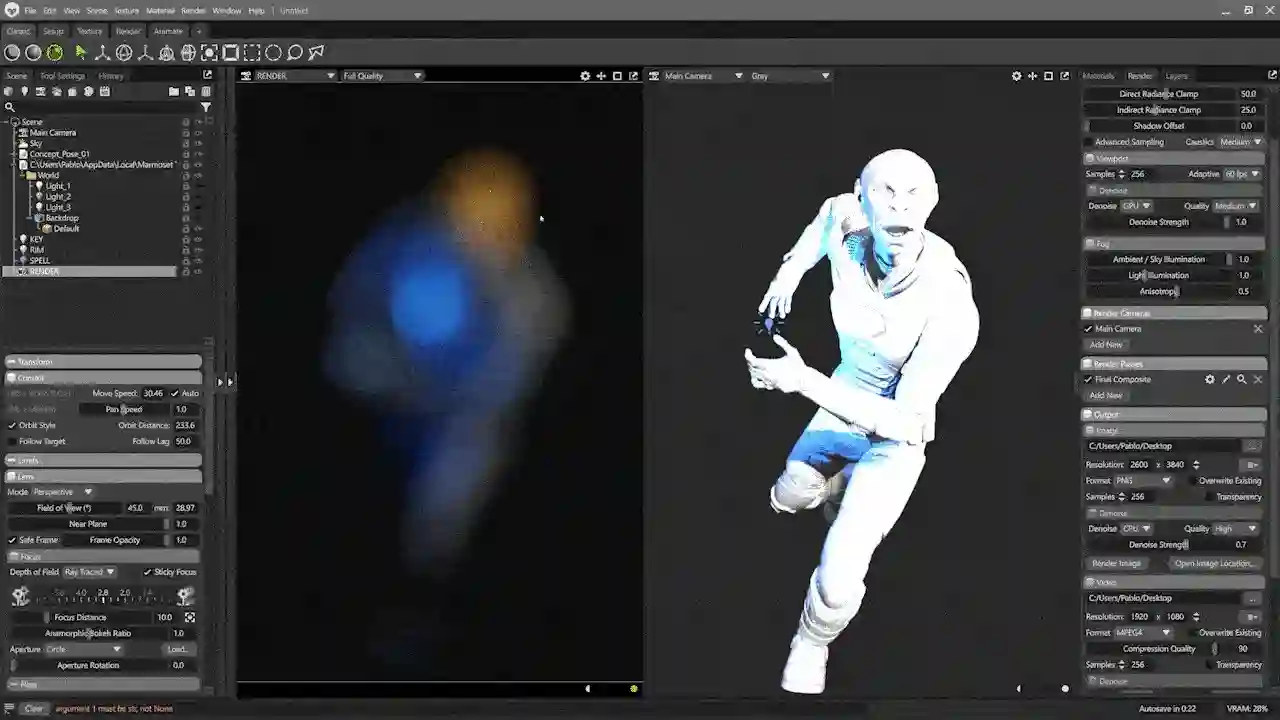
Create a dedicated Render camera and set the resolution and aspect ratio. I prefer portrait orientation for full-body character shots. Under Tone Mapping, switch to ACES for a cinematic color response, then tune the lens field of view to control perspective exaggeration or flattening.
Enable depth of field using ray tracing and enable sticky focus. I middle-click on the character’s eye to set a permanent focal point. Then adjust the aperture to control the falloff. Focusing on the eyes ensures the viewer connects with the character even when hands or limbs are slightly blurred for cinematic effect.
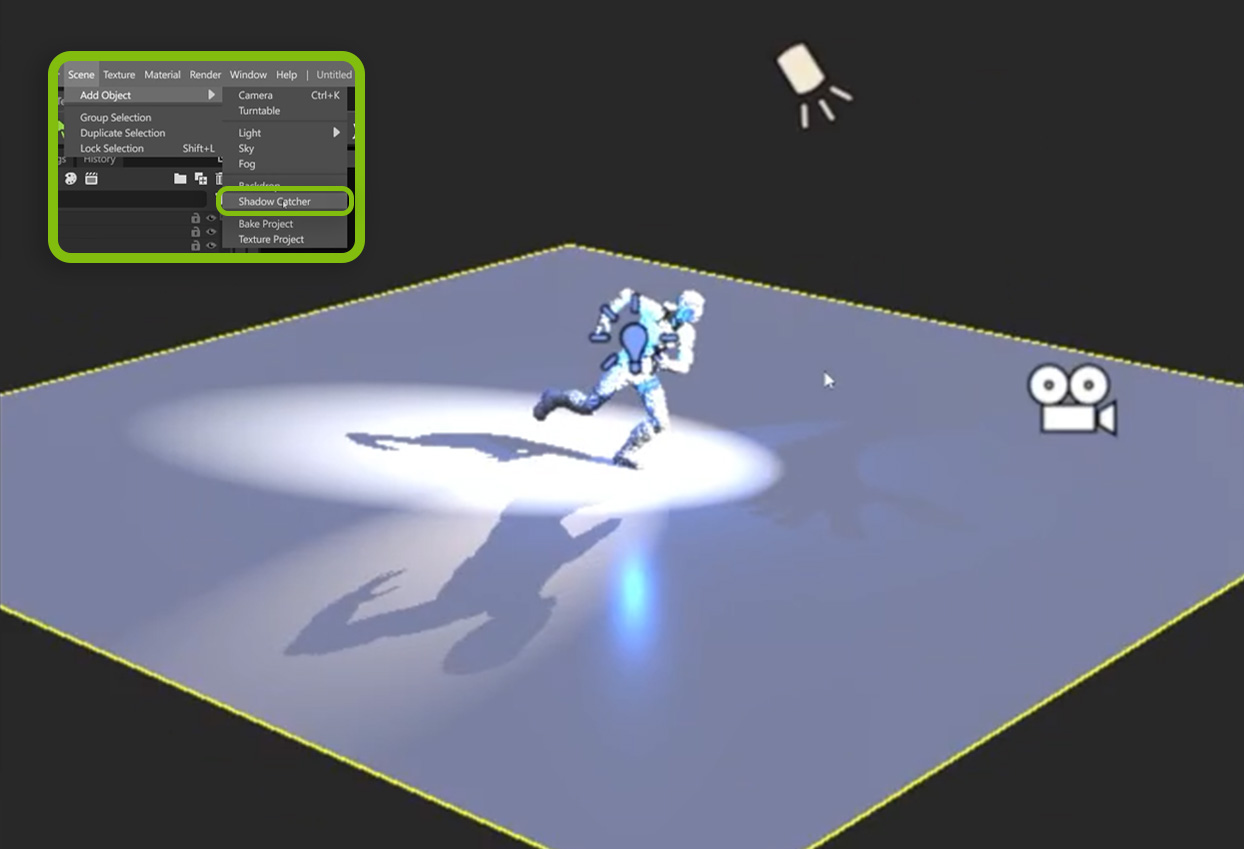
Scene view with shadow catcher plane visible alongside the rendered character.
Composition and final touches
Before rendering, I check composition for tangents. Make sure limbs or props do not visually overlap in ways that confuse the silhouette. Add a shadow catcher plane to ground the character so it looks like it is standing on something and not floating.
In the render settings make sure the Render camera is selected. If not, the software will render whatever viewport is active. Then render all images and export with transparency. I always render with an alpha channel so I can composite in Photoshop.
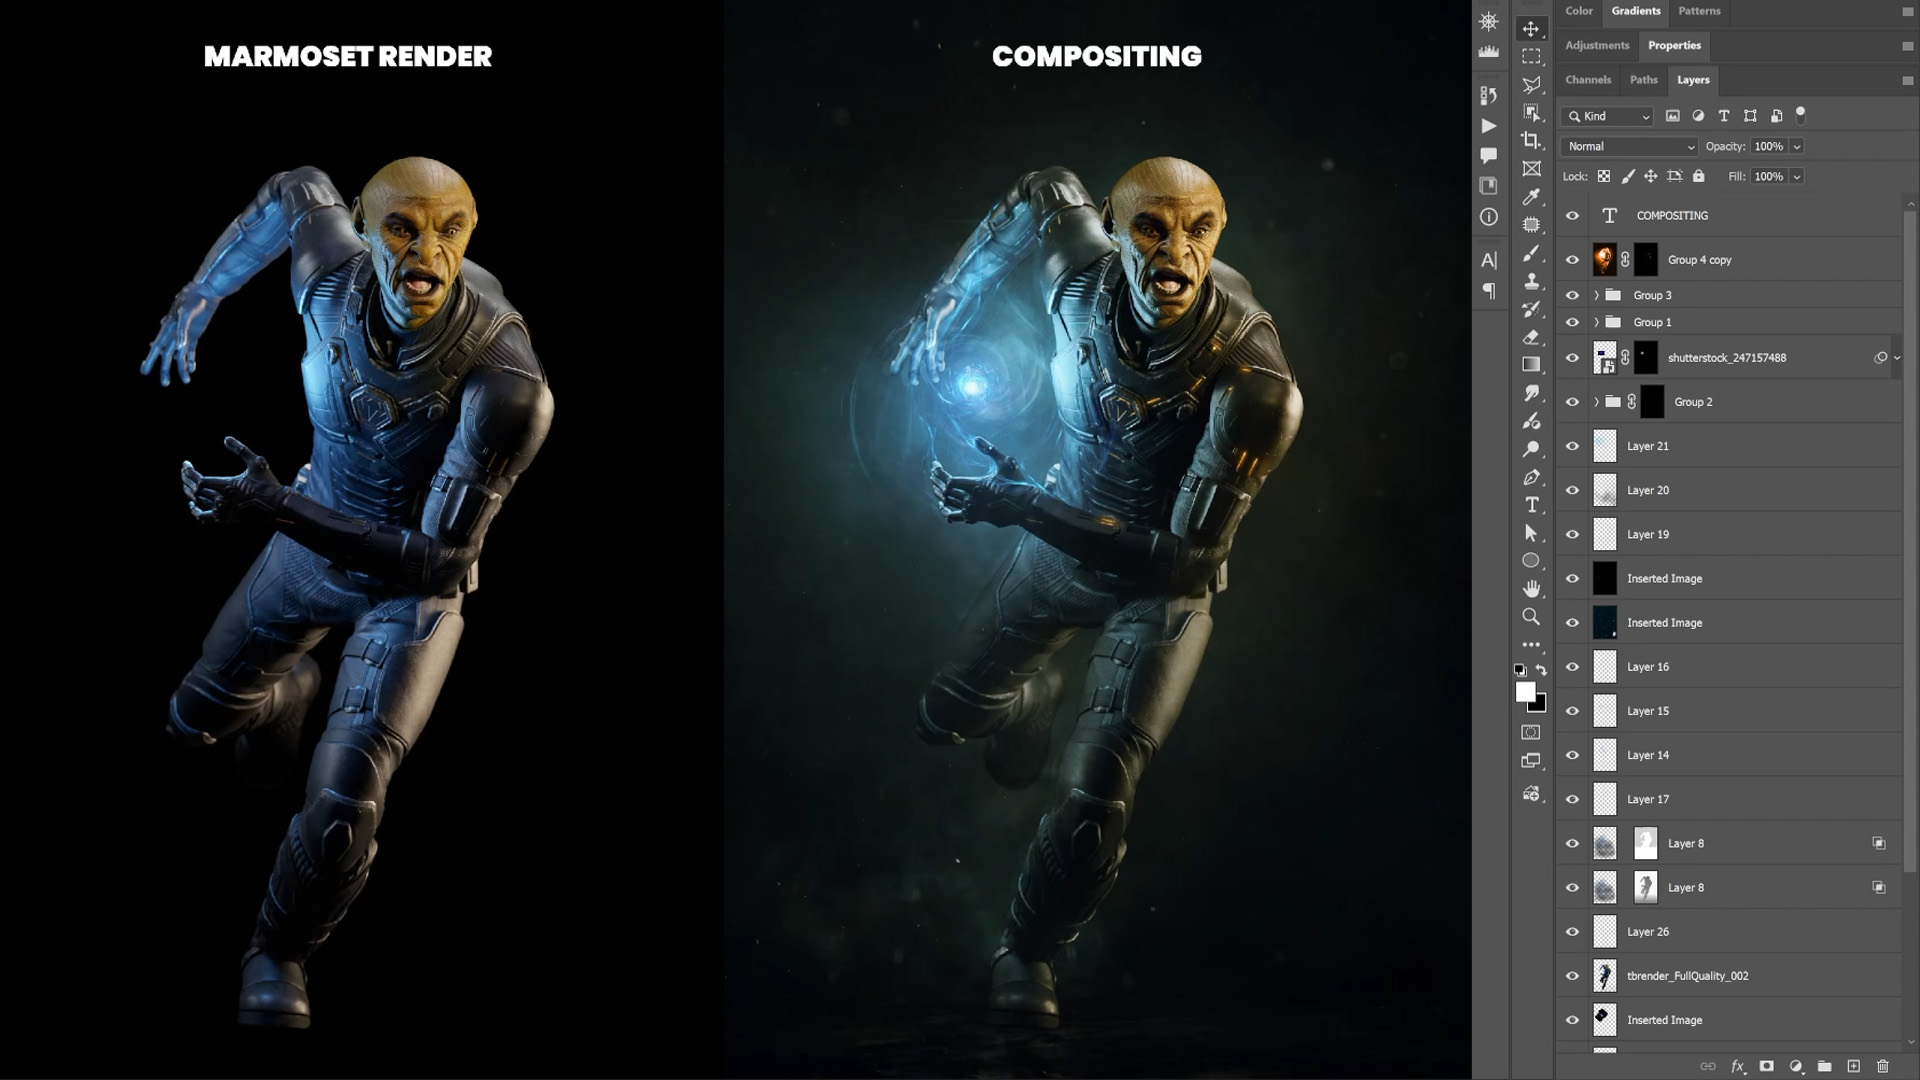
In compositing, I typically add a subtle background, paint haze, and rim glow to enhance the energy effect and introduce dust or particle details for atmosphere. Small, painted touches can lift the render from looking like a stock 3D output to feeling like a frame from a narrative scene.
Final Thoughts
Ultimately, this pipeline transforms Character Creator 5 into the essential glue that binds high-concept sculpting, physically accurate cloth simulation, and production-ready texturing into a seamless creative loop. By leveraging standout features like the Actor Mixer for rapid prototyping, Subdivision level two support for retaining high-fidelity geometry, and the Dynamic Wrinkle system for immediate realism, you remove the technical friction of manual rigging and weighting.
The integration with ZBrush via GoZ and the automated handoffs to Substance Painter and Marmoset Toolbag create a workflow where iteration is fast, changes are non-destructive, and the transition from a rough silhouette to a final, animated render is both frictionless and artistically empowering.
Cloth and Drapery Brushes Pack
This is a pack of 54 custom brushes that will simplify and speed up the process of setting up folds, sculpt wrinkles and detail various types of fabrics in ZBrush!
Get resource
From CC5 to Marmoset Toolbag 5: Real-Time Rendering Workflow
In this live demo, Pablo Muñoz Gómez walks through a practical, real-world workflow for moving characters from Character Creator 5 into Marmoset Toolbag 5 using the official add-o
Check it out


.webp)

