







The practical benefit is not just speed. The bigger advantage is reducing friction. When brush selection starts to feel like muscle memory instead of a small decision every few seconds, it becomes much easier to stay focused on form, silhouette, rhythm, and design.
This guide breaks down what RadialZ is, why this kind of setup matters, how to build a useful custom menu, and how to organize it in a way that genuinely supports sculpting rather than adding one more layer of complexity.
Why this workflow
A lot of sculpting interruptions are small enough to seem harmless:
- Opening a brush list
- Scrolling through palettes
- Searching a folder for a custom brush
- Switching between a few repeated ZBrush actions
- Breaking attention just to confirm where a command lives
None of those actions are dramatic on their own. But together they add friction, and friction is usually what disrupts momentum.
RadialZ solves that by keeping the most relevant commands near the cursor. A brush can be selected in a fraction of a second, the menu disappears immediately, and attention stays on the sculpt instead of the interface.
After a few sessions, those actions stop feeling like software navigation and start feeling more like directional gestures. Moving diagonally up and right for a move brush, or left for a cutting brush, becomes easier than consciously reading icons every time.
Quick Overview: The Steps
- Understand what RadialZ is actually solving.
- Decide which brushes and actions deserve immediate access.
- Use the pop-up library for fast brush testing and discovery.
- Group related brushes with parent and child slots.
- Create a custom menu and assign a safe trigger shortcut.
- Add core brushes first, then add shortcuts for repeated actions.
- Assign custom shortcuts in ZBrush where needed.
- Organize the radial layout so it matches instinctive hand movement.
- Adjust menu count, size, spacing, visibility, and colors.
- Refine the setup until it disappears into the background.
Step 1: Understand what RadialZ is actually for
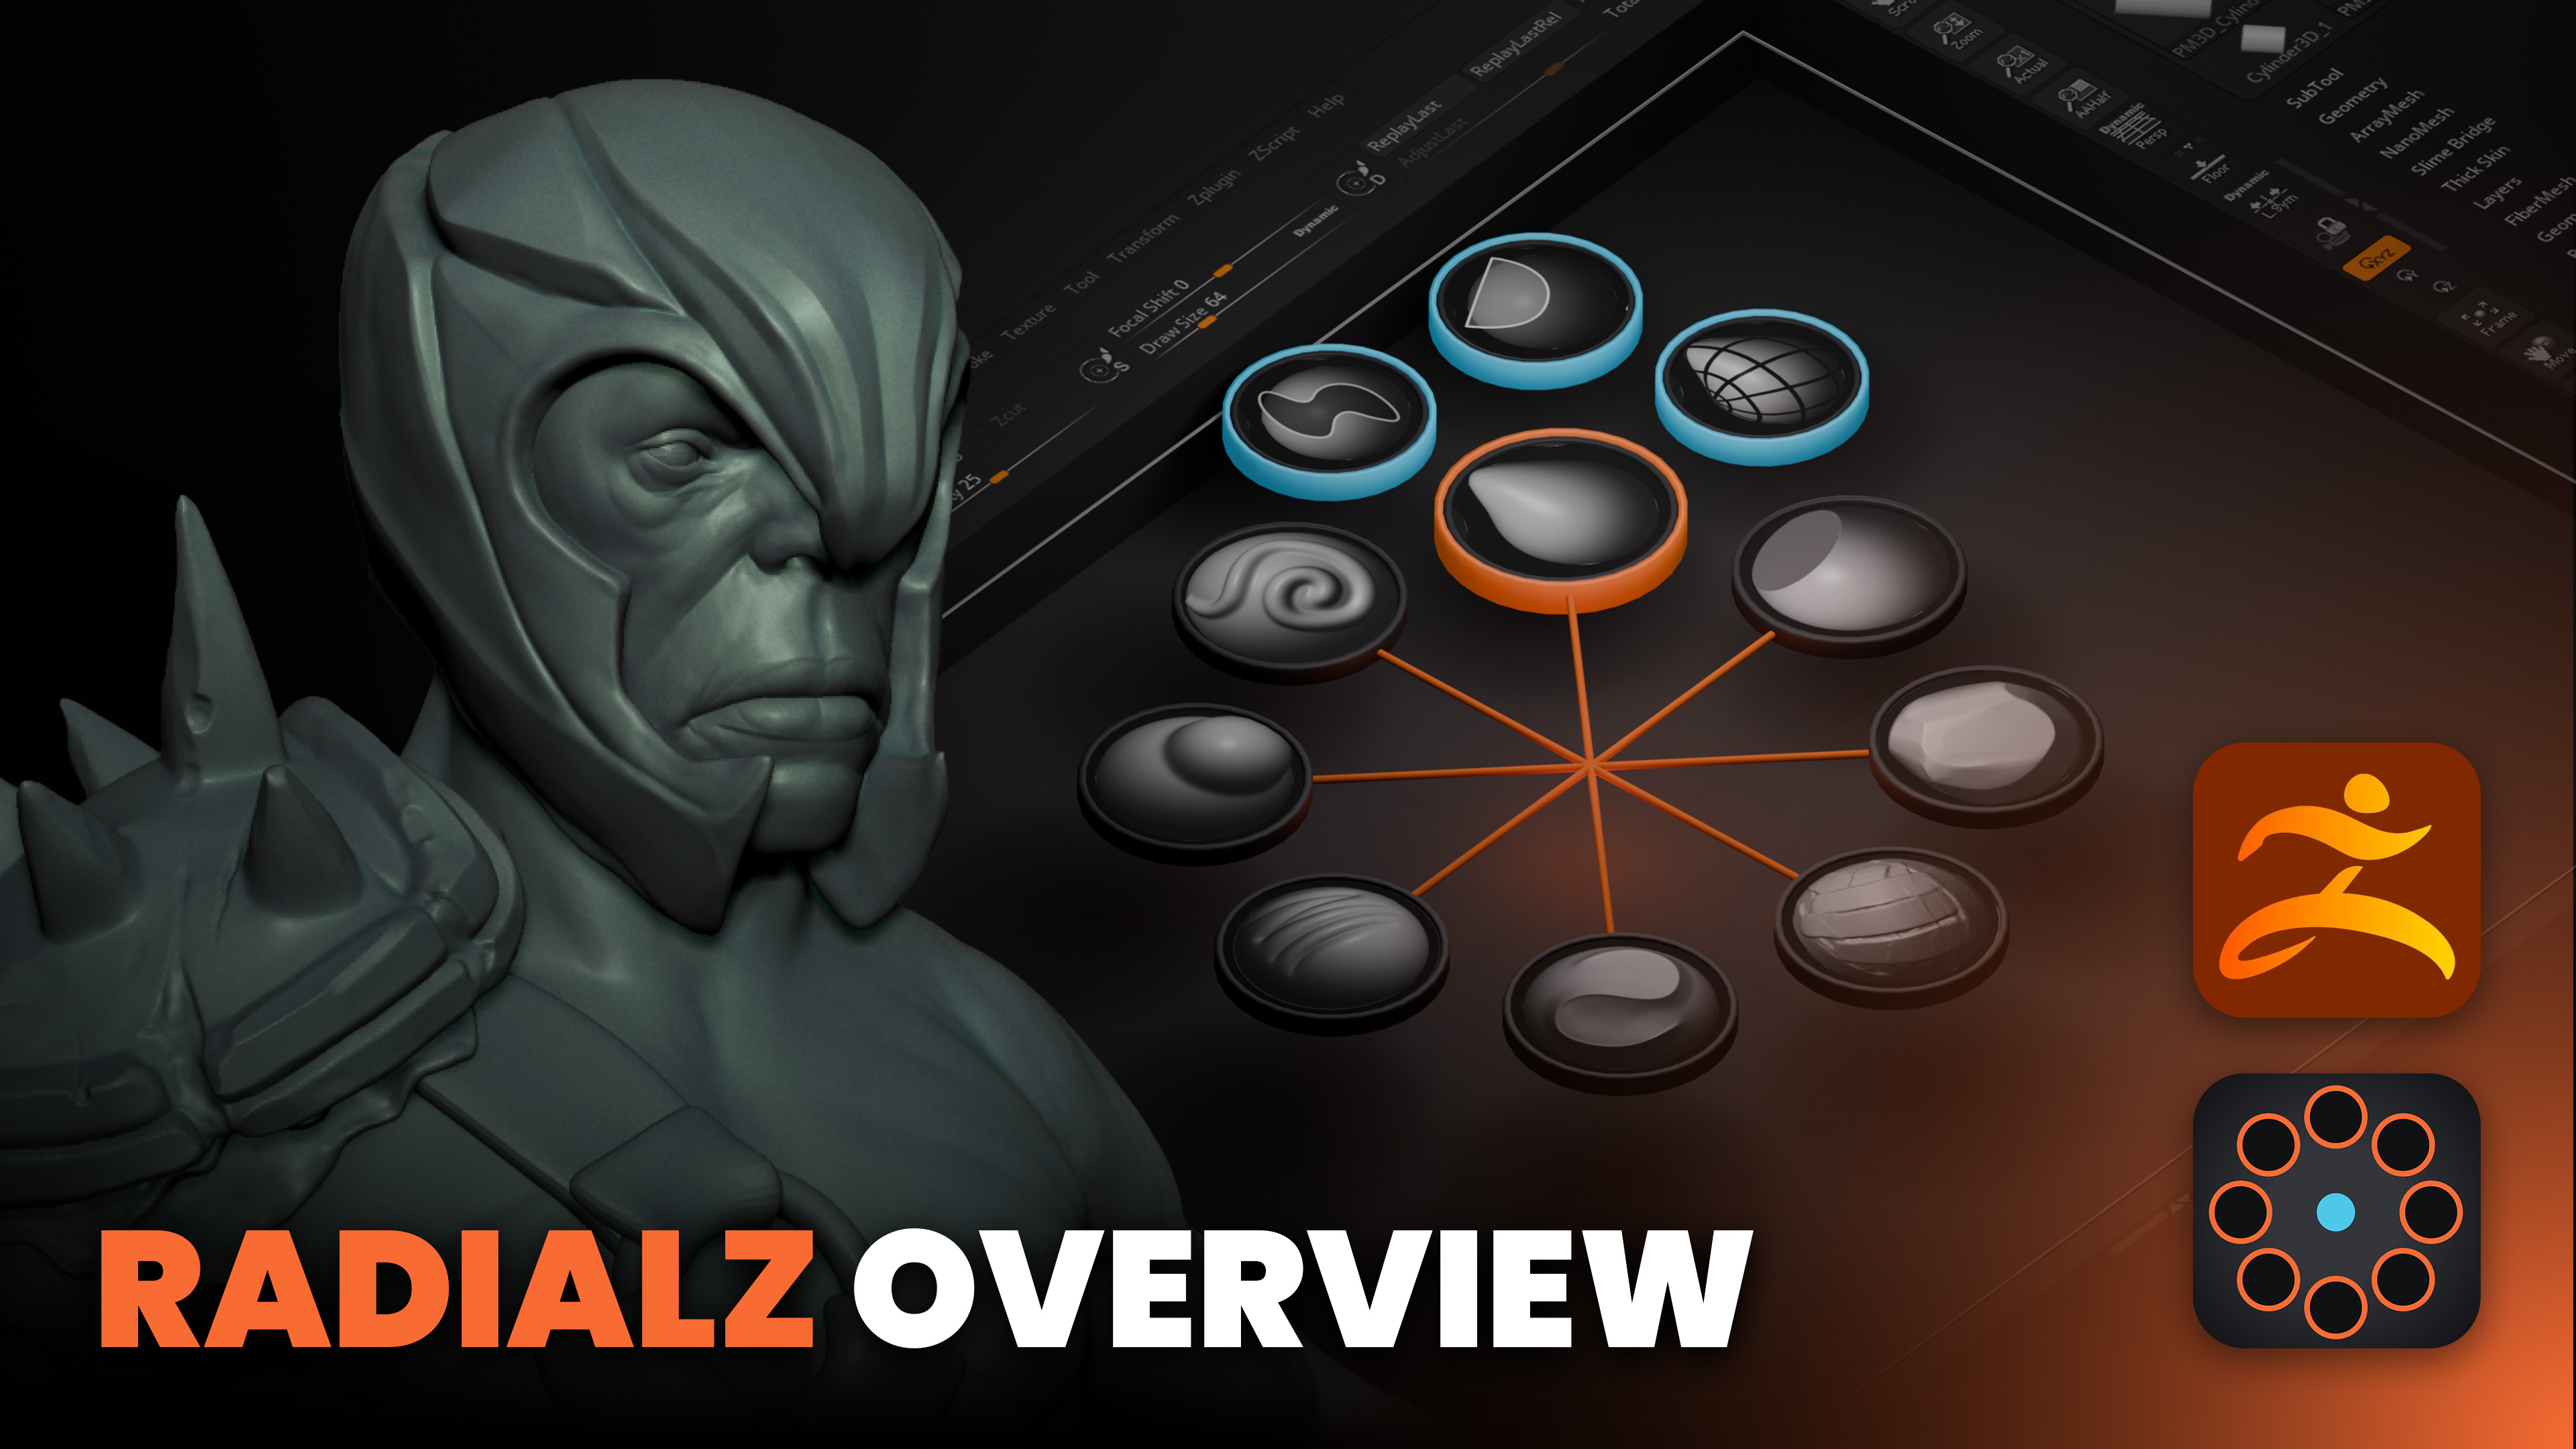
At its most basic, RadialZ is a radial picker for brushes and shortcuts in ZBrush. It can open a menu directly around the cursor, allow a quick selection, and then close immediately.
That sounds simple, and it is. But the value comes from where it sits in the sculpting process.
Instead of navigating across the UI to look for the Move brush, Standard, DamStandard, smooth brush variations, masking tools, or custom macros, those items can live in a compact radial menu that appears exactly where the hand is already working.
In practice, that keeps the canvas central. The interface becomes less of a destination and more of a supporting layer.
.png)
RadialZ is also not limited to one menu. It can be used for:
- A main brush menu
- A secondary brush menu
- A tools or shortcut menu
- A floating brush library
That means the setup can stay lean, with only the most important things in each menu, instead of trying to fit an entire workflow into one overloaded wheel.
Step 2: Decide what deserves a slot in the radial menu
The strongest RadialZ setup is not the one with the most items. It is the one built around repeated use.
A practical way to approach this is to think about the tools that show up constantly in sculpting sessions. Those are usually the best candidates for a main menu.
Typical examples include:
- Move
- Standard
- Inflate
- Pinch
- Clay or Clay Buildup variants
- Cutting or crease-style brushes
If a brush stops being useful, it can simply be replaced. That flexibility matters. A menu should not be treated like a permanent shrine to old habits. It should adapt to the current workflow.
A helpful rule of thumb is this:
- Put daily brushes in the radial menu
- Keep occasional brushes in the library
- Reserve shortcuts for repetitive actions that interrupt flow when buried in menus
Step 3: Use the pop-up library for brushes that do not need permanent placement
One of the most useful parts of the setup is the pop-up library. This acts as a floating brush browser that can be opened with a custom shortcut, pinned in place, searched dynamically, and used to load brushes with a single click.
That makes it ideal for testing brushes without going through LightBox or manually opening folders.
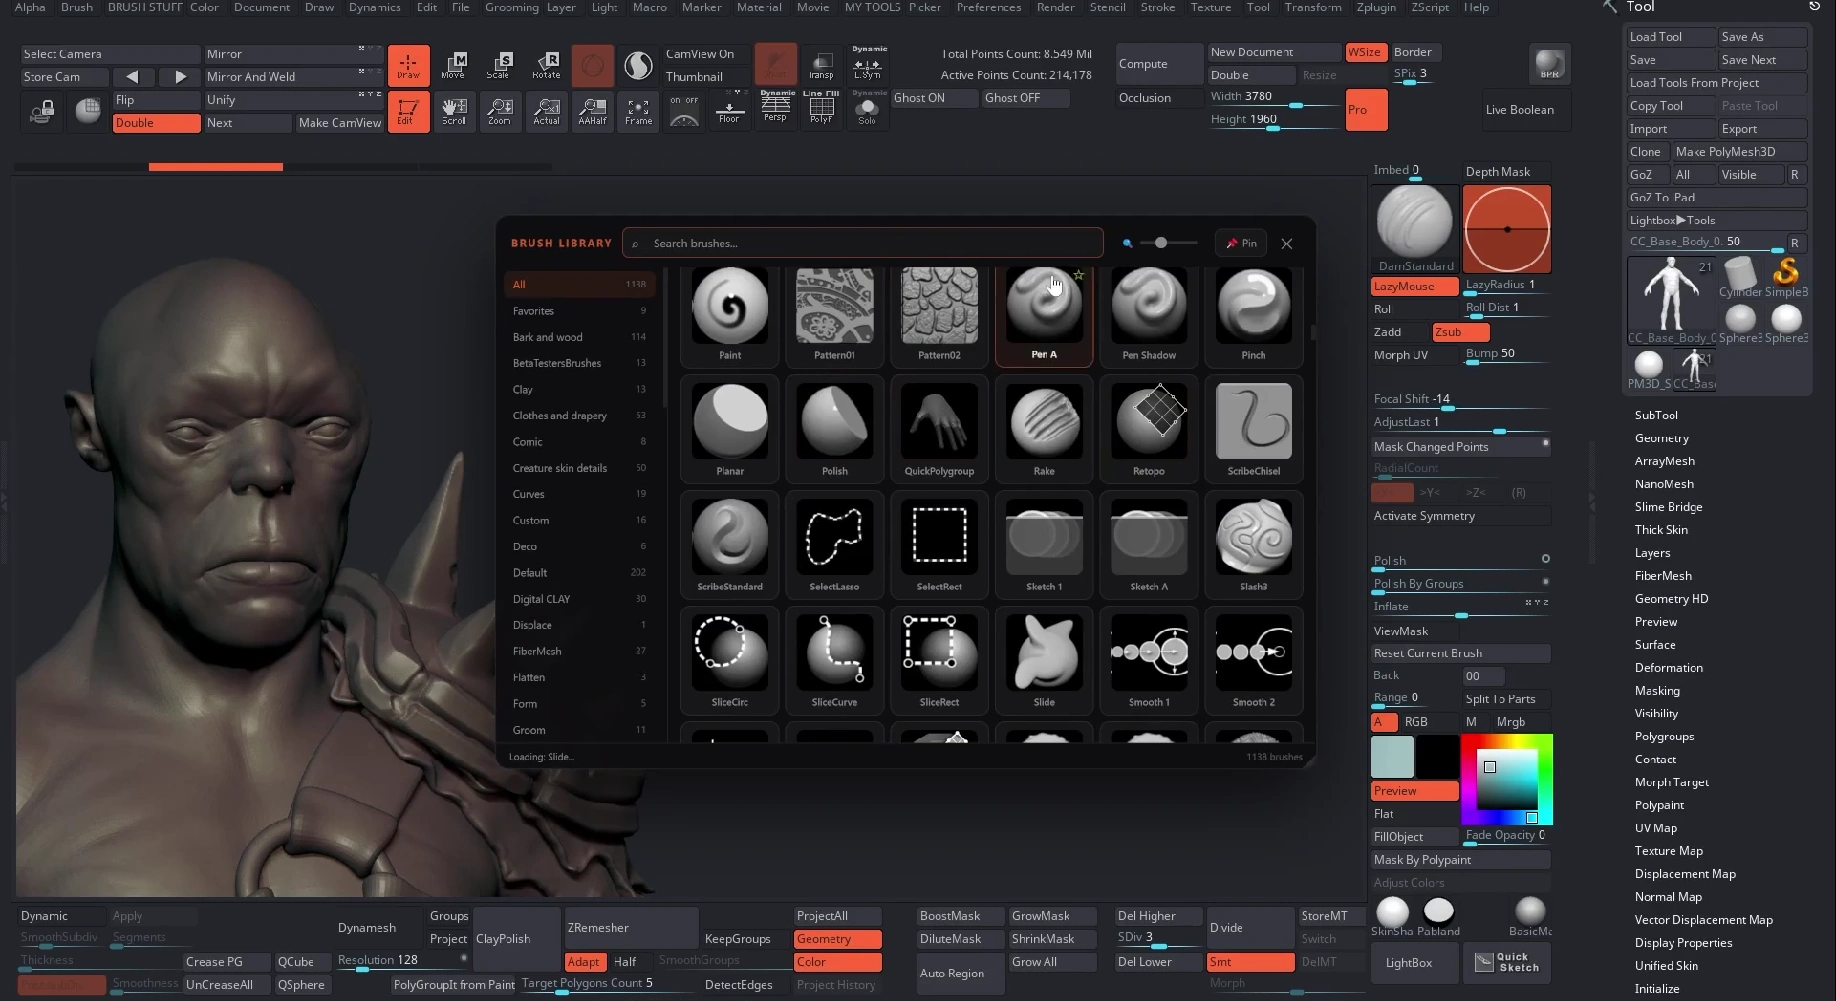
This is especially helpful when trying surface detail brushes or project specific tools. A brush can be loaded, tested directly on the sculpt, and quickly swapped out if it is not the right fit.
The library also supports a few practical behaviors:
- Pinning: the window can stay fixed in place
- Position memory: it reopens in the same location and size
- Dynamic search: typing part of a name is enough to filter results
- Favorites: starred brushes can be collected into a quicker shortlist
- Folder-based categories: brush groups are pulled from actual folder names
That last point is particularly useful. If brushes are already organized in meaningful folders, those categories become immediately usable inside the library without extra cataloging work.
For example, if there is a bark and wood folder, creature brushes folder, or membrane brush set, those can all be browsed directly or searched globally from one place.
Step 4: Group related brushes using parent and child slots
One of the smartest ways to keep a radial menu compact is to nest related brushes together.
In RadialZ, a main brush can act as a parent, and up to three related brushes can be attached as children. That means a single slot can hold a small brush family instead of just one isolated tool.
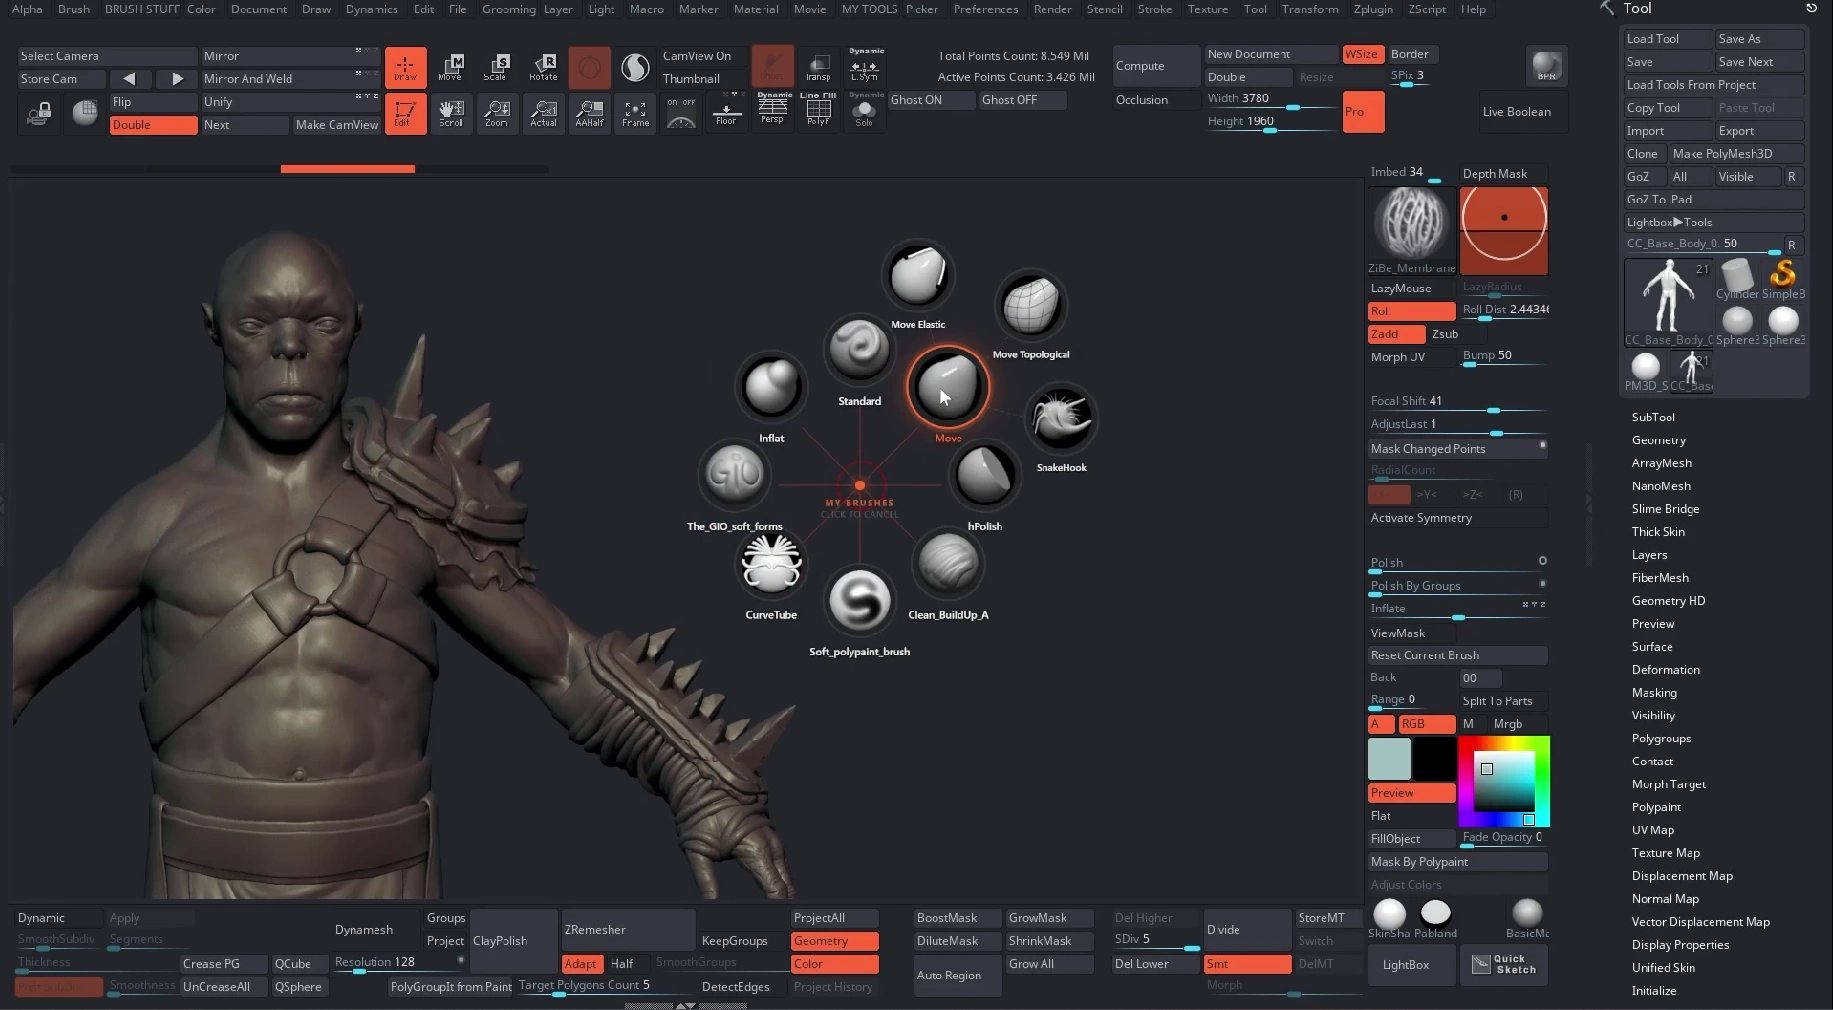
This works particularly well when the brushes belong to the same sculpting intent.
For example:
- Move as parent, with Move Topological, SnakeHook, or Move Elastic as children
- Crease/carving brush such as my custom HR Gigger Cutter as parent, with DamStandard or wrinkle-style brushes as children
- Clay brush as parent, with Clay Buildup and Clay Tubes as children
The key idea is not just saving space. It is building visual logic. If a brush changes form in a similar way, it makes sense to keep it near its closest relatives.
There is another useful behavior here: when a child brush is selected, it can temporarily become the active parent in that slot. That means the tool being used most recently stays immediately accessible without reopening a deeper submenu every single time.
In practical terms, the radial menu starts adapting to the current sculpting phase.
Step 5: Create a custom menu and assign a safe trigger shortcut
Building a menu in RadialZ is straightforward. A new menu can be added, named, and assigned its own shortcut trigger.
The important part is choosing a shortcut that does not conflict with an existing ZBrush command.
For example, using something like Ctrl+R may accidentally trigger a ZBrush render if that key combination is already mapped. A better choice is a key that is unused in the current setup, such as a function key or a custom modifier combination.
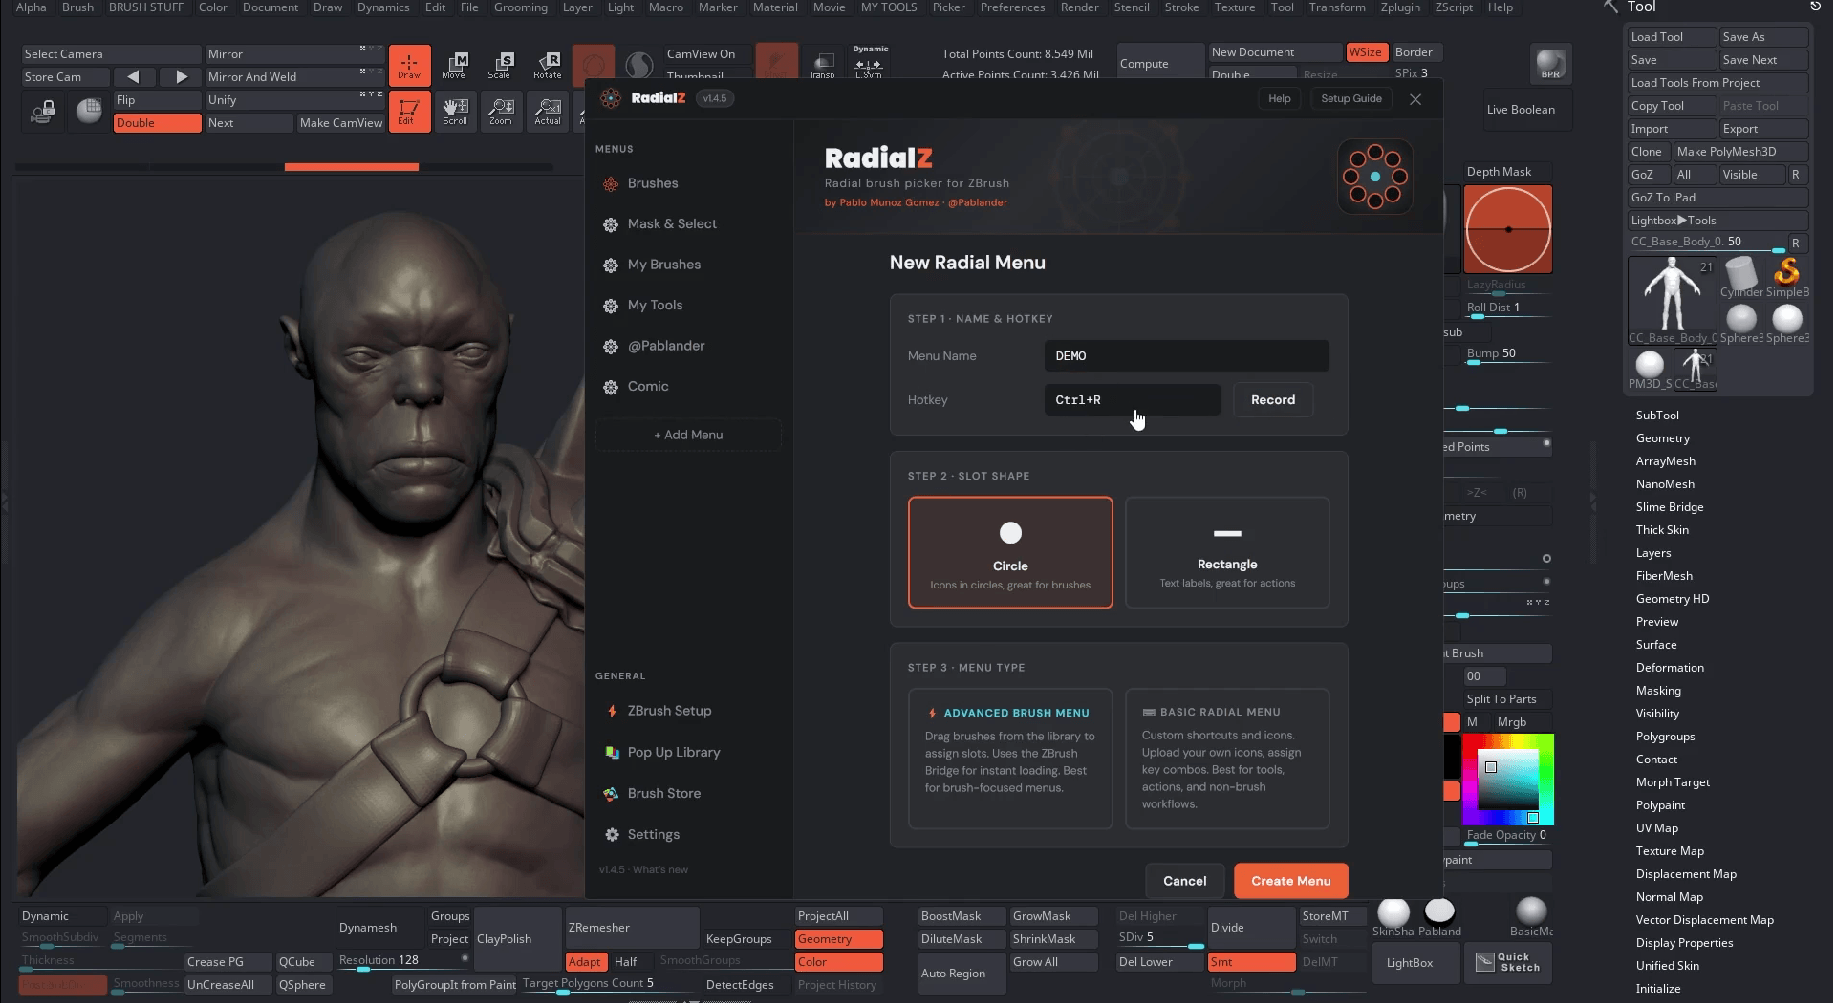
When creating a new menu, there are two main menu types:
- Advanced menu: designed for direct brush drag-and-drop
- Basic radial menu: useful for shortcut-driven actions
For brush-heavy menus, the advanced option is usually the easiest starting point. For command-only wheels, the basic version can be a cleaner fit.
A good setup often uses both ideas: direct brush slots for sculpting tools and shortcut-driven slots for actions such as polygrouping, delete hidden, or merge down.
Step 6: Add the main brushes first
Once the menu exists, the next step is to populate it with the core brushes that actually define the workflow.
The easiest method is to search for a brush in the editor and drag it into a slot. If a brush has related variations, those can be added later as children rather than consuming more primary slots.
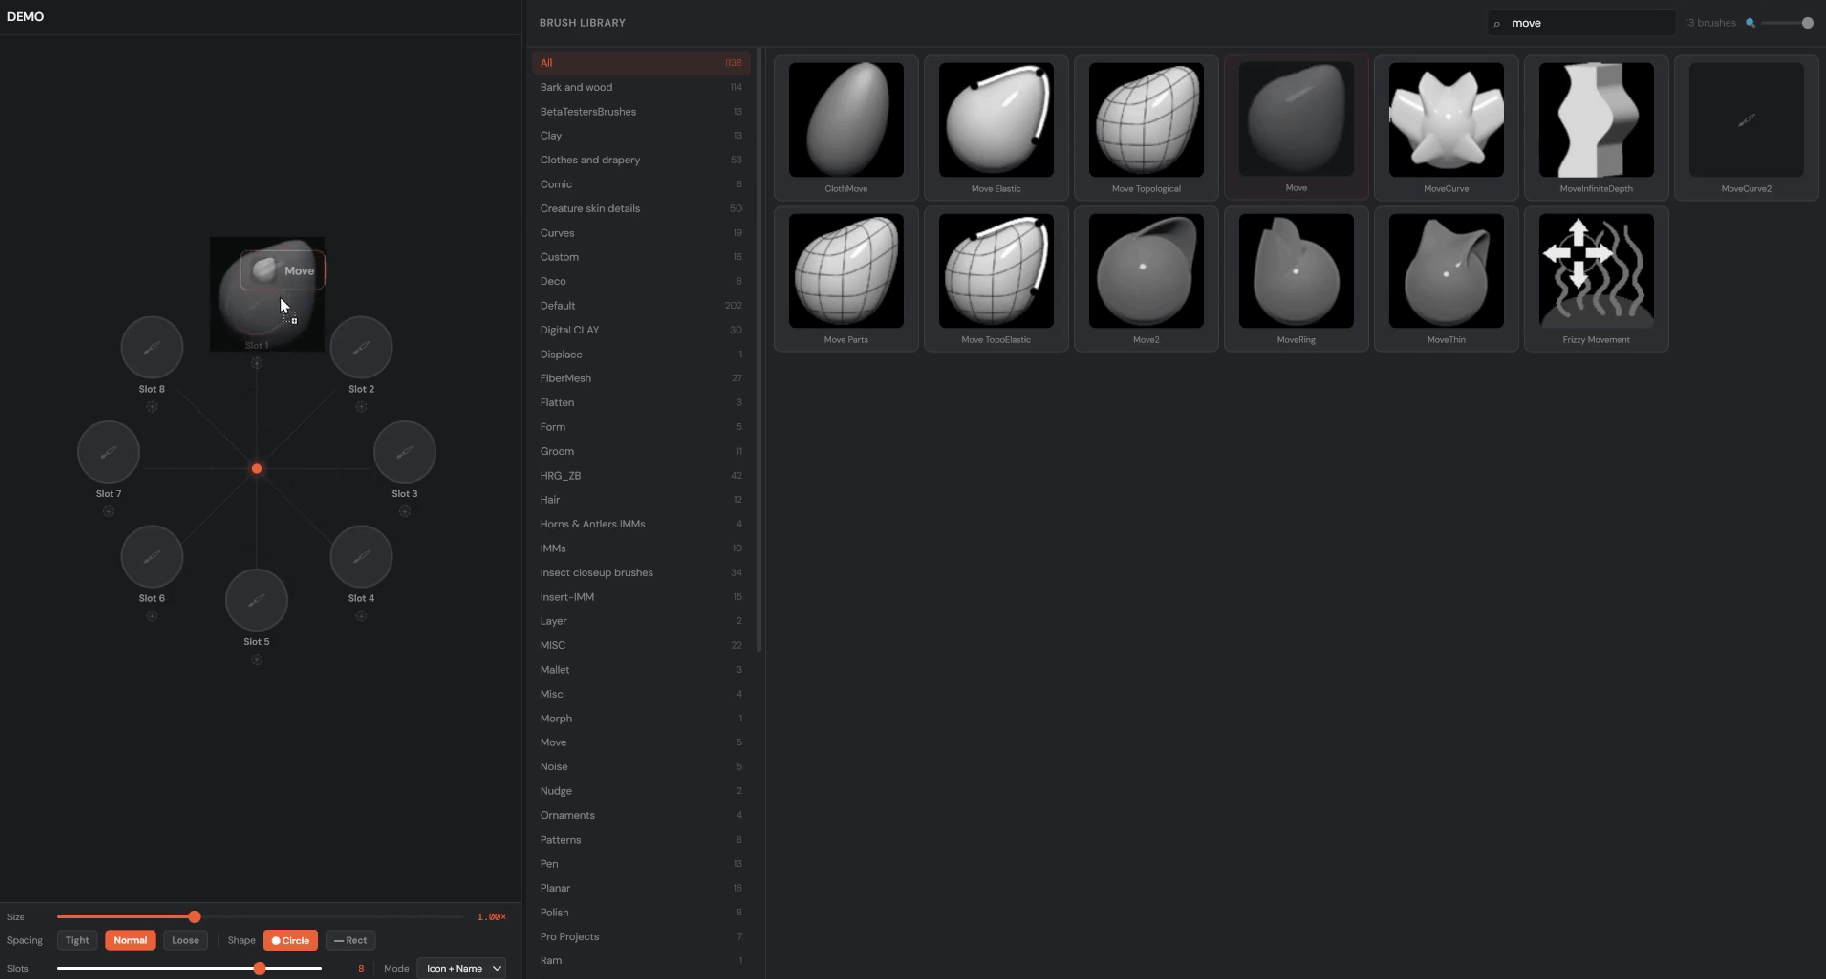
A strong first pass might include:
- Move
- Inflate
- Pinch
- Soft Clay or Clay Buildup
Then related versions can be nested inside those parent brushes.
It is also possible to rename the visible labels in the radial menu. That does not change the actual brush connection, but it can make the menu cleaner and easier to read. Long brush names can be shortened to something more memorable, such as:
- Topo
- Elastic
- Infinite
This small detail matters more than it seems. The shorter and clearer the labels are, the faster the menu becomes to read in the early stages before everything turns into muscle memory.
Step 7: Add custom shortcuts for repeated ZBrush actions
RadialZ is not limited to brushes. Menu slots can also trigger any ZBrush shortcut that already exists.
This is where the tool becomes especially powerful for production work. Repetitive commands that usually live deep in menus can be placed alongside sculpting brushes in the same radial setup.
Examples that make sense in a shortcut menu include:
- Polygroup
- Merge Down
- Delete Hidden
- Polyframe
- Solo mode
- Visibility toggles
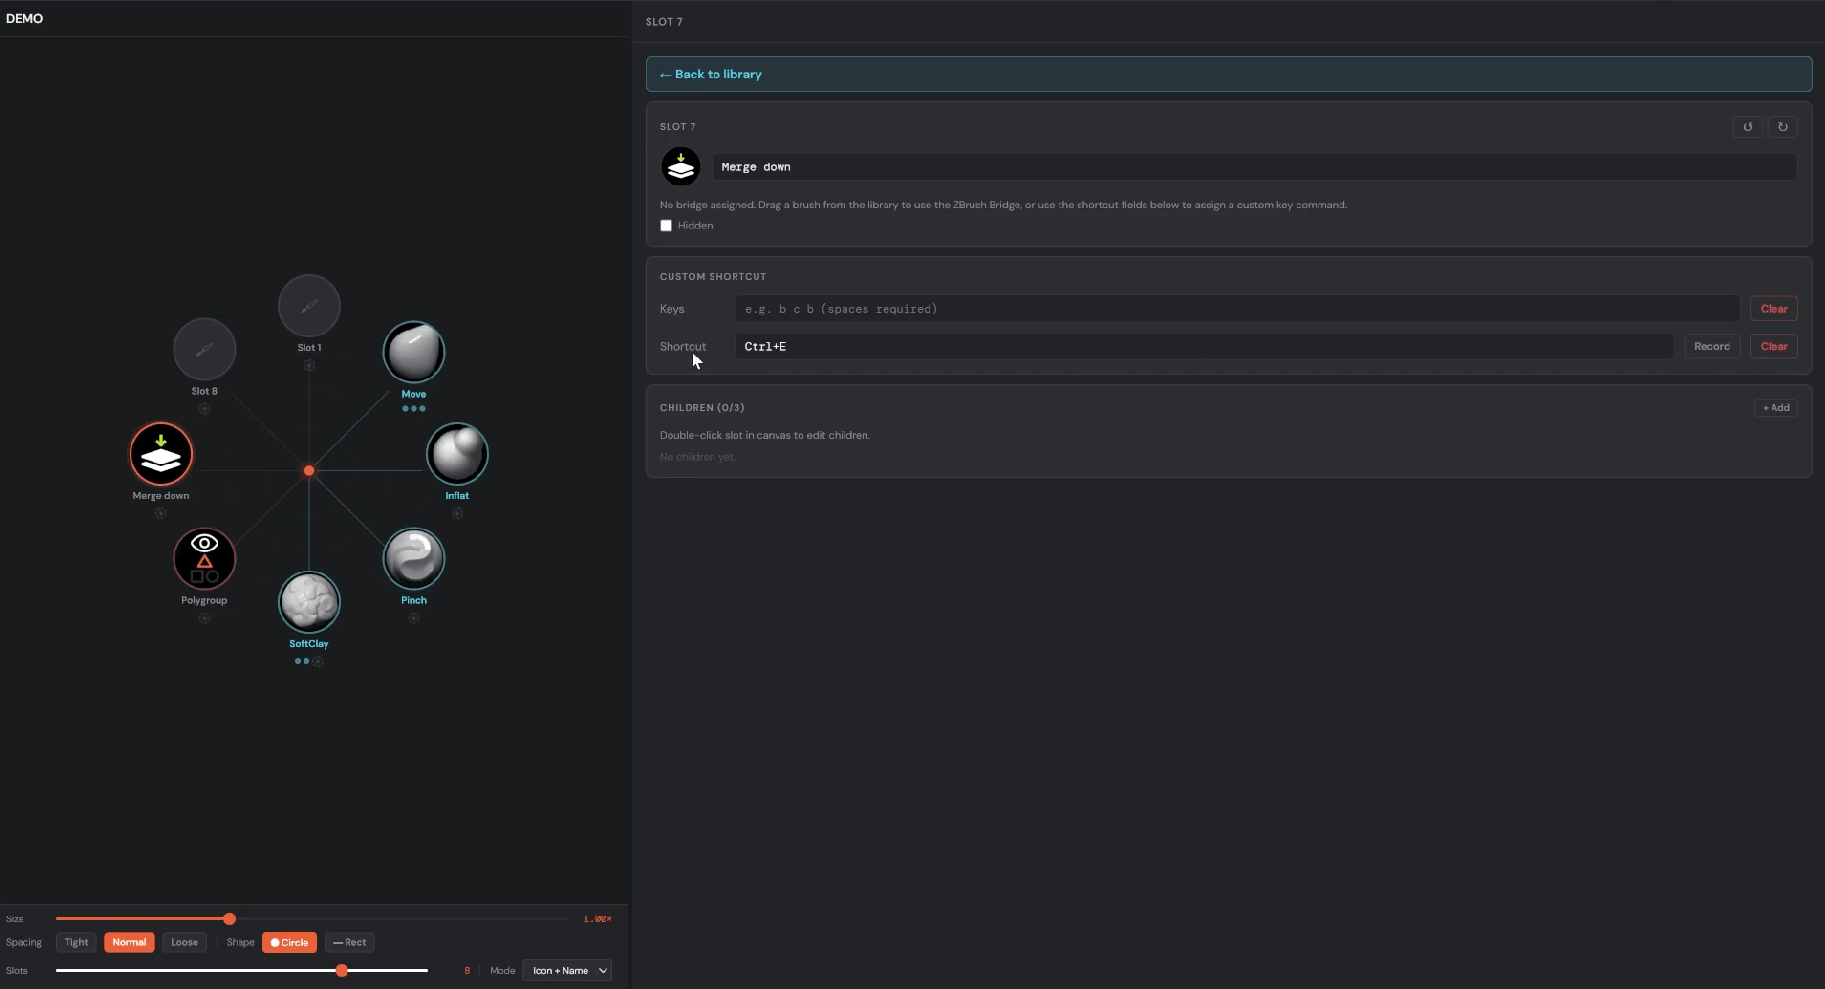
Each of these slots can have:
- A recorded shortcut
- A custom label
- A custom icon
That icon How to Stay in the Sculpting Flow with RadialZ in ZBrushsupport is a subtle but useful feature. Even a very simple graphic can make a shortcut easier to recognize at a glance. A half-sphere icon for visibility, a merge icon for combining subtools, or a polygroup icon for grouping actions can make the radial wheel much more readable.
It does not need to be fancy. A plain 512 by 512 image with a dark background is enough if it helps visually reinforce the action.
Step 8: Assign custom shortcuts in ZBrush when needed
If a command in ZBrush does not already have a shortcut, it can be assigned very quickly.
This is essential because RadialZ relies on ZBrush shortcuts for command-based slots.
The process is simple:
- Hold Ctrl + Alt and click the target UI button in ZBrush.
- When prompted, press the desired key combination.
- If that shortcut is already in use, choose another one.
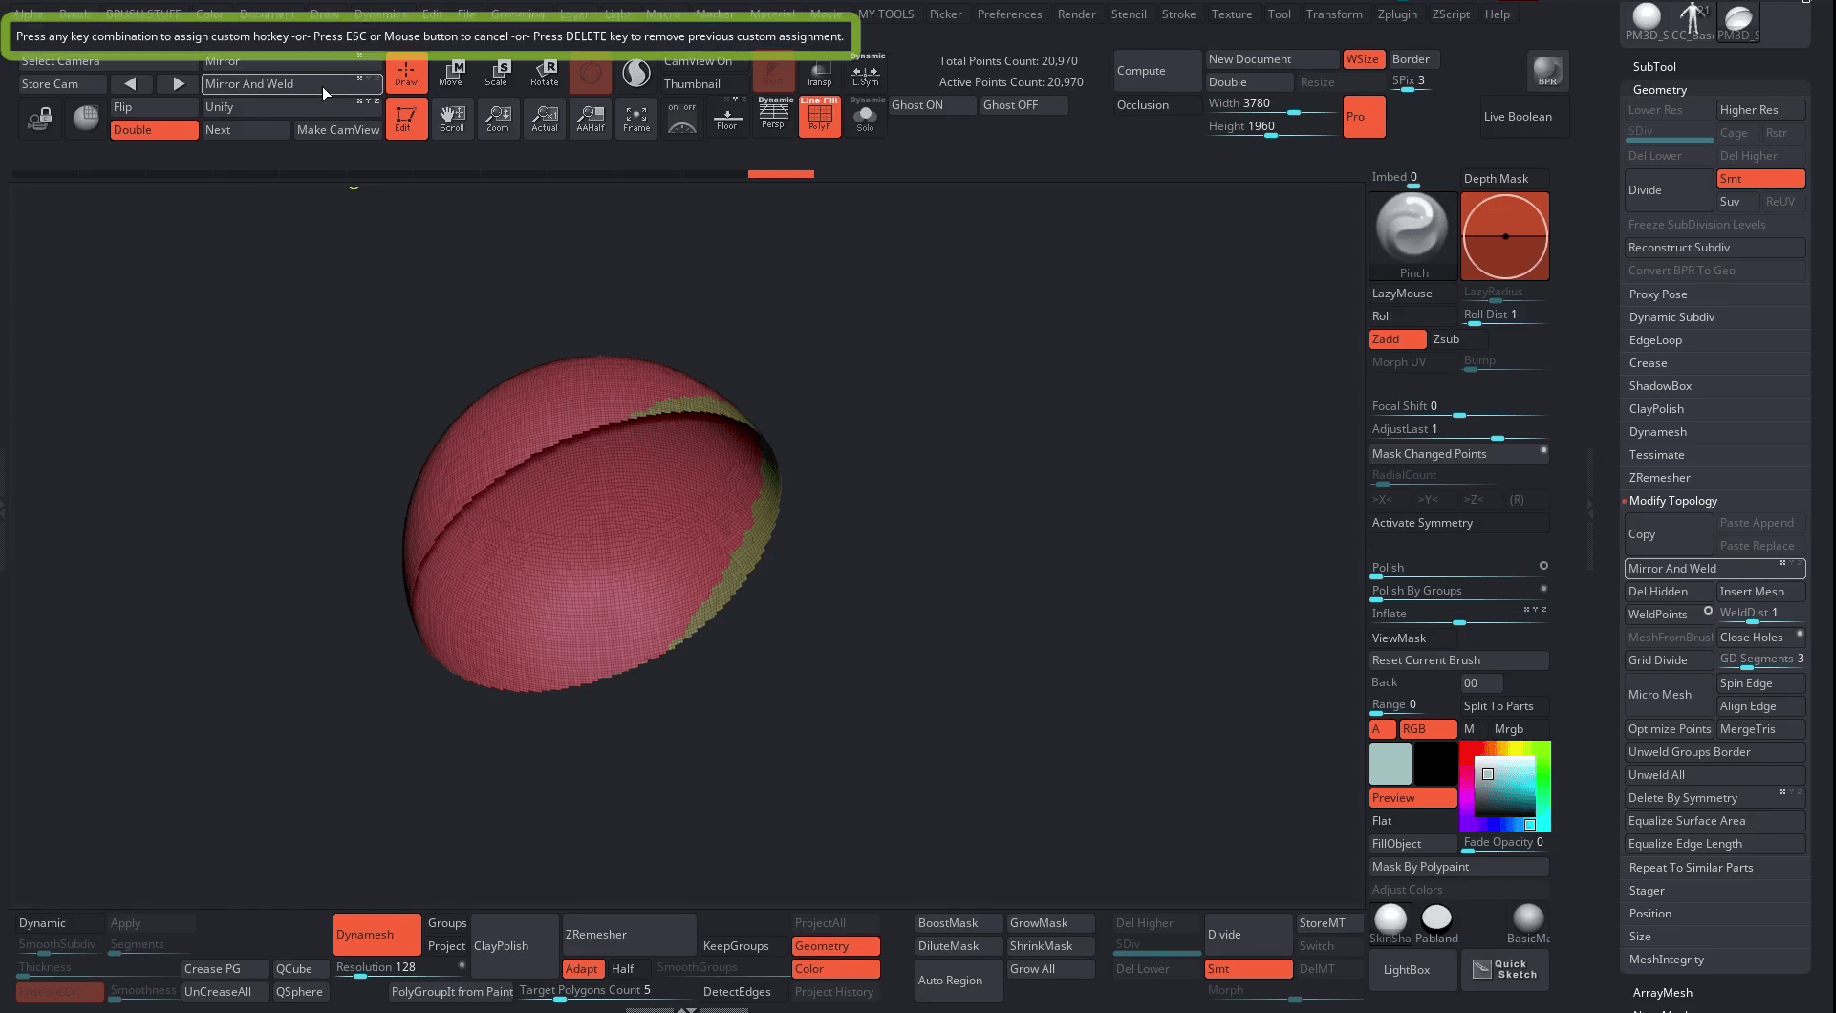
This can be used for almost anything, including modeling and utility actions like Mirror and Weld, Delete Hidden, or custom macros.
Macros are worth highlighting here. If a repeated process in ZBrush can be reduced to a single macro, that macro can receive one shortcut, and that shortcut can then be added to a RadialZ menu. In other words, a multi-step action can become one radial click.
That is where the workflow starts becoming very personal and very efficient.
Step 9: Organize the menu layout around instinct, not alphabetically
Where a brush sits in the radial menu matters just as much as whether it is included at all.
The ideal arrangement is one that matches how the hand thinks during sculpting. Over time, the user should not need to read the wheel. The direction should be enough.
For example, a layout might be organized like this:
- Top right: move-related brushes
- Top: standard or shaping brushes
- Left: cutting or crease brushes
- Bottom right: clay and buildup brushes
- Bottom: utility actions such as merge down
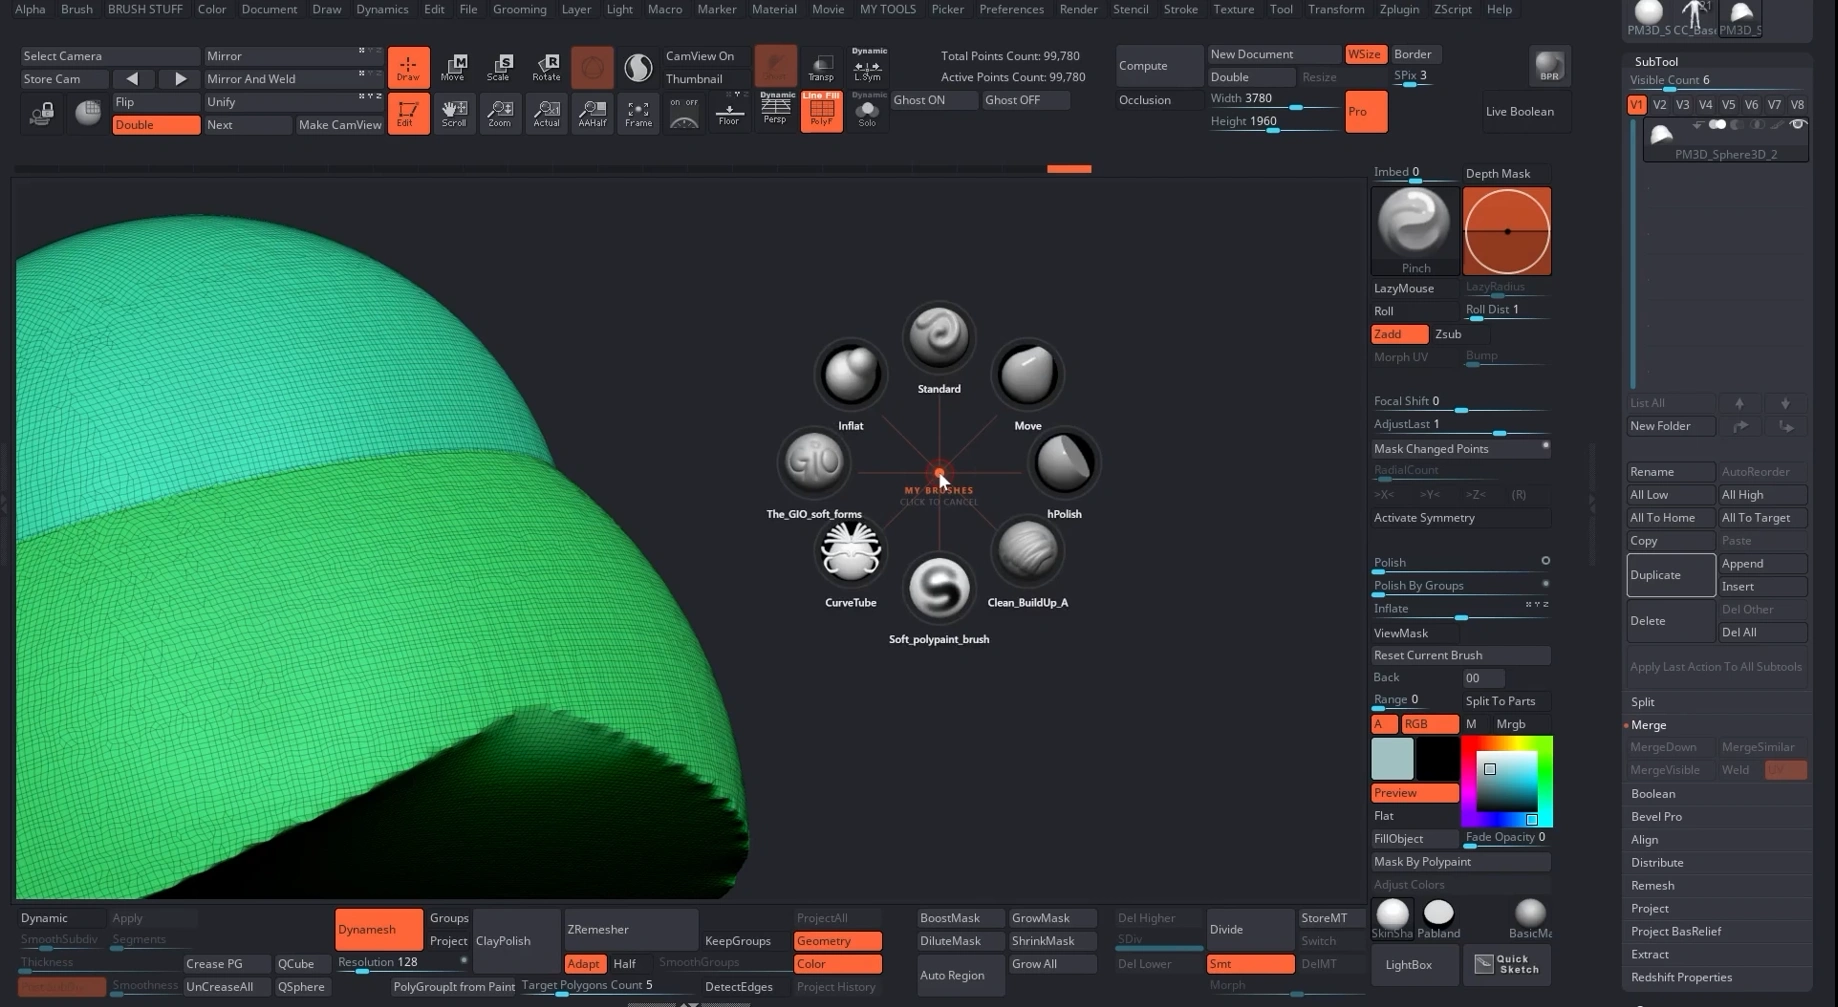
There is no single correct map. The important thing is consistency.
If merge down feels like a downward action, placing it at the bottom of the menu makes sense. If moving form changes is mentally associated with the upper right, putting Move there helps build reliable hand memory.
RadialZ also allows slots to be rotated around the menu, hidden selectively, or reduced in count. So the layout can be reshaped until it feels natural.
A useful principle here is this: organize by intention, not by software category.
Step 10: Adjust menu count, size, spacing, and appearance
Once the functional setup is working, the final stage is refinement.
RadialZ allows several quality of life adjustments:
- Up to ten slots in a menu
- Fewer slots if a simpler wheel works better
- Circle or rectangular layout styles
- Custom spacing between items
- Custom menu size
- Custom child brush size
- Hidden slots without deleting the assignment
- Custom colors for background, text, and menu lines
- Restore to previous saved state if an edit goes wrong
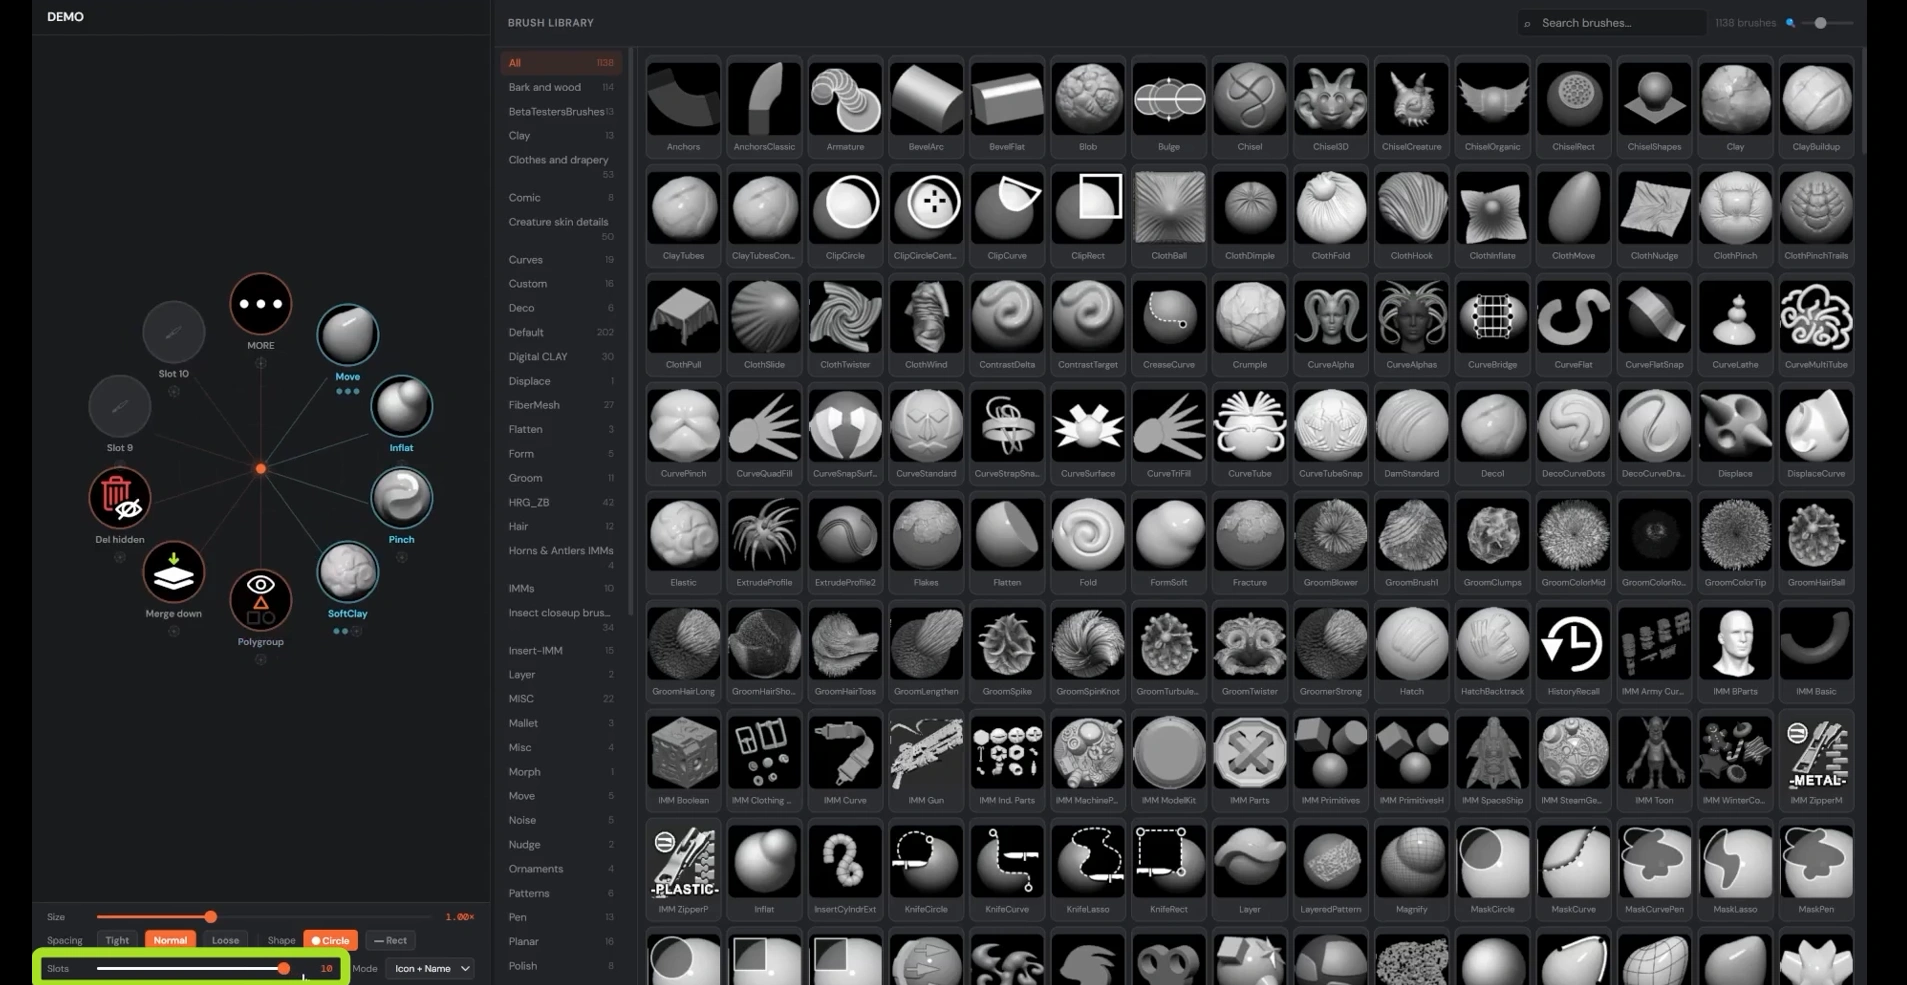
Eight slots is often a strong balance because it gives enough room for variety without making the wheel visually dense. But depending on the workflow, four can be enough for a highly focused menu, while ten can make sense for broader tool collections.
Spacing and scale also matter more than expected. A very tight menu can reduce cursor travel. A larger menu may be easier to read quickly. The best choice depends on hand movement, screen setup, and tablet habits.
Appearance customization is partly aesthetic, but not only aesthetic. Stronger contrast, clearer labels, or more recognizable accent colors can improve readability, especially during streaming, recording, or long sessions.
Common mistakes to avoid
Step 11: Avoid common setup mistakes
Most problems with a new RadialZ setup come from a few predictable issues.
Using shortcuts that already belong to ZBrush
If a trigger key is already assigned, both actions may fire. Always test a new shortcut before building around it.
Adding too many brushes too early
A crowded wheel is harder to learn. Start with core brushes and expand only where the need is obvious.
Organizing by names instead of use
Alphabetical order may look tidy, but it rarely supports fast sculpting. Group by intent and frequency instead.
Giving permanent slots to occasional brushes
Those belong in the pop-up library, not in the main wheel.
Ignoring visual logic
If related tools are scattered randomly, the menu stays cognitive instead of becoming instinctive.
Step 12: Build one practical workflow around it
A useful way to think about RadialZ is not as a single giant menu, but as a small system:
- Main brush wheel: the tools used constantly while shaping form
- Secondary brush wheel: smoothing, masking, slicing, selection, and support brushes
- Tools wheel: custom ZBrush actions and utility shortcuts
- Library shortcut: access to the full brush collection when exploration is needed
That structure keeps the main sculpting wheel clean while still making the rest of the workflow easy to reach.
It also avoids one of the biggest traps of customization: building something impressive instead of something useful.
Summary… why this works
This workflow works because it reduces small interruptions that normally break concentration. RadialZ does not replace sculpting skill, and it does not change how ZBrush fundamentally works. What it changes is access.
Brushes, toggles, and repeated commands become easier to reach, easier to memorize, and easier to fold into muscle memory. Over time, that saves minutes, but more importantly, it protects focus.
That is the real value: the sculpt remains the main thing in attention, while the interface fades into the background.
Final thought
If the current ZBrush workflow feels slightly more interrupted than it should, RadialZ is worth setting up carefully. Start with the brushes already used every day, add only the shortcuts that genuinely save repeated effort, and organize everything around instinctive movement rather than software categories.
The best version of the tool is not the most complex one. It is the one that becomes invisible after a few sessions and lets sculpting take over again.
Bark & Wood Brushes Pack
This is a set of brushes that have been designed to simplify the sculpting and detailing process for Bark and Wood in ZBrush allowing you to create intricate details and patterns on your meshes with ease.
Get resource
Radialz Demo - The Making of Astreon
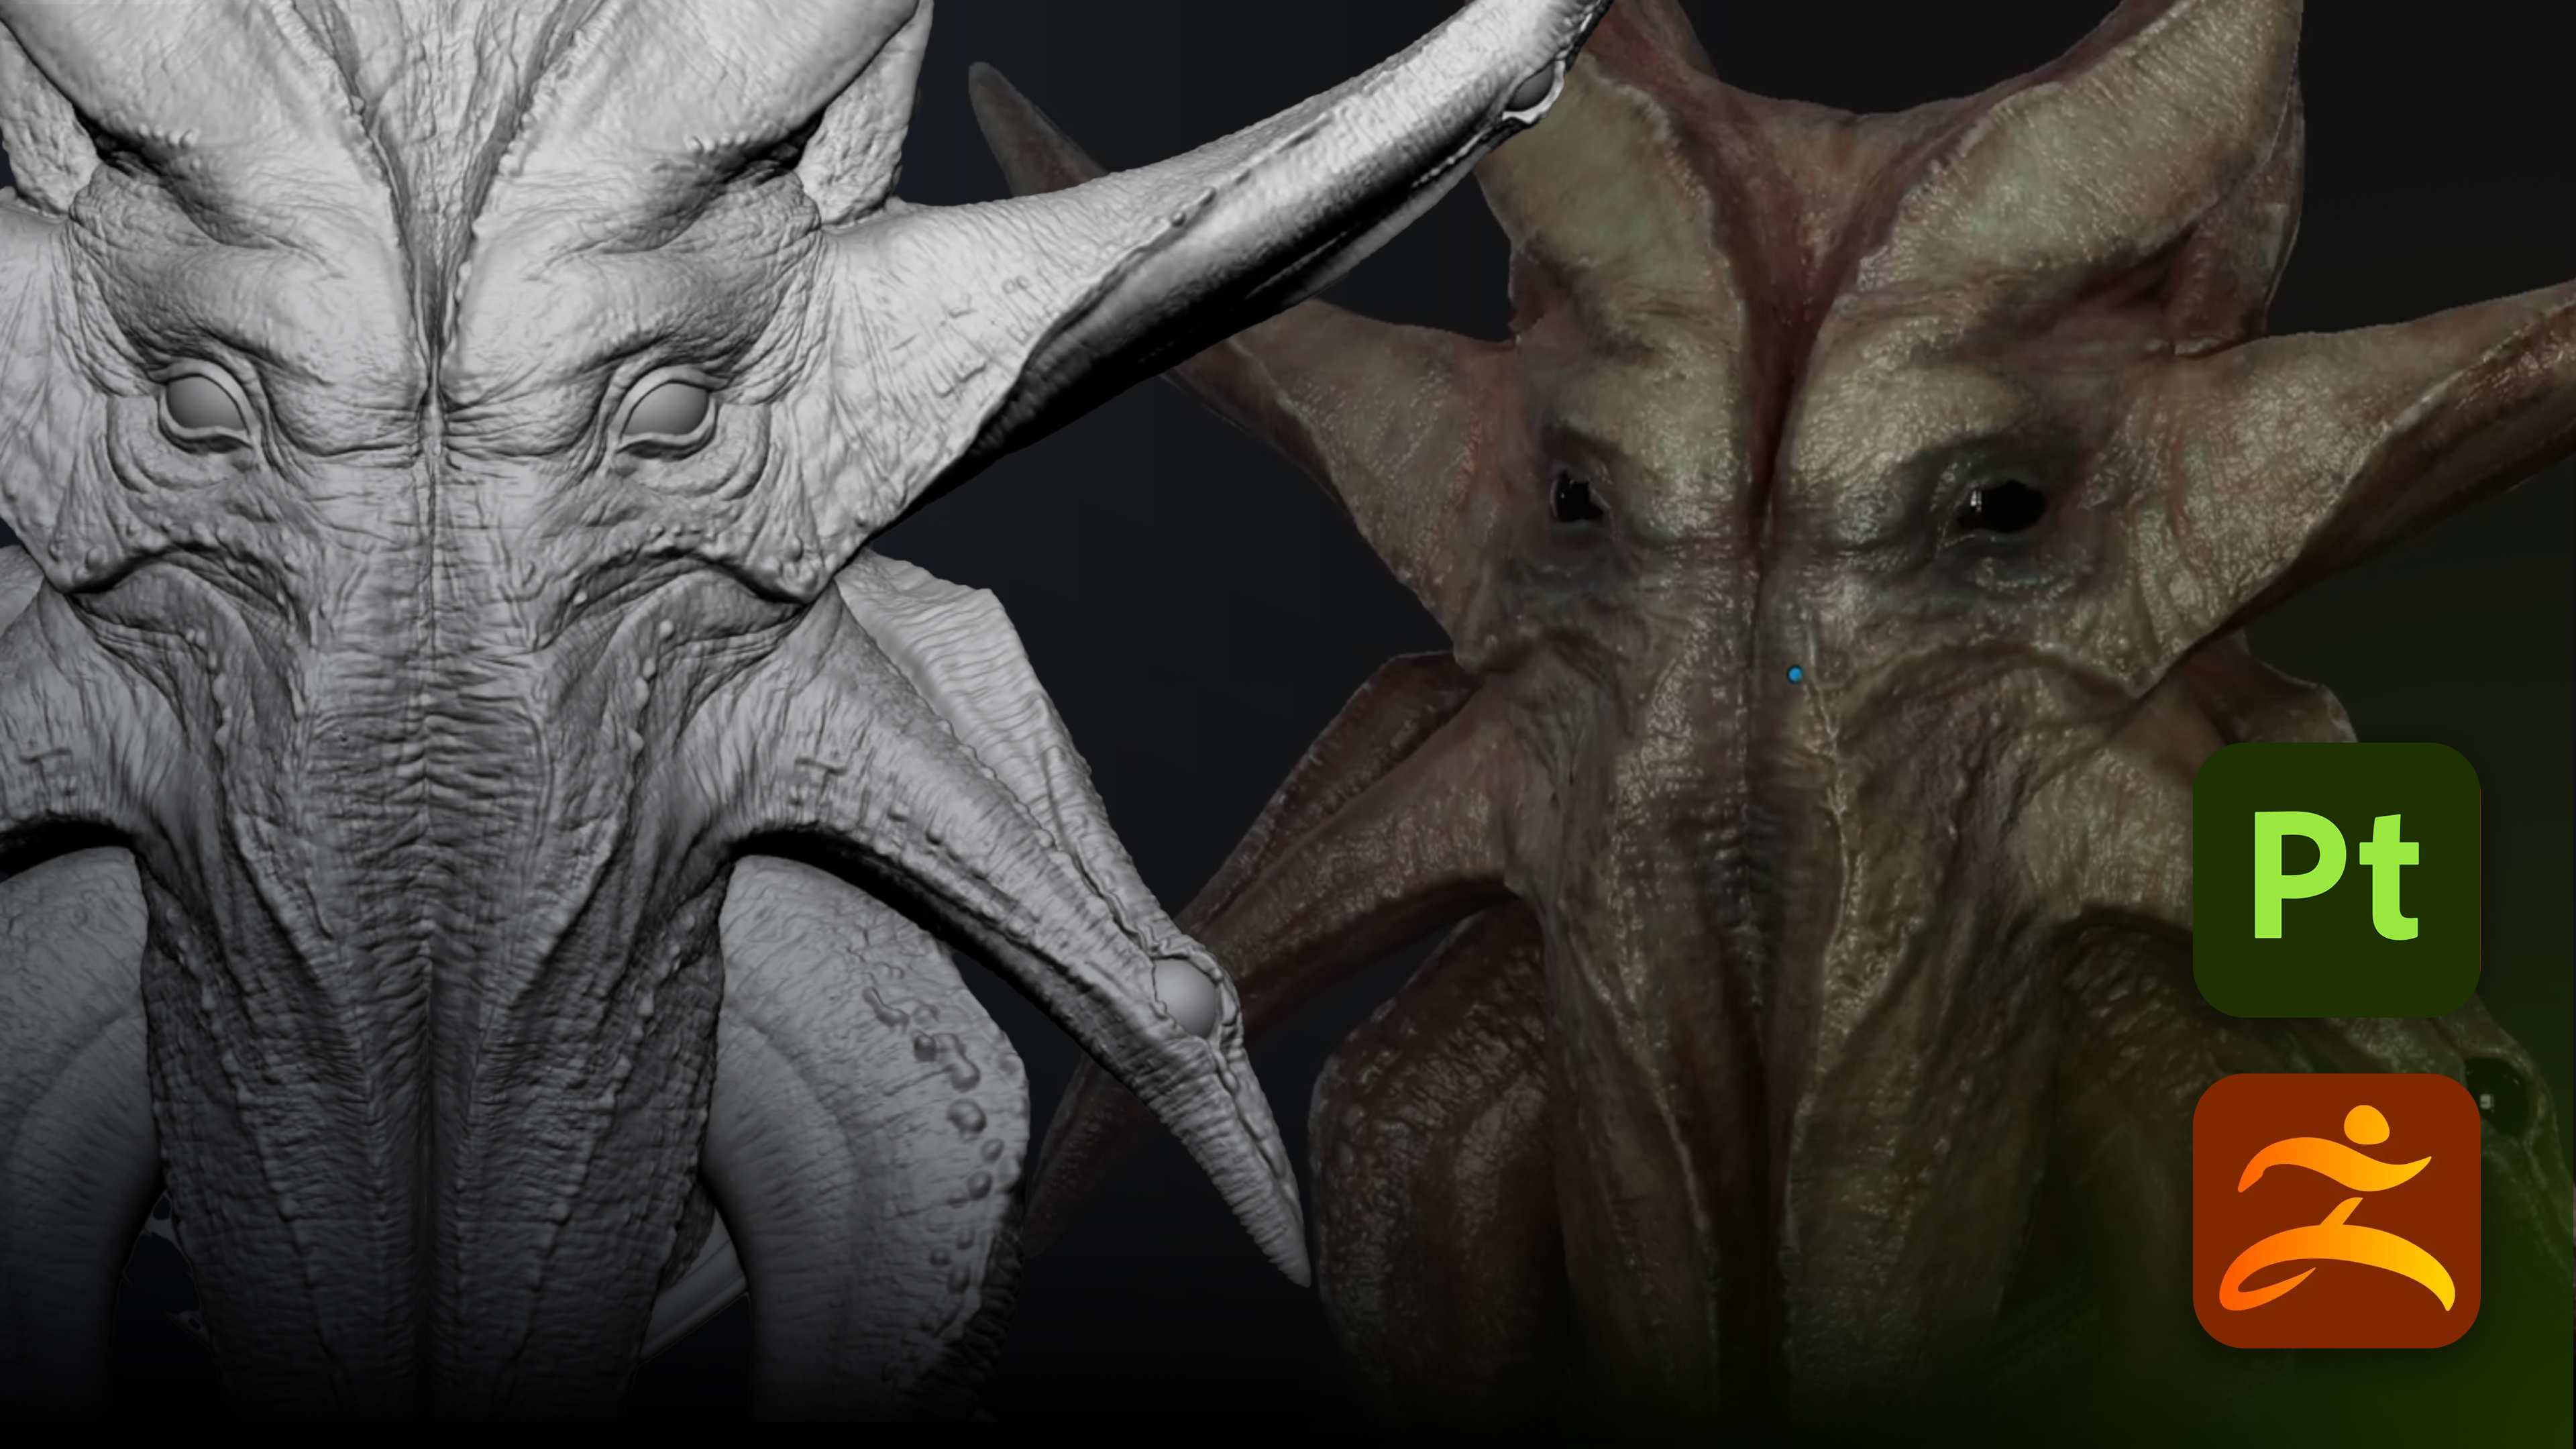
This is the sculpting and detailing process for the Astreon creature concept. This was a recent piece I made while building and testing RadialZ (a radial brush menu tool I created to speed up my own ZBrush workflow).
Check it out.webp)